Have you ever wanted to create an image that depicts two separate images fading into each other?

This is a nice professional effect that’s easy to create using Photoshop’s Layer Masks. This tutorial shows you how it’s done.
Matt Doyle | Elated Communications
Web and WordPress Development
Covers Photoshop, Paint Shop Pro and other graphics articles and tutorials.
See also:Have you ever wanted to create an image that depicts two separate images fading into each other?
This is a nice professional effect that’s easy to create using Photoshop’s Layer Masks. This tutorial shows you how it’s done.
Now you know how to create paths, we’ll take a look at how you can change your path after you’ve made it. This way you can alter the shape of your path and “fine-tune” those lines and curves until they’re just right!
Now that you know the theory of Photoshop paths, it’s time to explore Photoshop’s Pen tool and other related tools.
Most of the drawing and editing of paths can be done via the tools under the Pen tool icon in the Tools palette. Click and hold the mouse button on this icon to bring up all the other tools:
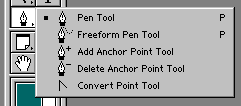
Let’s briefly go over these tools now, and what you can use them for.
In this introductory tutorial, you’ll learn about Photoshop’s Paths feature. Paths are a powerful tool and a big topic to cover. They’re also quite tricky to get the hang of, but once you do, you’ll never look back!
Enjoy…
Once you’ve made your basic selection using one of Photoshop’s numerous selection tools, there are a lot of things you can do to play around with it. In this tutorial we’ll look at:
Photoshop’s Quick Mask mode is a really versatile way to select things. Instead of creating marquees as you do with the other tools, you can “paint” the selection using any of Photoshop’s painting tools. You can even use the other selection tools on the Quick Mask, as if it was a regular image. This makes the Quick Mask mode a very powerful feature of Photoshop.
Photoshop’s Color Range command is great for selecting particular colours in your image — for example, all the reds, or all the greens. You can then work on these specific colours — turning them from green to red, for example, or removing particular colours from the image.
This command doesn’t work well for selecting particular areas of your image (such as a foreground object), as it has a tendency to only partially select pixels, and often selects unwanted parts of your image that are a similar colour. But it’s great for selecting colours to work on!
[Read more…] about Selecting with Photoshop’s Color Range Command
In this tutorial you’ll look at two very quick and easy ways to make selections in Photoshop: The Quick Selection tool and the Magic Wand tool.
[Read more…] about Using Photoshop’s Quick Selection and Magic Wand Tools
Selections are a great way to work on parts of your image independently, rather than manipulating the image as a whole.
Once you’ve selected a part of an image (e.g. a person’s head or other object), you can then manipulate this object separately from the rest of the image. This means you can cut the object out; add drop shadows; adjust the brightness/contrast; warp it; apply effects and filters easily – in fact, anything you like!
In this series of tutorials you’ll explore the various selection tools in Photoshop. On this page we start with the marquee and lasso tools.
[Read more…] about Selecting with Photoshop’s Marquee and Lasso Tools