Photoshop’s Color Range command is great for selecting particular colours in your image — for example, all the reds, or all the greens. You can then work on these specific colours — turning them from green to red, for example, or removing particular colours from the image.
This command doesn’t work well for selecting particular areas of your image (such as a foreground object), as it has a tendency to only partially select pixels, and often selects unwanted parts of your image that are a similar colour. But it’s great for selecting colours to work on!
To use the Color Range command, choose the Select > Color Range menu option. You’ll see the Color Range dialog appear:
The most flexible way to use Color Range is in the “Sampled Colors” mode (choose Sampled Colors from the Select drop-down box). Click with the mouse in the document window on an area of your image that contains the colour you want to select. You’ll then see this colour range turn white in the preview inside the Color Range dialog. This means that this range has been selected.
Changing the selection
To increase the degree to which colours in the colour range are selected, increase the Fuzziness slider. You’ll see increasing areas of the preview image turning white as the degree to which each pixel is selected increases. Slide the slider to the left to decrease the intensity of the selection.
You can add to the range of selected colours by holding down the Shift key and clicking on new areas of colour in your image. Alternatively, you can click on the eyedropper icon with the little plus sign in the Color Range dialog.
Likewise, you can subtract colours by holding down the Alt/Option key and clicking in the image, or selecting the eyedropper icon with the minus sign then clicking in the image.
Preview options
You can click the Image radio button to preview the entire image in the dialog (useful if you can’t see all of the image in the main window). Click the Selection radio button to revert to the normal preview mode.
You can also preview the selected areas in the main document window using the Selection Preview drop-down box. You can choose from the following options:
- Grayscale shows how the selection will appear if converted to a channel.
- Black Matte will show the selected areas in colour over a black matte background.
- White Matte will show the selected areas in colour over a white matte background.
- Quick Mask shows how the selection would look in Quick Mask mode, using the current Quick Mask settings (more info on the Quick Mask mode).
Color Range presets
The Select drop-down box allows you to choose various preset colour ranges, such as all Reds, Blues or Greens in the image. You can also select just the Highlights, Midtones or Shadows.
Out of Gamut will select all the colours in the image that are out-of-gamut (i.e. cannot be printed).
An example
In this example, we want to select all the green leaves in the image so that we can change their colour. To do this, we use the Color Range command in “Sampled Colors” mode, then Shift+click on a couple of leaf areas to select a broad range of greens:
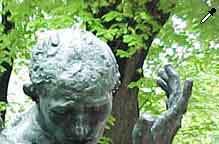
We then click OK to create the selection, and use Image > Adjust > Hue/Saturation to change the leaves from green to brown, without affecting the rest of the image:
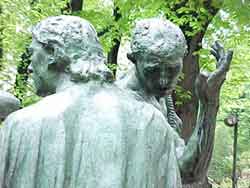
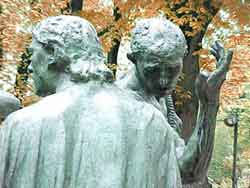
And that’s how to turn a summer scene into an autumn scene! 🙂
Further reading
Photoshop offers many different ways to select stuff. Find out more in the following tutorials:
Leave a Reply