
Does your WordPress website seem to take forever to load?
Wouldn’t you love it if it came up super-fast — for you and your visitors?
WordPress is a fantastic platform with amazing features, but all those features can come at a cost: speed! I’ve seen many otherwise-great WordPress websites deliver a painful experience, simply because they take ages to load.
And it’s not just website visitors that are affected. Slow websites can also rank lower in Google search results, and are less likely to appear near the top of Facebook news feeds. And that’s not good!
So it’s super-important to make sure your WordPress site is as fast as it can be.
In this step-by-step guide, I’ll show you exactly how you can speed up your WordPress site.
You’ll learn how to:
- Measure your website’s current speed
- Back up your site (very important before making any changes)
- Install a caching plugin to take the pressure off your server
- Use an optimisation plugin to streamline the data that travels between your site and your visitors
- Resize your images so they load more quickly
- Speed up your images even further with some clever tools
- Optimise your WordPress database to remove the cruft
- Deal with unwanted plugins that can slow down your site
- Upgrade your server to make it faster
- Move your server nearer your visitors for better responsiveness, and
- Use a content delivery network to speed up your site for visitors around the globe.
I’ve laid out these steps in the order you should try them. The steps near the top of the list are “quick wins” that usually have a big impact on speed. If your site is still slow after you’ve done the first few steps, carry on working down the list!
OK, let’s get started! The first step is to check your website’s current speed.
Step 1: Measure your site speed
To start with, you need to work out just how slow your site really is. It may seem slow — or even fast — to you, but how fast is it for your visitors?
The best way to measure your true site speed is to use one of these online tools:
My personal favourite is GTmetrix. It’s easy to use, it gives you lots of useful details about your website speed, and you can easily save your speed report as a PDF for future reference (and share the report online with your web developer if necessary). To use it, just pop the address of your website’s homepage into the URL box and press Analyze:

After a short while, you’ll see the results of your speed test:
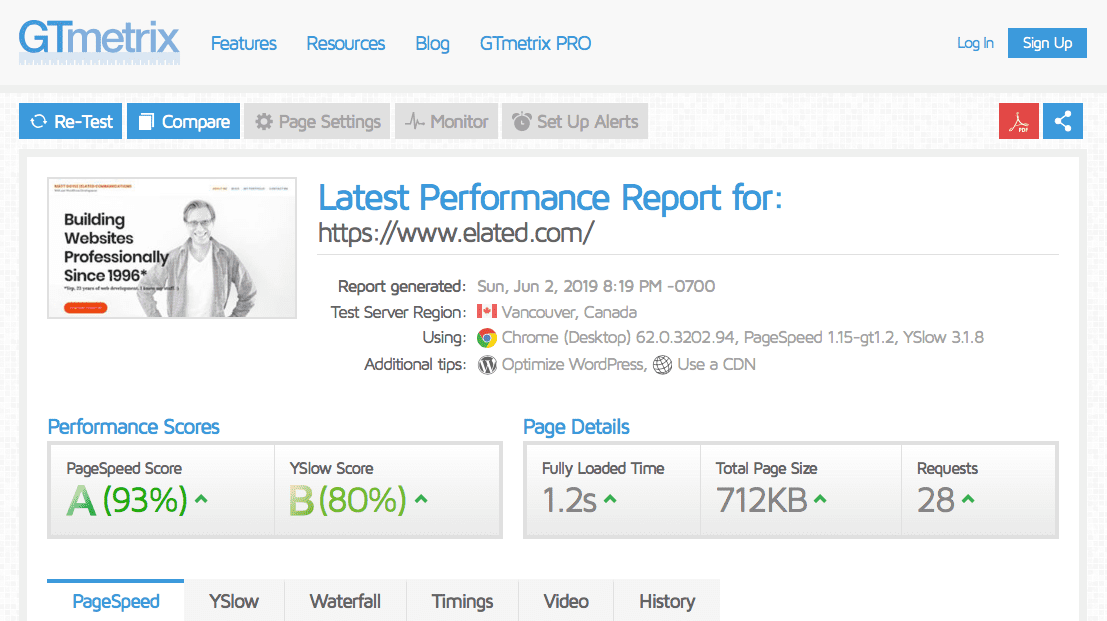
The important things to look for are the figures in the grey boxes — the Performance Scores and the Page Details. Here’s what they mean:
- PageSpeed Score and YSlow Score
These give you an overall idea of how well your homepage is optimised for speed. (PageSpeed and YSlow are simply two different ways to rate a website’s speed optimisation.) Generally you want to see A or B scores here. If your site has a score of C or below then there’s definitely room for improvement! - Fully Loaded Time
This is how long it took GTmetrix to load your entire homepage, including all the images, CSS files, and JavaScript files that the page includes. Bear in mind that this timing will be different each time you run the test, and can also be quite different for each visitor to your site, depending on their network and where they live. However, to give you a rough idea, under 2 seconds is a fast-loading site, while over 8 seconds is slow. - Total Page Size
This shows you the total size, in bytes, of all the resources that need to be downloaded to display your page: the HTML page itself, as well as all images, CSS files, fonts, and JavaScript files. Obviously, the smaller this figure the better! It’s definitely good to keep the page size below 1 MB (1,024 kB). - Requests
This figure shows how many times the browser has to connect to your server in order to download the page, as well as its images, CSS files, and so on. Lots of requests can really slow down the loading of your pages, especially if your visitors are a long way from your server. Try to keep this figure below 50 — ideally below 20.
Now that you’ve tested your site speed, you’ll have a better idea of the problem. Is it really slow, according to GTmetrix? If so, how are the PageSpeed and YSlow scores? If they’re C or below, have a look at the detailed info in the PageSpeed and YSlow tabs further down the report. These tabs show you exactly why your page received a low score.
A large page size or number of requests is also a sign that your site speed needs improving. Read on to find out how to do just that!
Step 2: Back up your site
Before you make any of the following changes to your site, please make sure you have a backup! Whenever you install plugins or make changes that can affect your site’s data or images, there’s a chance that things can go wrong. Usually it’s a small chance, but it’s not worth taking the risk of losing your site!
So do a quick backup first. It only takes 5 minutes. Here’s a simple guide to backing up your site using UpdraftPlus.
Step 3: Install a cache plugin to take the load off your server
The first step that I always recommend for speeding up a website is to install a WordPress cache plugin. This often makes a big speed improvement, particularly if your server isn’t super-fast to begin with.
Without a caching plugin, every time someone visits a page on your site the whole WordPress engine has to run. That means running PHP, loading and running all the WordPress code, and fetching the page from the database. Not only is this process slow, but it also puts heavy demands on your web server.
A cache plugin saves your commonly-viewed pages as simple, pre-generated HTML files on the server. Then, when a visitor views one of these pages, your server simply sends them the HTML file, rather than running the entire WordPress engine. This is much quicker, and won’t tax your server anywhere near as much.
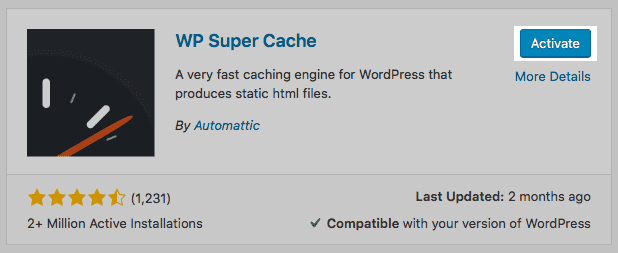
One of the best — and easiest to use — cache plugins is WP Super Cache, and it’s made by the people who make WordPress.
To set it up, follow these steps:
- Install the plugin
Log into your WordPress admin, then choose Plugins > Add New from the left-hand menu. Then, in the Search plugins box in the top-right corner, type WP Super Cache. You’ll see the WP Super Cache plugin appear in the list. Click the Install Now button next to the plugin to install it then, when it’s installed, click Activate to activate the plugin:
- Turn on caching
Once you’ve installed the plugin, choose Settings > WP Super Cache from the left-hand menu. Then, at the top of the page, click the Caching On button, and click Update Status:
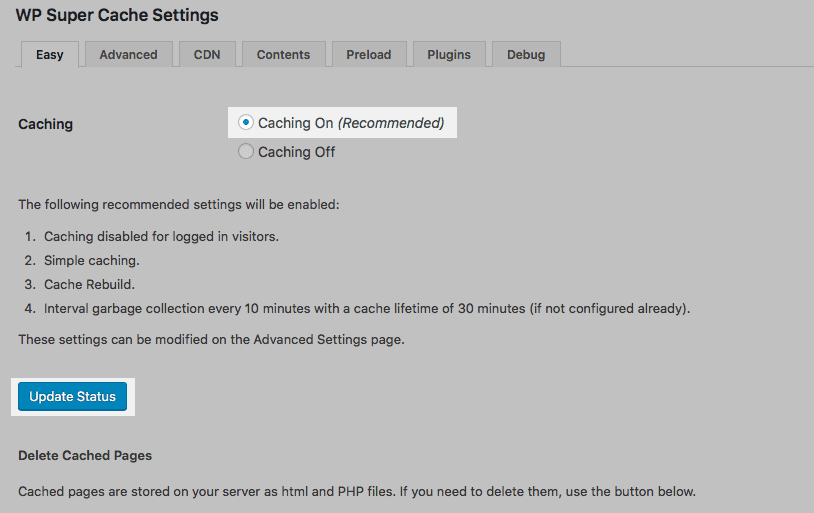
That’s it! Your pages will now be cached when they are served to your visitors, which will help speed up your site and reduce the load on your server. Good work!
Step 4: Install an optimisation plugin so your site files load faster
When a visitor views a page on your site, all sorts of things are also fetched from the server: images, CSS files, JavaScript files, and fonts. All these extra resources can really slow down your site.
Fortunately, there’s a great WordPress plugin that can alleviate this problem: Autoptimize. This clever plugin squishes your CSS and JavaScript files (known as minifying them), and also joins these files together so the browser makes fewer requests to the server. It can also make browsers load all these resources in the right order to help your pages appear more quickly, and even optimise any Google Fonts used in your pages.
Another nice feature that Autoptimize offers is lazy loading of images. This works by loading a page’s images only when a visitor scrolls down to them. This means that fewer images need to load when the page loads, making the page appear much more quickly on image-heavy pages.
Here’s how to install and set up the plugin:
- Install and activate the plugin
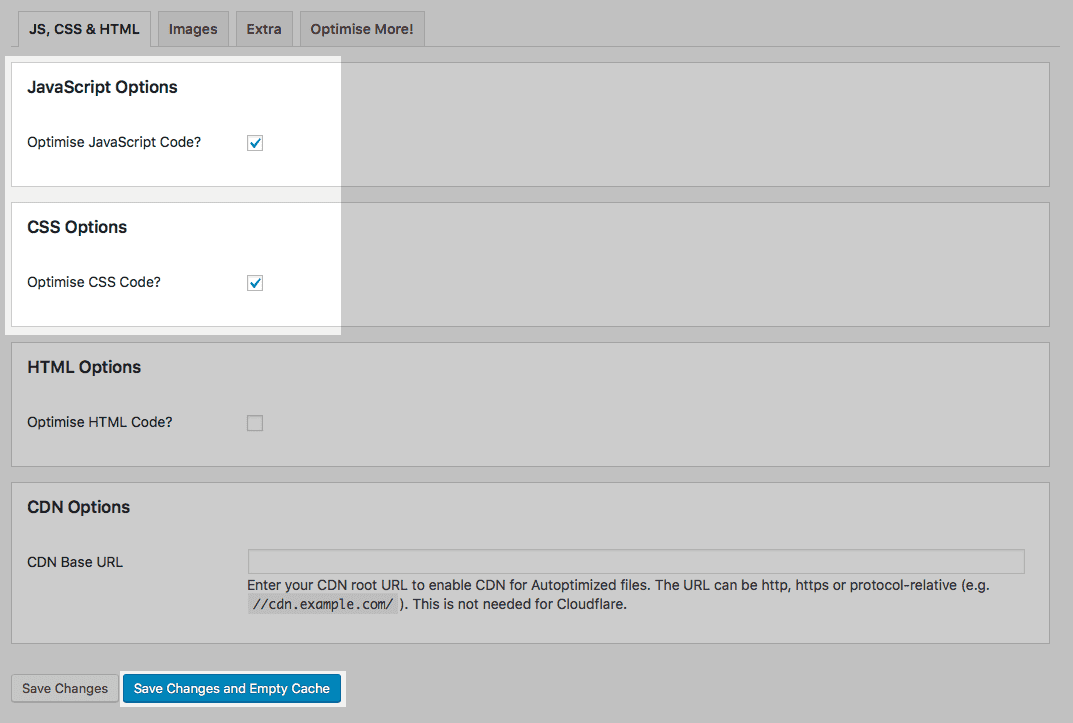
Follow the instructions under “1. Install the plugin” in Step 3, but search for Autoptimize instead of WP Super Cache. - Set the options you want to use
Choose Settings > Autoptimize from the left-hand WordPress admin menu to access the Autoptimize settings. I recommend enabling at least the JavaScript and CSS options (see screenshot below). Click Save Changes and Empty Cache when you’re done. - Turn on image lazy loading
If you also want Autoptimize to lazy-load images in your pages as described above, click the Images tab and select the Lazy-load images? checkbox. Don’t forget to click Save Changes to update this setting also.
Autoptimize will now optimise your JavaScript and CSS files — and lazy-load your images if enabled — which should improve your page load time, as well as your GTmetrix score.
Step 5: Resize your images for the web
A common mistake that I see many of my clients make is to insert full-size photos into the page. Most images in webpages need to be no more than 1,000 pixels by 1,000 pixels, and should usually be under 200 kB in size. If you insert a photo straight from your phone into your page then it is likely to be at least 3,000 by 3,000 pixels — and several megabytes in size!
As you’d imagine, this will have a big negative impact on your website’s speed.
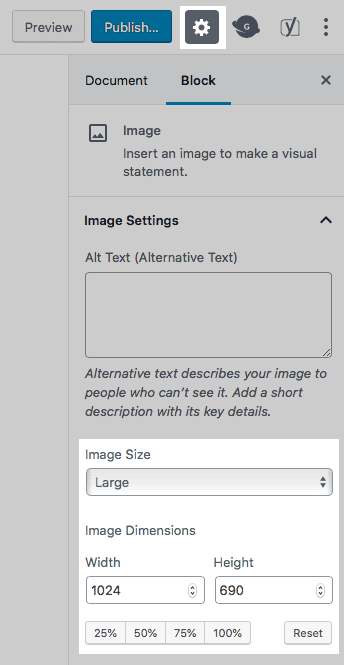
So when inserting images into your page, resize them to a sensible size first using an image editor. Failing that, make sure you choose an appropriate size for the image in WordPress after you’ve uploaded it. To do this, simply edit your page or post, click the image in question, and choose an option under Image Size in the right-hand sidebar:
Step 6: Compress your images so they load quickly
As well as resizing your images for the web, you can compress each image to reduce its file size even further without noticeably affecting the image quality. There are a few ways to do this:
- Using your image editor: When you export a JPEG photo from Photoshop or a similar image editor, you can usually set the compression level (often called Quality). Try reducing this value until you get a decently small file size without reducing the visual quality of the image too much.
- Using an image optimiser: These will usually do a better job at compressing images than your image editor can, and they can compress PNG images very well too. Popular optimisers include ImageOptim (for Mac) and TinyPNG (works on any computer).
- Using an image optimisation plugin: There are many WordPress plugins that will compress images automatically. ShortPixel is a popular one. Even better: if you’re using the Autoptimize plugin (see above) then this plugin also supports ShortPixel. Select the Images tab in the Autoptimize settings, then select the Optimize Images checkbox.
Step 7: Optimise your WordPress database for speed
WordPress stores all of your site’s data — posts, pages, comments and settings — in a MySQL database running on your server. Databases are very good at storing and retrieving data quickly, but if you have a very large database full of spam comments, trackbacks, and unneeded post revisions then your database can start to slow down your site.
There’s an easy fix for this: plugins such as WP-Optimize will go through your database and remove all of that cruft. Here’s how to use WP-Optimize to clean your database:
- Install and activate the plugin
Set up the plugin as shown in Step 3, but search for WP-Optimize instead of WP Super Cache. - Run the optimisations
After making a backup, choose WP-Optimize in the left-hand WordPress admin menu. Select the optimisations you want to run — the default selection is usually the safest bet — then click the Run all selected optimisations button:

After a few minutes, the job should be finished and your database will be leaner and meaner!
WP-Optimize also includes caching and image compression features, so you could potentially use this plugin to do the jobs of WP Super Cache and Autoptimize as well. Fewer plugins are usually better!
Speaking of which…
Step 8: Deactivate or remove unneeded plugins
If you’ve had your WordPress site for a while, chances are that you’ve installed quite a few plugins — many of which you aren’t actively using. The trouble is, each time a visitor views a page on your site, the code in all of those plugins has to run. So having a large number of plugins can slow your site down. (All those plugins can also cause problems with your site’s security and stability!)
So take a look through all of your plugins (choose Plugins > Installed Plugins in your WordPress admin) and deactivate or remove any plugins that you no longer need. Your site will thank you for it!
Step 9: Upgrade your server to make it faster
If you’ve tried the above steps, your GTmetrix score is now hopefully showing an A or a B for either the PageSpeed or YSlow scores. But what if your pages are still taking a long time to load? It might simply be that your hosting isn’t up to the job.
WordPress puts quite a heavy load on web servers, so if you’re using a $5-a-month shared hosting account, your server might be struggling to keep up. Have a word with your hosting company and see if they can upgrade you to a more powerful service.
The best bet is to use hosting that is specially designed for WordPress — look for the phrase “managed WordPress hosting”. I usually recommend Flywheel to my clients — they are super-reliable and have great support. Another great budget option is SiteGround’s WordPress hosting.
Many hosting companies will migrate your site from your old server to their server for free, as part of the setup process.

Step 10: Move your server nearer to your visitors
Did you know that the distance between your web server and your visitor can actually make a big difference to your website’s speed?
Every time your visitor’s browser needs to retrieve something from your server — whether it’s a webpage, or an image or other file included in the page — it sends a request to the server. Then it has to wait until the server sends the requested data back. The farther the server is from the visitor, the longer it takes for that “round trip” to happen, and the slower your site loads.
So if possible, try to locate your server so it’s close to where your visitors mostly live. (If your clients are mostly in Australia, don’t host your site in the UK!)
Many hosting companies give you an option during the signup process to choose the data centre where your site will be hosted, and some let you change the data centre at a later date. Make sure you choose the data centre that’s closest to most of your visitors. If in doubt, ask your hosting company for help!
Step 11: Use a content delivery network
What if your visitors are worldwide, or it’s not easy for you to move your server to the country where most of your visitors live?
In that case, a great solution is a content delivery network, or CDN. This is a worldwide network of servers, known as proxy servers, that sit between your web server and your visitors. Rather than getting your website’s content directly from your server, your visitors get it from the server closest to them, which is likely to be in their nearest big city. This makes your site much faster for your visitors.
Whenever you update your site, the update gets pushed out to all the proxy servers, so that they always have an exact copy of your site.
One of the most popular CDNs is Cloudflare. It’s free for personal sites and paid for business sites. Check out their plans. Cloudflare also offer a free WordPress plugin that makes it fairly easy to set up their CDN for your WordPress site.

Time to step on the gas!
A slow WordPress website can be bad news for your visitors — as well as your sales. But if you follow the steps in this guide, your website will be super-fast, and your customers super-happy! So why not get started today?
If you have any questions or tips on speeding up WordPress websites, let me know in the comments below!
[Image credits: Rocket Launch by WikiImages (CC0), cropped
I am using LsCache Plugin in my WordPress site. It’s working very nicely and my site speed increased really. I will definitely suggest everyone try this plugin for at least one time.