So you have a WordPress site, and you know you should be backing it up. You know that WordPress backups are essential for keeping your site safe and secure.
You’ve heard about the free UpdraftPlus backup plugin and decided it to try it out on your site. Hey, good decision! UpdraftPlus is one of the world’s most popular and respected plugins for backing up WordPress sites.
But like all complex technology, UpdraftPlus can be a bit of a minefield. First you have to install it and work out all the settings. You need to link it up to your Dropbox or other cloud storage; set up schedules; and check it’s all working OK.
There are also tons of paid add-ons for UpdraftPlus. Are they worth it? Which ones should you buy?
Finally, if the worst happens and your site breaks, how do you use UpdraftPlus to restore everything and get it all working again?
You’ll learn all this — and more — in this tutorial. I’ll guide you through the process of installing UpdraftPlus; linking it to your Dropbox; setting up backup schedules; choosing add-ons; and restoring your site if disaster strikes.
By the time you’ve finished reading, you’ll understand exactly how to set up and manage your backups with UpdraftPlus, and you’ll be confident that your WordPress site is nice and safe!
Let’s start by taking a quick look at UpdraftPlus’s features.
What does UpdraftPlus do?
UpdraftPlus backs up your WordPress site’s database, theme files, plugin files, and your uploaded media files (such as images and PDFs). In other words, it backs up all the important bits of your site.
It stores these backups in Zip files to save space, then uploads those Zip files to a remote destination — such as your Dropbox, your Google Drive, or your own FTP server — for safekeeping.
It can also email the backup Zip files to your email address, although this option is only worth using if your site is very small, or if you’re just backing up your WordPress database (which is much smaller than the other parts of your WordPress site).
You can set up a backup schedule, so that UpdraftPlus automatically backs up your site. You can choose how often to run backups — from as often as every four hours, to as rarely as once a month.
UpdraftPlus is pretty reliable. If a backup fails, it automatically tries again until it backs up successfully. It also splits large backups into multiple backup files, which helps to reduce the load on your web server and makes the backups easier to download.
Finally, it’s really easy to restore your site from a backup just by clicking a couple of buttons. UpdraftPlus restores your site’s database and files automatically.
Ready to install UpdraftPlus and start backing up your site? Let’s go!
Step 1: Install UpdraftPlus
You install UpdraftPlus just like any other WordPress plugin. Follow these steps:
- Log into your WordPress admin.
Visit your WordPress admin URL, then enter your admin username and password and click Log In. - Search for the UpdraftPlus plugin.
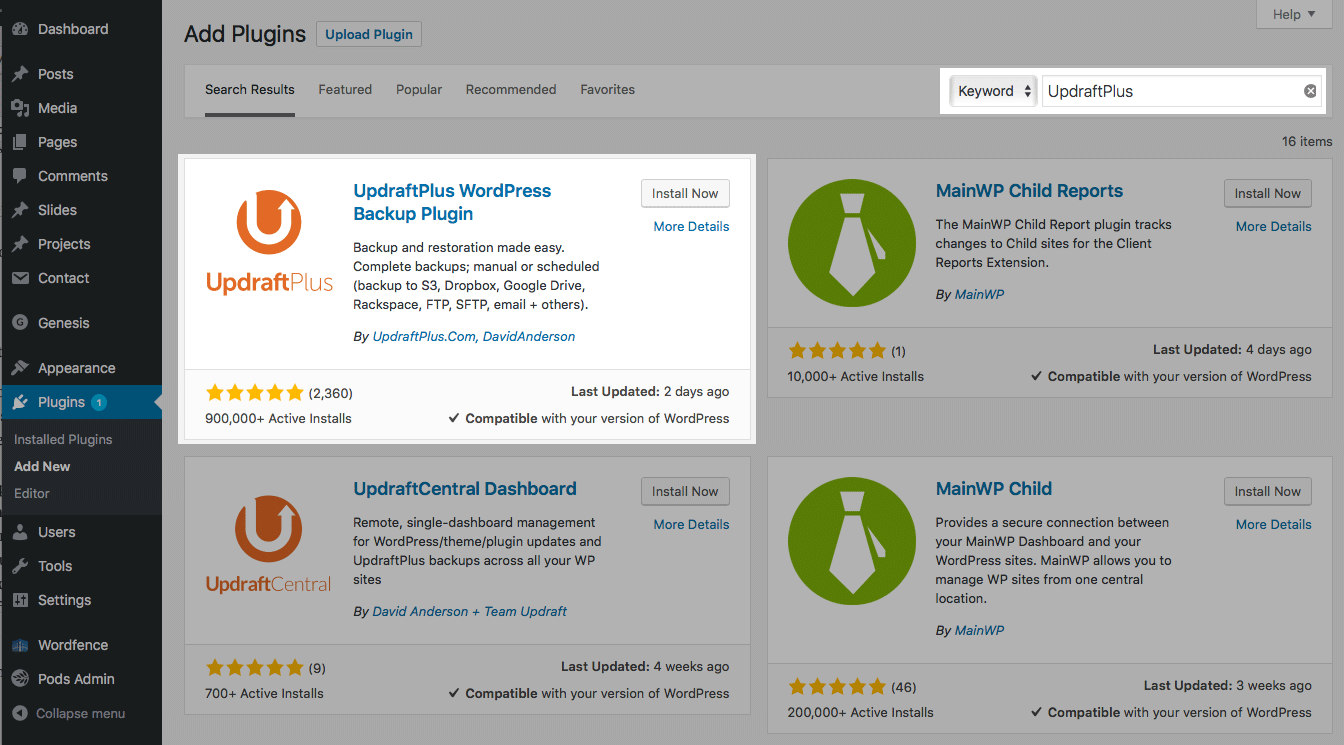
In the left-hand admin menu, choose Plugins > Add New. In the Search Plugins box at the top right of the page, type UpdraftPlus and press Return. - Install the plugin.
Find UpdraftPlus WordPress Backup Plugin in the search results, and click Install Now to install the plugin:
To install UpdraftPlus, search for it in the Search Plugins box, then click its Install Now button. - Activate the plugin.
After a short while, the Install Now button should change to say Activate. Click the button to activate the plugin. In a few seconds, you should see the message Plugin activated appear at the top of the page.
You’ve now installed UpdraftPlus. Nice job!
Step 2: Make your first backup
Let’s make a manual backup of your site to check everything works. Do the following:
- Visit the UpdraftPlus admin page.
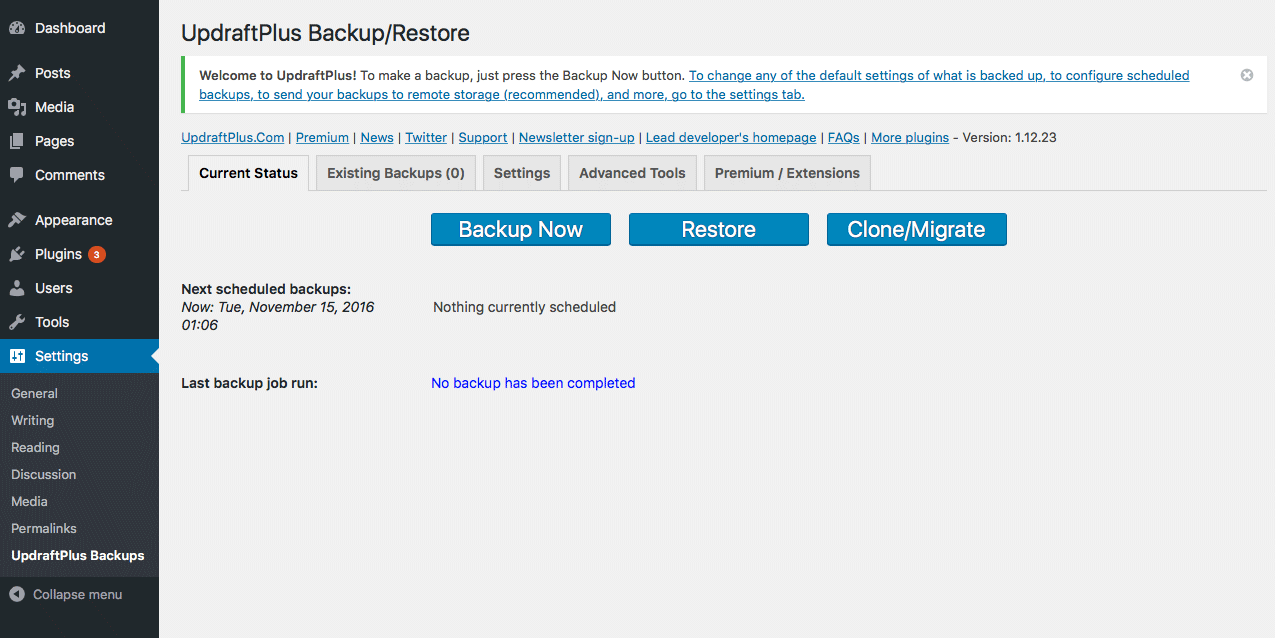
In the left-hand admin menu, choose Settings > UpdraftPlus Backups. The UpdraftPlus admin page appears:
Choose Settings > UpdraftPlus Backups to visit the UpdraftPlus admin page. - Make a backup.
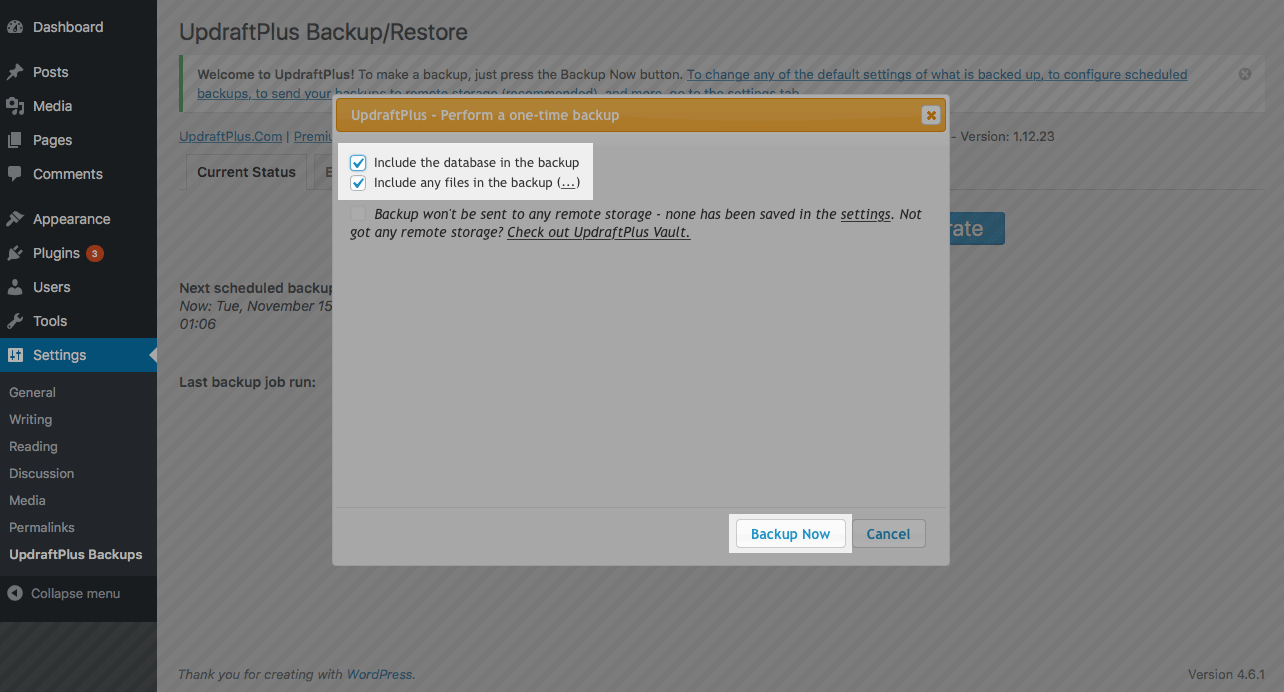
Click the big blue Backup Now button towards the top of the page. A popup appears. Make sure the Include the database in the backup and Include any files in the backup checkboxes are selected, then click Backup Now:
Make sure everything will be included in the backup, then click Backup Now to make the backup.
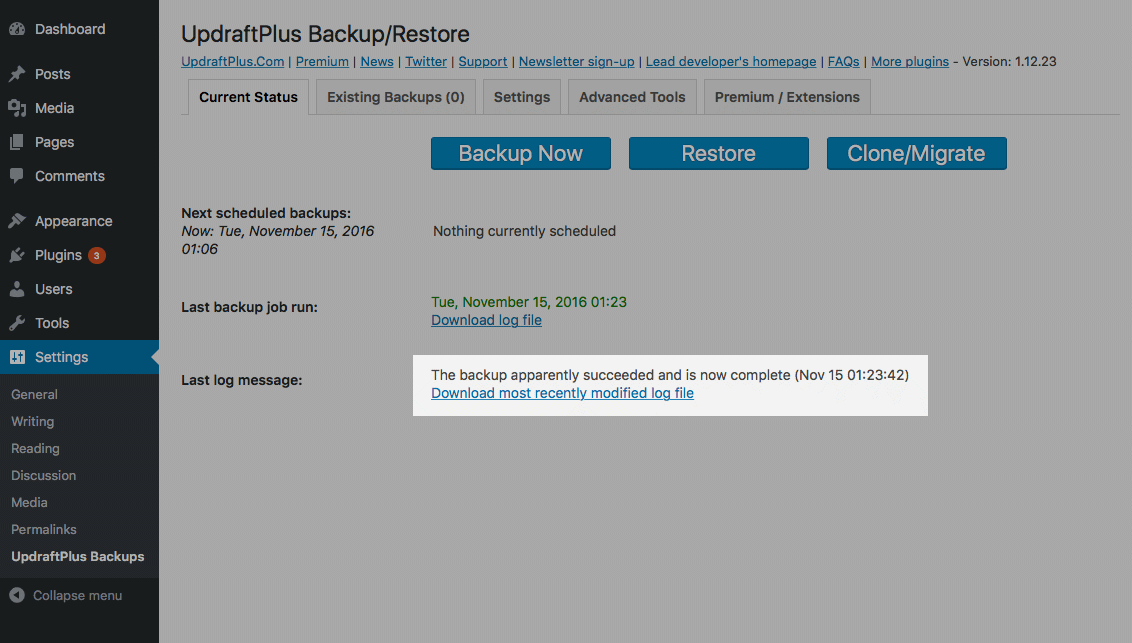
You’ll see a progress bar as UpdraftPlus backs up your site. When it’s finished, you should see the message The backup apparently succeeded and is now complete appear in the page:
Also, if you head on over to the Existing Backups tab, you’ll see your backup appear in the list:
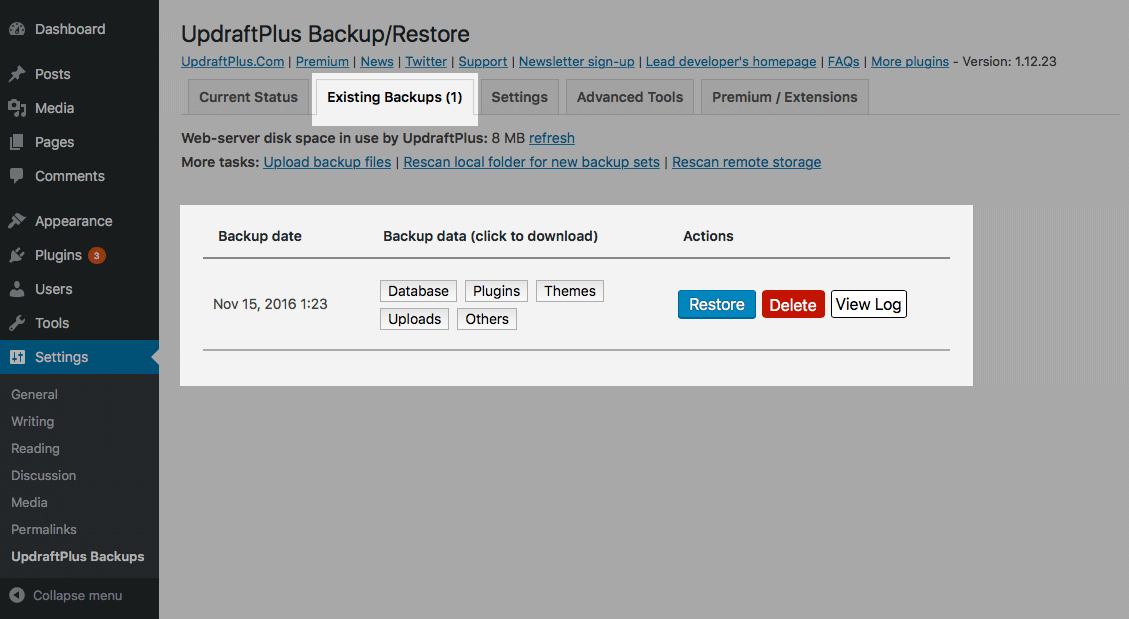
It’s a good idea to download this backup to your computer, then delete it from your server (leaving backup files on your server is a security risk). Follow these steps:
- Download the database backup file.
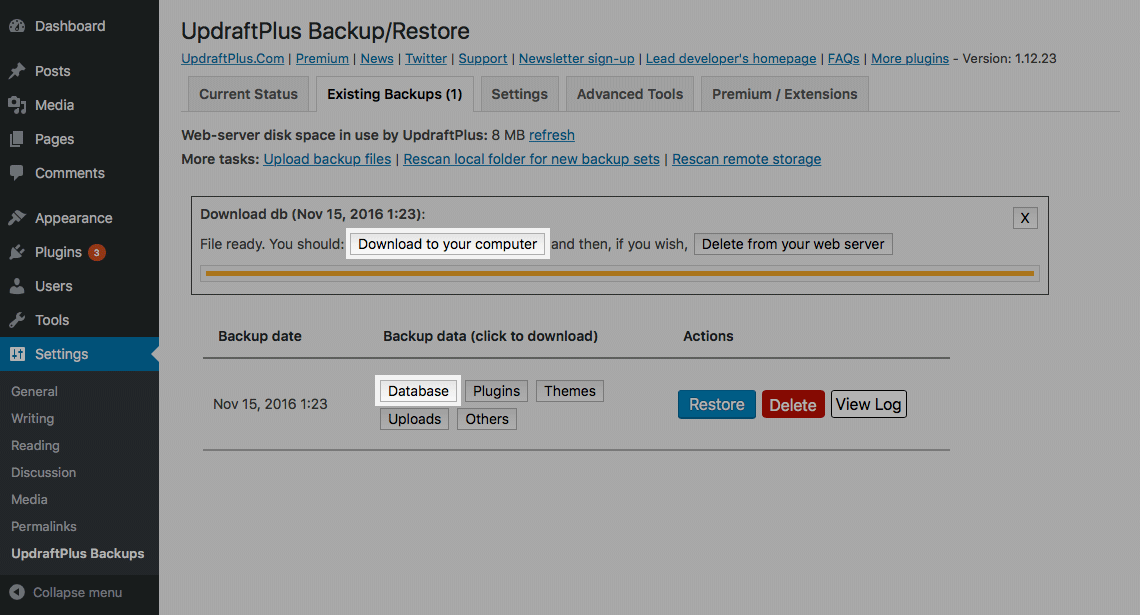
Click the Database button. After a few seconds you’ll see a Download to your computer button appear. Click it to download the backup of your database:
Click the Database button, then click the Download to your computer button to save the database backup on your computer. - Download the other backup files.
Click the Plugins, Themes, Uploads and Others buttons in turn. After you’ve clicked each button, click the Download to your computer button that appears, as you did in the previous step. - Delete the backup.
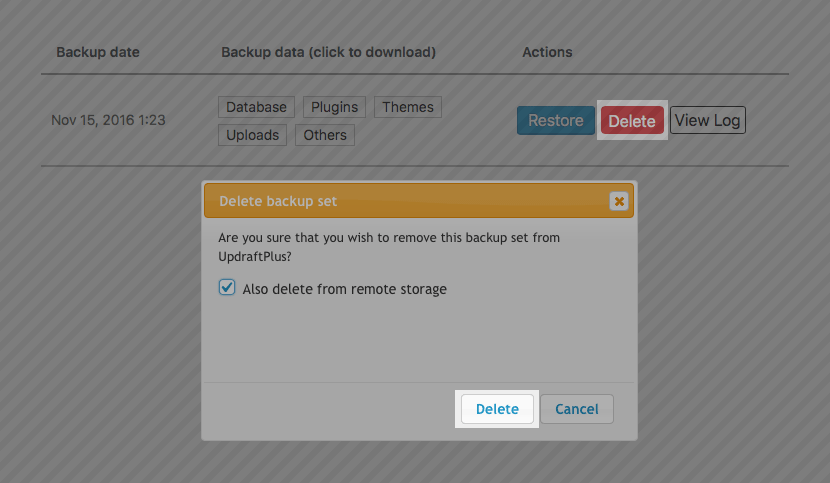
Once you’ve downloaded all five backup files, click the red Delete button next to the backup. In the popup that appears, click the Delete button to delete the backup:
To delete the backup, click the red Delete button, then click Delete in the pop-up box.
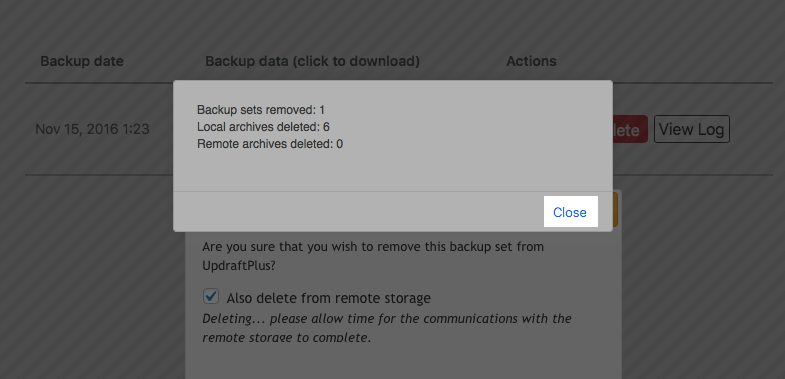
After a short while, you’ll see an alert box appear, confirming the deletion. Click Close to close the alert box:
Step 3: Send backups to your Dropbox account
You’re doing great! You’ve installed UpdraftPlus and you’ve made a manual backup, which you’ve downloaded to your computer. You now have a full backup of your site’s database and files stored on your computer, in case anything goes wrong in the future.
As we saw in the last step, it’s not a good idea to store backups on your web server, so let’s tell UpdraftPlus to store the backups in your Dropbox account instead.
Follow these steps to set up Dropbox within UpdraftPlus:
- Bring up the UpdraftPlus Settings tab.
In the UpdraftPlus admin page, click the Settings tab near the top:
Click the Settings tab to bring up the UpdraftPlus settings. - Select the Dropbox remote storage option.
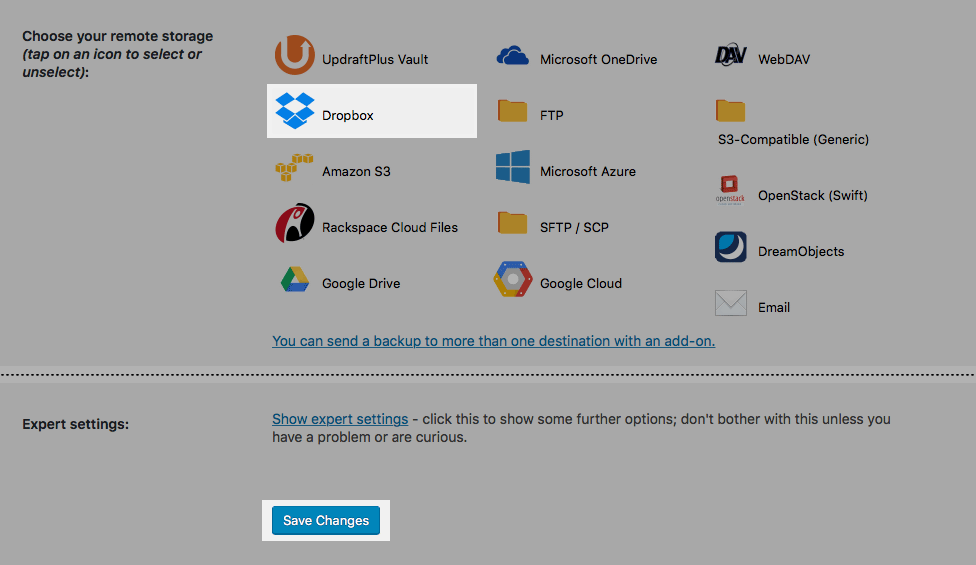
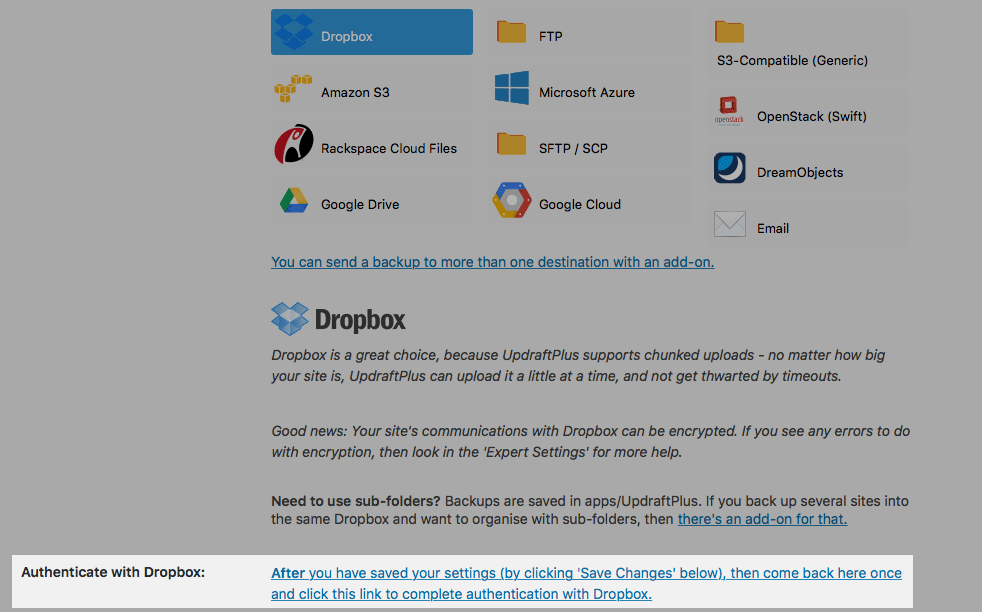
Click the Dropbox icon, then scroll down to the bottom of the page and click the Save Changes button:
Click the Dropbox icon, then scroll down and click Save Changes. - Authenticate with Dropbox.
When the page refreshes, scroll down the page until you see Authenticate with Dropbox. Click the link to the right of this text:
Click the blue link to start the process of connecting UpdraftPlus to your Dropbox. - Allow UpdraftPlus to connect to your Dropbox account.
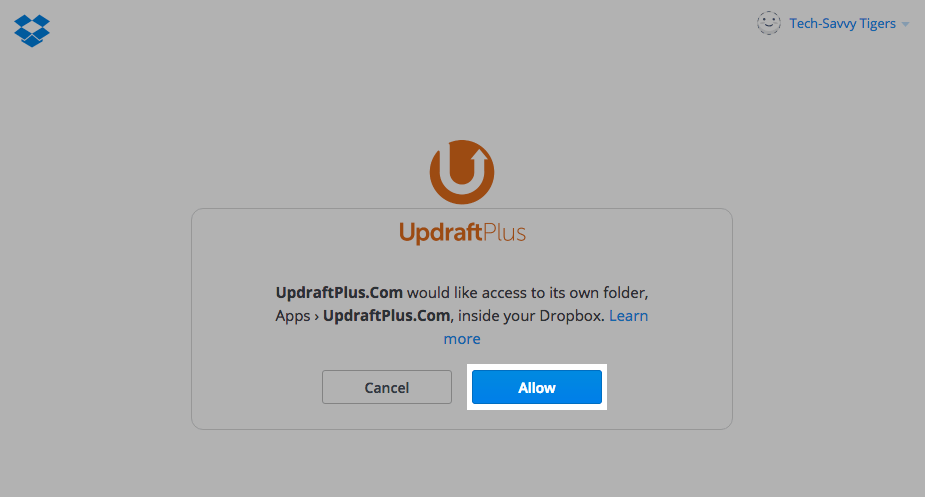
You’ll be taken to the Dropbox site. Sign in to Dropbox if you’re prompted to do so, then click the Allow button to allow UpdraftPlus to access your Dropbox account: - Complete the Dropbox setup.
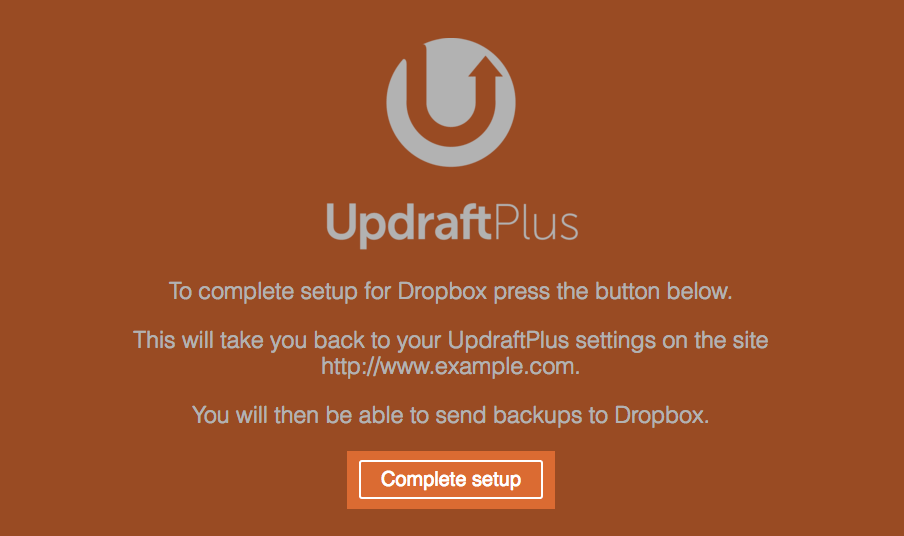
Now you’ll see an orange page appear, with a Complete setup button. Click the button to return to your UpdraftPlus settings page:
Click Complete setup to finish linking UpdraftPlus with Dropbox.
If all went well, you’ll see a message at the top of the UpdraftPlus settings page, indicating that Dropbox was linked up successfully:
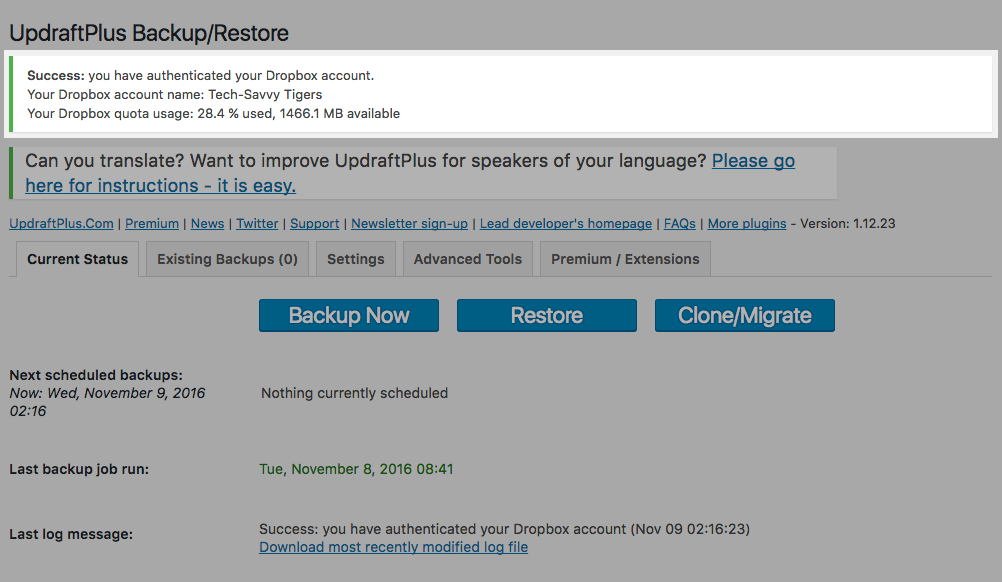
Good work! UpdraftPlus will now store all your backups in your Dropbox account. You’ll find them inside a folder called UpdraftPlus, which is inside the Apps folder in your Dropbox.
Step 4: Set up a backup schedule
Your site changes every day as you add new content, install and tweak plugins and themes, and get comments on your blog posts. So it’s a great idea to set up a backup schedule, so that UpdraftPlus regularly backs up your site for you.
To set up a schedule, bring up the UpdraftPlus Settings tab again. At the top of the page, you’ll see two sections: Files backup schedule and Database backup schedule:
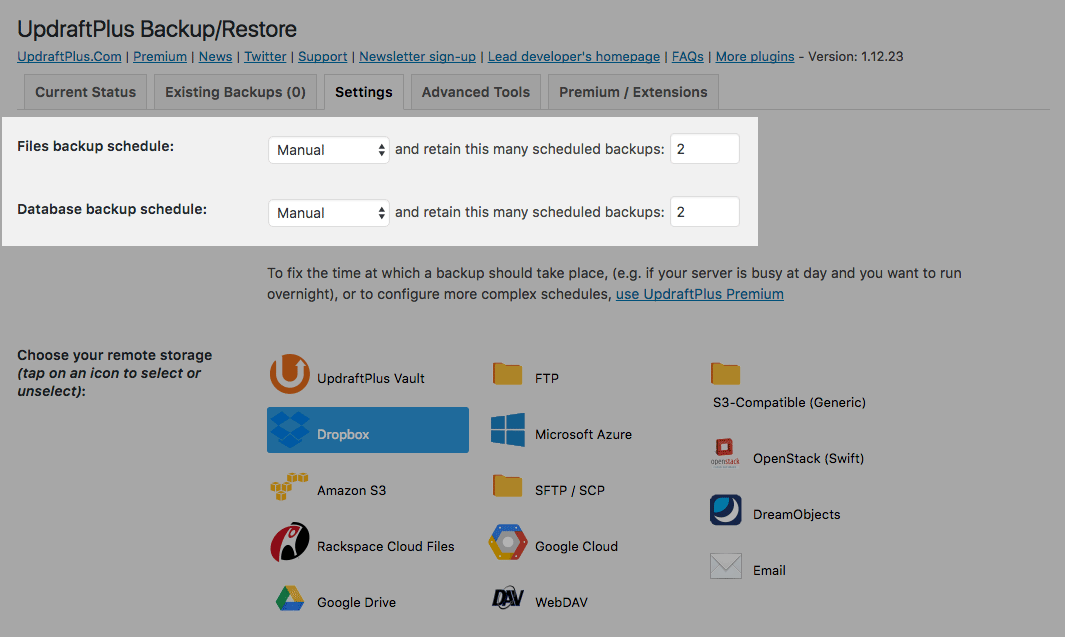
You use these sections to set up separate backup schedules for:
- Your files (themes, plugins, and your uploaded media) and
- Your WordPress database (which contains your pages, posts, widget settings, and other settings and content).
For the Files backup schedule, click the Manual button and choose a frequency from the menu that appears:
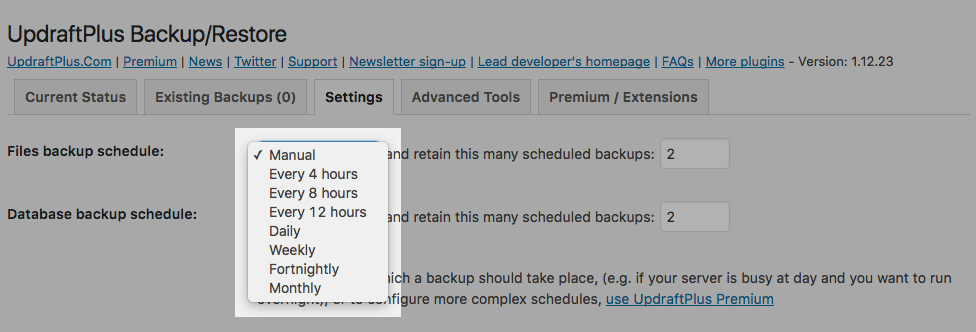
To stop your Dropbox filling up, UpdraftPlus only keeps recent backups, and deletes older backups. To tell UpdraftPlus how many backups to keep, enter a number in the right-hand box:
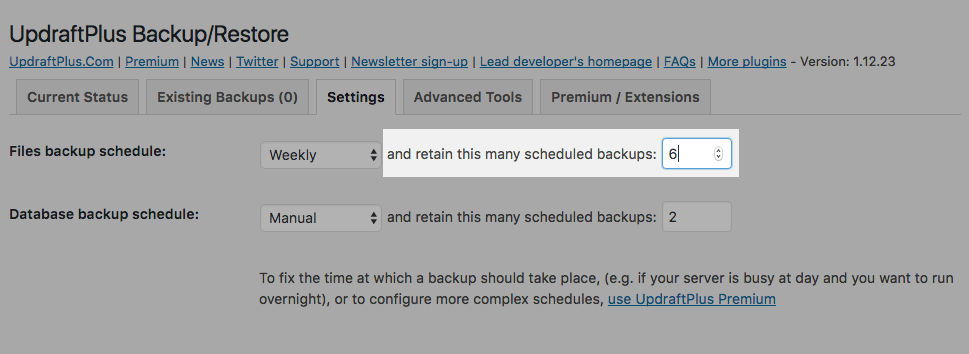
Repeat this process for the Database backup schedule. Then click Save Changes at the bottom of the page.
What schedule should you use?
If you don’t update your site much then Weekly is probably fine. If you update more often, or you have an online store, then you’ll probably want to set it to Daily or even Every 4 hours.
Bear in mind that it’s a good idea to keep several weeks’ worth of backups in case you need to roll your site back. I like to keep at least three months’ worth. So if you set your schedule to Weekly then I’d recommend keeping at least 15 backups or so.
What about storage space?
If you’re (a) backing up daily, (b) keeping several weeks of backups, and (c) running anything other than a tiny site, then you’ll start to use up a lot of storage space in your Dropbox.
One way around this problem is to set the Database backup schedule to Daily, but set the Files backup to Weekly. There are three reasons for this:
- The stuff stored in your Database backup is more important.
If you were to lose your Files backup, you could probably reinstall your theme and plugins, and recover or recreate at least some of your uploaded images from your computer. However, the Database backup contains all your pages, posts, comments, settings, and other content, which would probably be harder to recreate if you lost the backup. - Your database is updated more frequently than your files.
You might upload an image or two every few days, and maybe update your theme and plugins once a week. However, your database changes whenever you post or update a page or blog post; whenever someone leaves a comment; and — in the case of an online store — whenever anyone makes a purchase. So it’s much more important to have frequent backups of your database. - The database is smaller.
Finally, the Database backup is usually much, much smaller than the Files backup. So it’s OK to back it up every day.
If you set up different schedules for your database and files like this, you’ll be able to store a lot more backups before you run out of Dropbox space.
Step 5: Turn on email reporting
Since you’ve scheduled your backups to run automatically, it’d be nice to know that they’re happening! This is easy to do:
- Bring up the UpdraftPlus Settings tab.
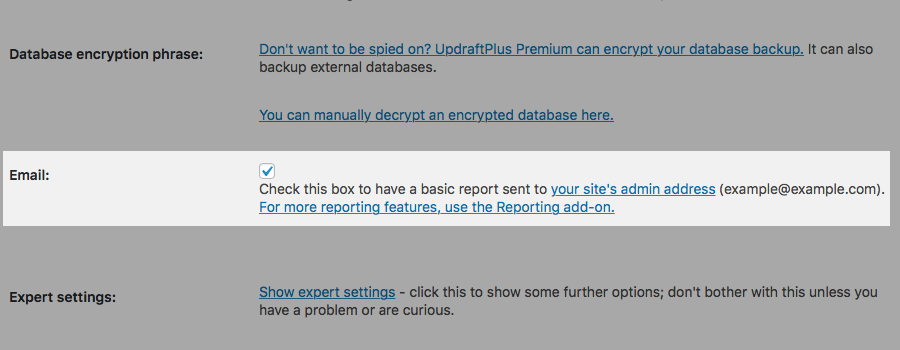
In the UpdraftPlus admin page, click the Settings tab near the top. - Select the Email checkbox.
Scroll down until you see the section called Email. Click the checkbox to select it: - Save your changes.
Scroll down to the bottom of the page and click Save Changes.
Now, every time UpdraftPlus runs a backup — or fails to run a backup — it will email you the result.
By default, UpdraftPlus sends the emails to your WordPress admin email address. If you want to change your admin address, choose Settings > General from the WordPress admin menu, then type your new address in the Email Address box and click Save Changes.
Step 6: Test your backups are working
Depending on your backup schedule, you’ll eventually receive an email telling you that UpdraftPlus has done a backup. But how do you know for sure that the backup really worked?
Option #1: Do a test-restore
The only way to be 100% sure a backup has worked is to try restoring your site from the backup. You probably don’t want to risk restoring a backup to your live site, though, in case the backup actually is broken! So the best bet is to set up a subdomain on your server and do a test-restore to that subdomain.
The tricky thing about test-restoring your backup to a subdomain is that, after restoration, all the URLs in the restored WordPress database need to be changed from your live site’s domain (as stored in the backup) to your new subdomain. If you don’t do this critical step then the restored site won’t work.
The easiest way to do this is to purchase the Migrator add-on (see Step 7 below). This automatically does a search-and-replace on your restored WordPress database, replacing all occurrences of the old domain with the new one.
Briefly, here’s what you need to do:
- Purchase the Migrator add-on.
- Use your hosting control panel (such as cPanel or Plesk) to create a subdomain and a separate MySQL database (and database user). If you’re not sure how to do this, ask me or your hosting company for help.
- Password-protect the subdomain site (because you don’t want to have two publicly-viewable copies of your live site). For example, in cPanel, click Directory Privacy in the Files section. Again, ask me or your hosting company if you get stuck!
- Install a fresh copy of WordPress on the new subdomain and database.
- Follow these steps to restore your UpdraftPlus backup to your new subdomain.
- Test everything works OK, and that all your content is there.
Option #2: Check the backup files
Does test-restoring from your backup seem a bit scary? If so then an easier alternative is simply to inspect the backup files themselves to make sure they look OK. This isn’t as foolproof as doing an actual restore, but it does at least reassure you that your content is being backed up!
To check your backup files, follow these steps:
- Open the
UpdraftPlusfolder in your Dropbox.
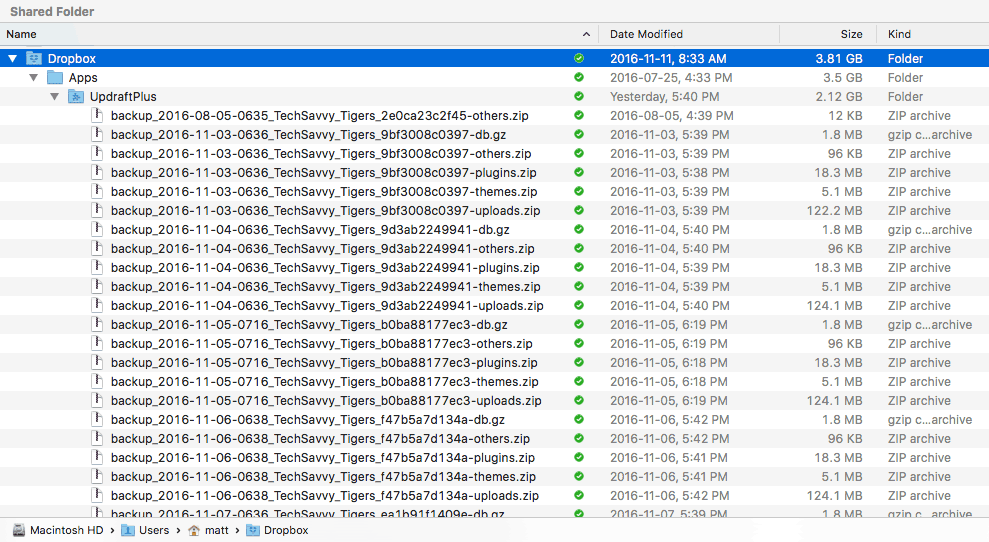
Open yourDropboxfolder on your computer. You should see anAppsfolder. Open this folder, and there should be anUpdraftPlusfolder inside. Open theUpdraftPlusfolder, which should contain your backup files:
Open the Apps/UpdraftPlusfolder in your Dropbox. This contains your site backup files. - Copy the most recent backup files.
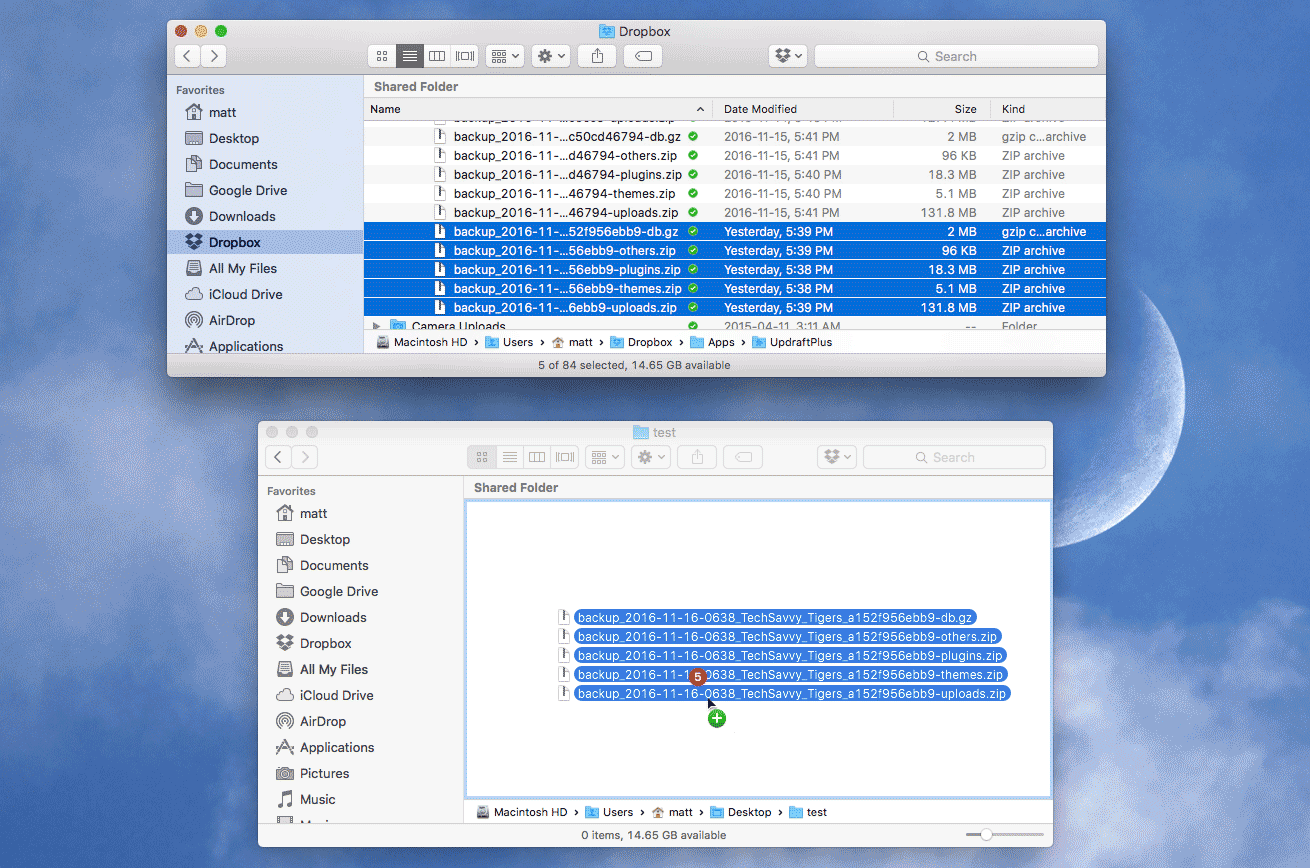
Each backup is made up of five files:*-db.gz(your database),*-plugins.zip(your installed WordPress plugins),*-themes.zip(your installed themes),*-uploads.zip(all your uploaded media files), and*-others.zip(any other files and folders inside yourwp-contentfolder). Create a folder calledteston your Desktop, and copy the five most recently-added files to thetestfolder; this is your most recent backup:
Copy the five most recent backup files to a testfolder on your Desktop. - Unzip the backup files.
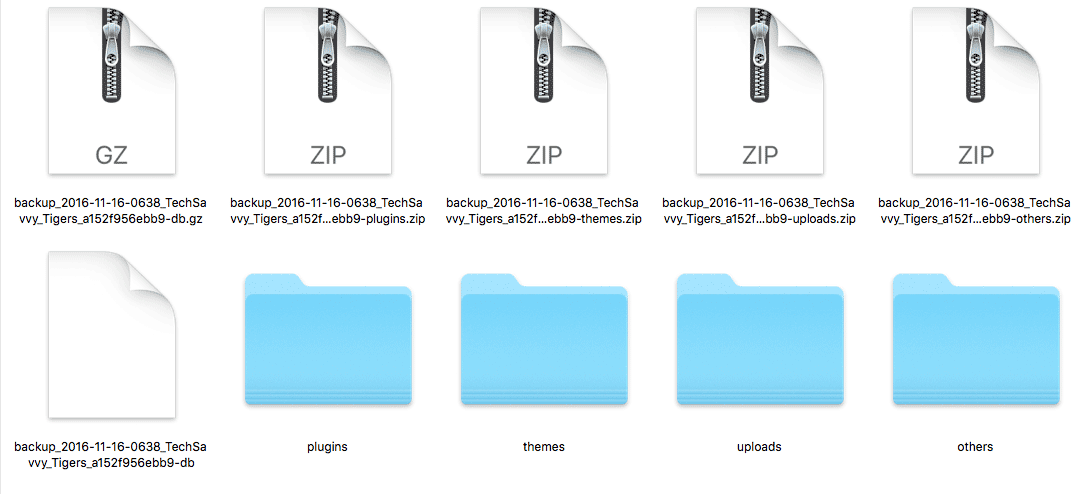
Open thetestfolder and unzip the files inside. On a Mac, you can double-click each file to unzip it. On Windows, right-click each file and choose Extract All. (To unzip the*-db.gzfile on Windows, you may have to install an unzipping app such as 7-Zip.)
Once you’ve unzipped the five backup files (top) inside your testfolder, you’ll be left with a*-dbtext file and four folders (bottom). - Check the contents of the folders.
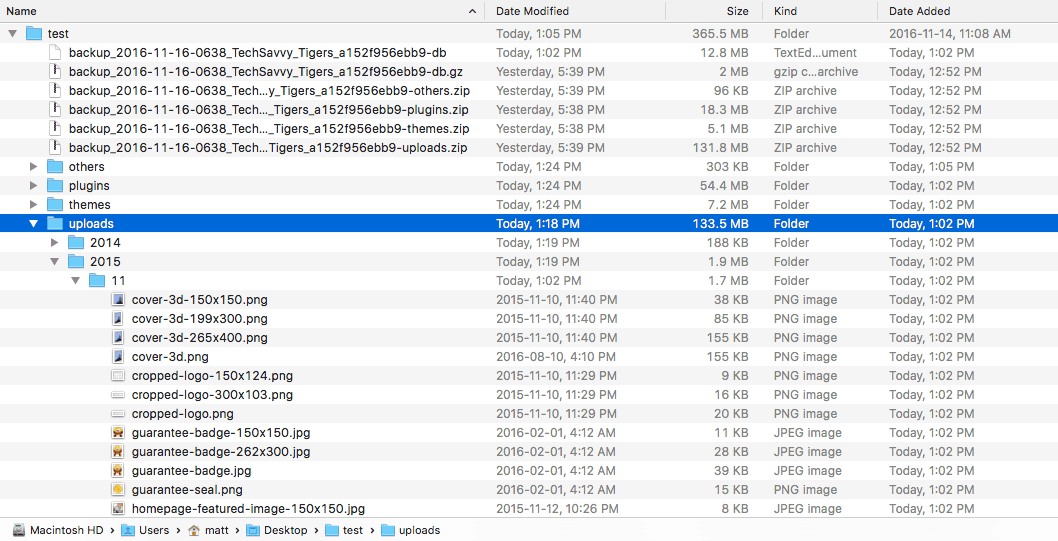
Open each folder and check that it contains all the files you’d expect. I especially like to check out theuploadsfolder to make sure it contains all the images and other media that I’ve uploaded to my site:
Here I’m checking the contents of my uploadsfolder to make sure all my uploaded media files are backed up. - Check the contents of the database.
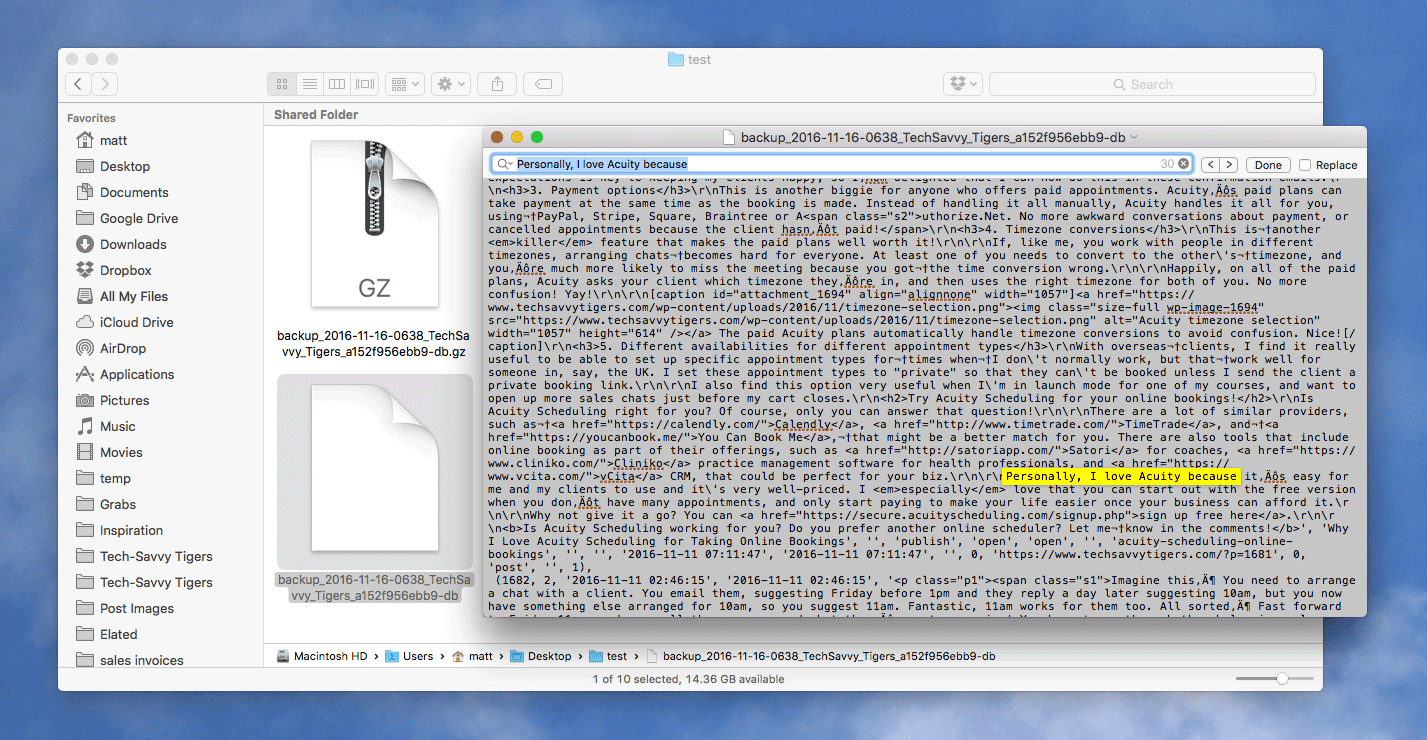
Open the*-dbfile in your computer’s text editor (for example, TextEdit on the Mac or Notepad on Windows). You’ll see lots of code appear — these are the MySQL instructions to recreate your database, along with the database content itself. I like to use the text editor’s search feature (Edit > Find) to search through the code, spot-checking for important data. For example, you might search for the title of your most recent blog post, or perhaps a sentence from a comment. It should all be there in the file:
Here I’m searching the database backup for some text from a recent blog post to make sure the backup’s working.
It’s worth test-restoring from your backups, or checking your backup contents, every couple of months to make sure they’re being backed up OK. Check the “last modified” dates on the backup files to make sure that your backups are recent.
Step 7: Check out the UpdraftPlus add-ons
While the free version of UpdraftPlus is perfectly usable, there are some pretty handy add-ons that you can buy:
- Migrator lets you clone a site to a different domain name. It automatically updates all the URLs in your WordPress database so that they use the new domain.
- Automatic Backups automatically backs up your site before you update WordPress, or any of your plugins or themes. So if an update breaks your site, you can quickly roll back to just before the update happened.
- Backup time and scheduling lets you set the exact time of day that backups occur. It also gives you more control over keeping backups to save space (for example, “keep all daily backups for a week, then keep only one backup per week after that”).
- More files backs up everything in your site. The free UpdrafPlus only backs up your database, plus your
wp-contentfolder (which includes plugins, themes, your media uploads, and other files found in the folder). With More files, UpdrafPlus can also back up your WordPress core code, other files and folders outside yourwp-contentfolder, and yourwp-config.phpfile (which contains the basic settings for your WordPress site). - Multiple storage destinations lets you send each backup to more than one destination. (It’s a good idea to have at least two backup destinations in case one fails.) When restoring or downloading a backup, if UpdraftPlus can’t reach a backup destination, it automatically tries the next one.
- Reporting gives you more detailed email reports of each backup. It also lets you choose which email address (or addresses) to send the backups to (the free version can only send to your WordPress admin email).
- More database options lets you encrypt your database backups; back up other non-WordPress tables inside your WordPress database; and back up non-WordPress databases.
- Importer imports backups made with other WordPress backup plugins — either ones that are no longer supported, or plugins that don’t have their own restore feature.
- Lock Settings lets you password-protect the UpdraftPlus settings page so that only you can access your backups or change UpdraftPlus settings. Good for managing client sites, or if there are multiple admins on your site.
- UpdraftVault is UpdraftPlus’s own cloud storage service. It’s really easy to use: once you’ve signed up, you just enter your UpdraftPlus account email address and password in the UpdraftPlus settings, then click the Connect button. You can choose from 5 GB, 15 GB, and 50 GB storage capacities.
- UpdraftCentral Cloud is a ManageWP-style remote web-based dashboard for managing multiple WordPress sites. It lets you control the UpdraftPlus backups and settings on each site, as well as manage WordPress, plugin and theme updates.
- Support includes various support packages in case you get stuck, or have problems backing up or restoring. Always nice to know help’s available if you need it!
- Additional storage add-ons give you more options for remote storage, including Microsoft OneDrive, SFTP/FTPS/SCP (which let you securely transfer backups to your own server), WebDAV, Google Cloud Storage (not the same as Google Drive, which is included for free), and Microsoft Azure cloud storage.
If you want to use more than one or two add-ons then your best bet is to purchase an UpdraftPlus Premium subscription, which includes all add-ons as well as free upgrades, free support, and 1 GB of UpdraftVault storage.
Step 8: For when it all goes horribly wrong…
Don’t you hate that sinking feeling when you visit your site and it’s broken?
This time, though, you have backups. UpdraftPlus to the rescue! Here are a couple of scenarios that you might encounter, and how to deal with them:
Scenario #1: You just need to recover a file or two
If you accidentally make a small change that breaks something on your site — say you mess up your theme’s stylesheet, or you delete an important image by mistake — then the best bet is to recover the individual files from your UpdraftPlus backup. Follow these steps:
- Open the
UpdraftPlusfolder in your Dropbox.
Open yourDropboxfolder on your computer. Open theAppsfolder, then open theUpdraftPlusfolder inside it. - Copy the Zip file.
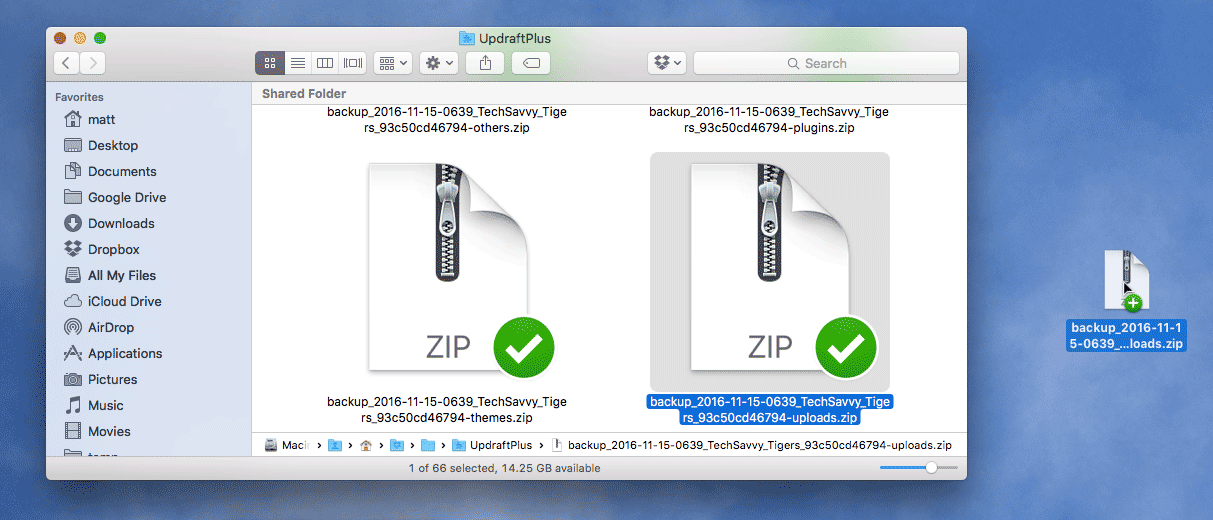
Copy the appropriate.zipfile from yourUpdraftPlusfolder to your Desktop. For example, if you want to restore an uploaded image from your last backup, copy the latest*-uploads.zipfile to the Desktop:
Find the Zip file in your Dropbox/Apps/UpdraftPlusfolder that contains the file you want to restore, then copy the Zip file to your Desktop. - Unzip the Zip file.
Unzip the.zipfile that you copied to your Desktop. On a Mac, you can double-click the file to unzip it. On Windows, right-click the file and choose Extract All: - Find the file to restore.
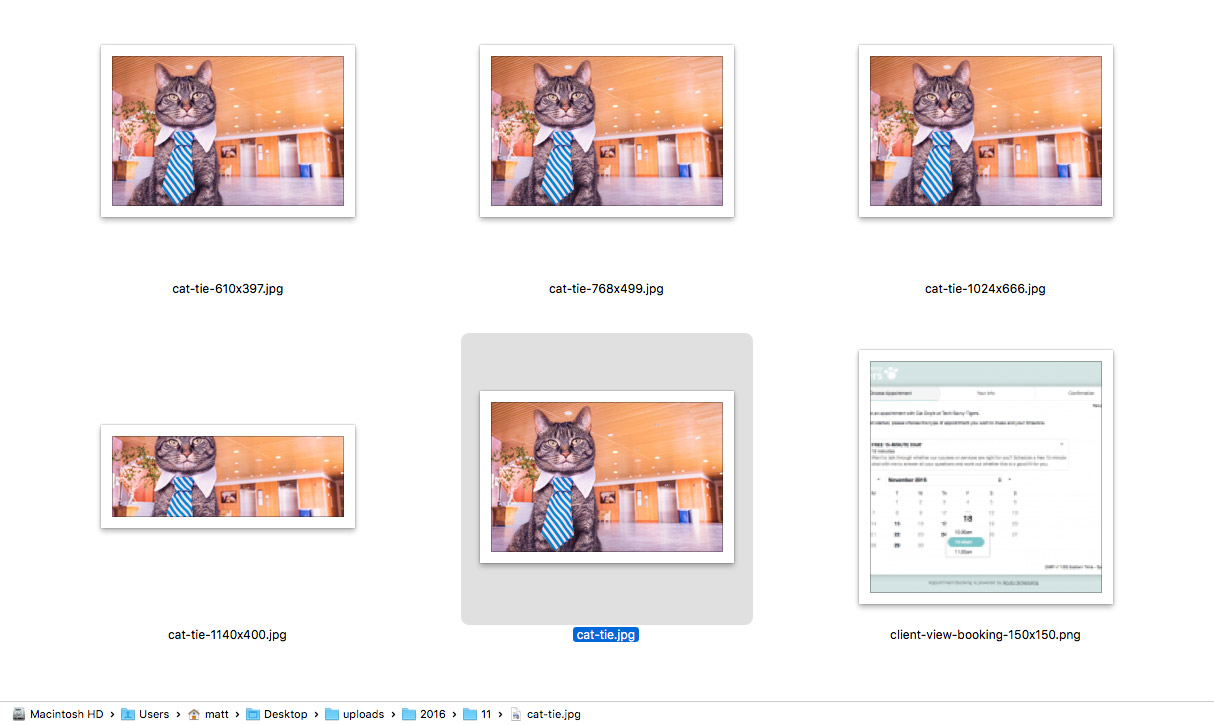
Open the unzipped folder and find the file that you accidentally deleted: - Re-upload the file.
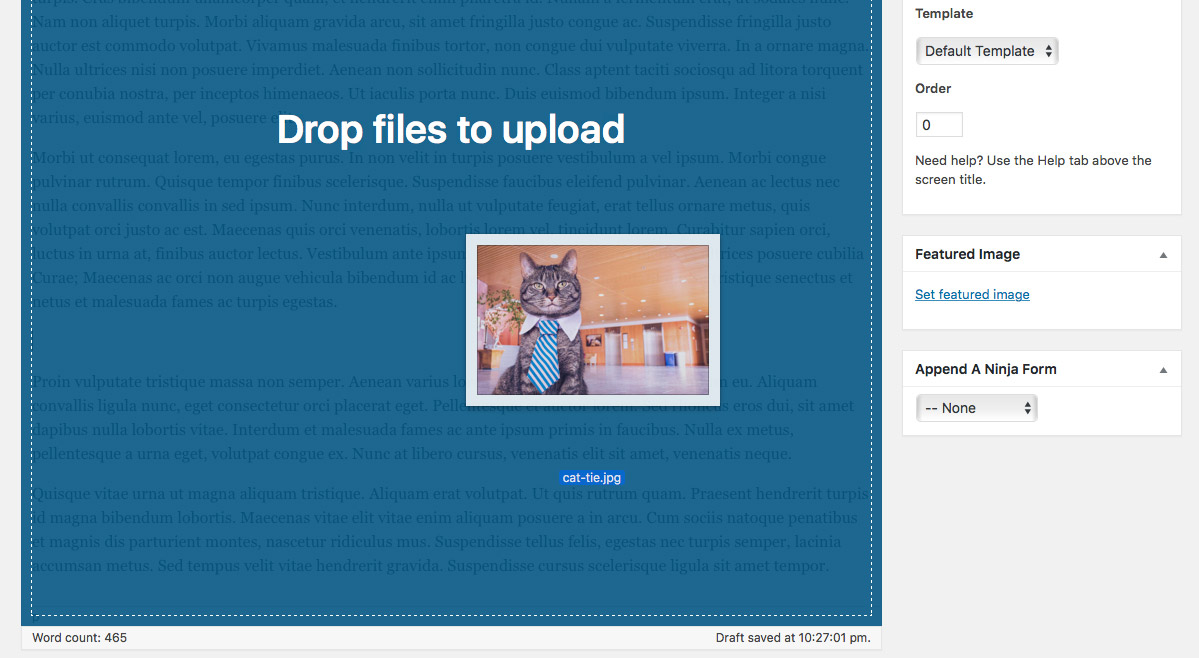
Log into your WordPress admin and upload the file to your site. For example, if the file was a featured image for one of your posts then edit the post and click the Set featured image link to upload the image. Or if it was an image inside one of your posts or pages, simply drag the image back into the WordPress editor:
Scenario #2: It’s all gone belly up
The above plan is OK for small problems. But sometimes — hopefully not very often! — the worst happens:
- You break your site completely, and can’t work out how to fix it
- Your site gets hacked, or
- Your web host accidentally deletes your site, and their backup doesn’t work.
In this scenario, you’ll need to do a full restore of your site from your UpdraftPlus backup.
If your site is so broken that you can’t even log into your WordPress admin, you’ll need to restore your site manually. This involves installing a fresh copy of WordPress; unzipping the UpdraftPlus .zip files and uploading the unzipped folders; and using your cPanel/Plesk and phpMyAdmin to restore your database. It’s not too hard to do, but you do need some technical know-how. Here are the instructions for a manual restore.
If your site’s broken, but you can still log into your WordPress admin, then you’re in luck! UpdraftPlus can restore your site for you automatically. Here’s how to do that:
- Bring up the UpdraftPlus Existing Backups tab.
In the UpdraftPlus admin page, click the Existing Backups tab near the top. - Click the appropriate Restore button.
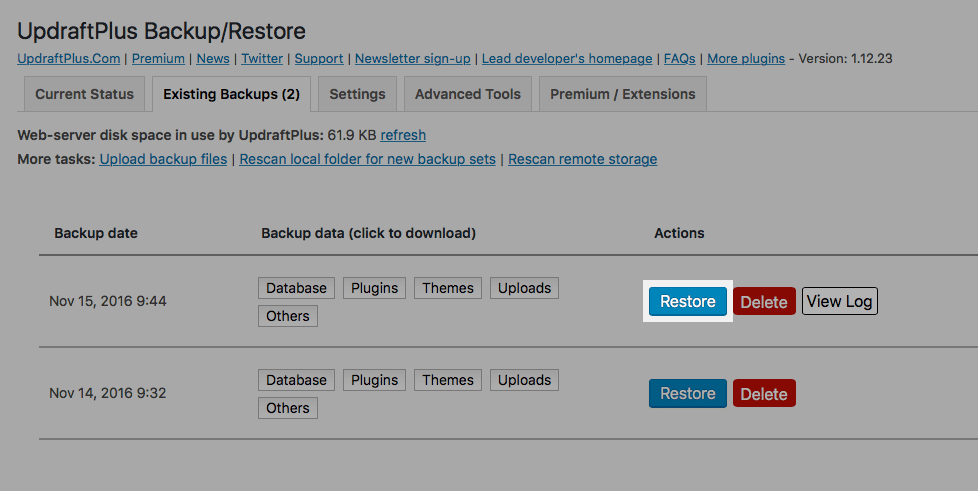
Find the backup that you want to restore, then click the Restore button next to the backup:
Click the Restore button next to the backup you want to restore. - Select the items you want to restore.
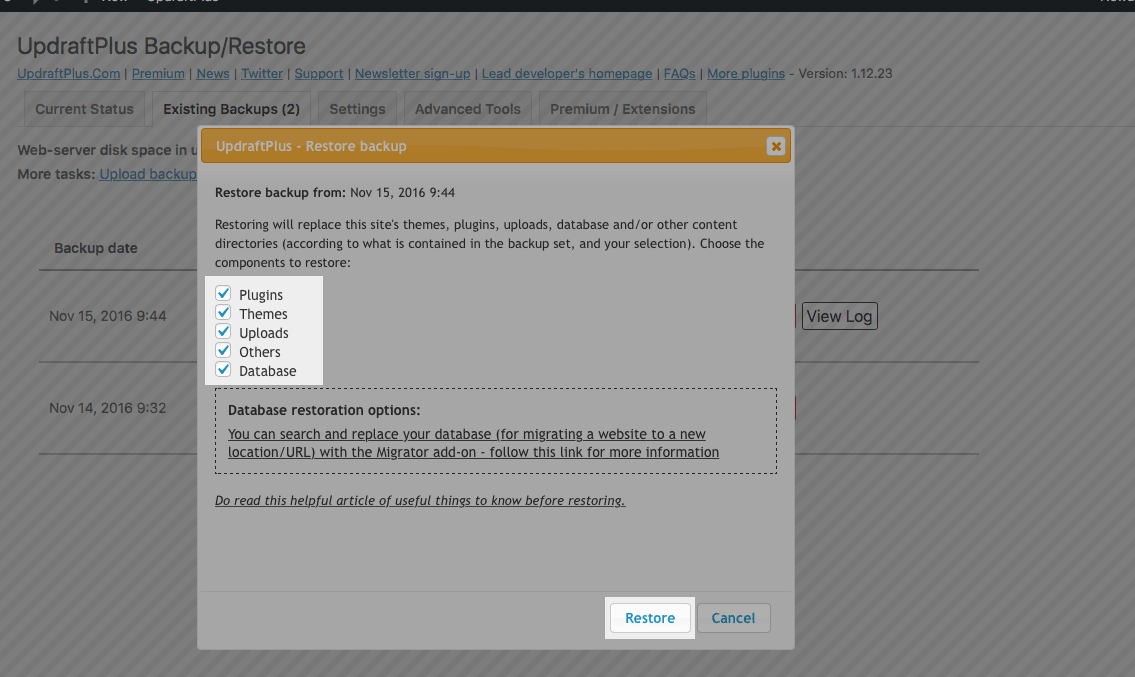
In the popup that appears, click the checkboxes next to the items that you want to restore. Usually you’ll want to restore everything (Plugins, Themes, Uploads, Others, and Database). Then click the Restore button to continue:
Select everything you want to restore, then click the Restore button. - Start the restore.
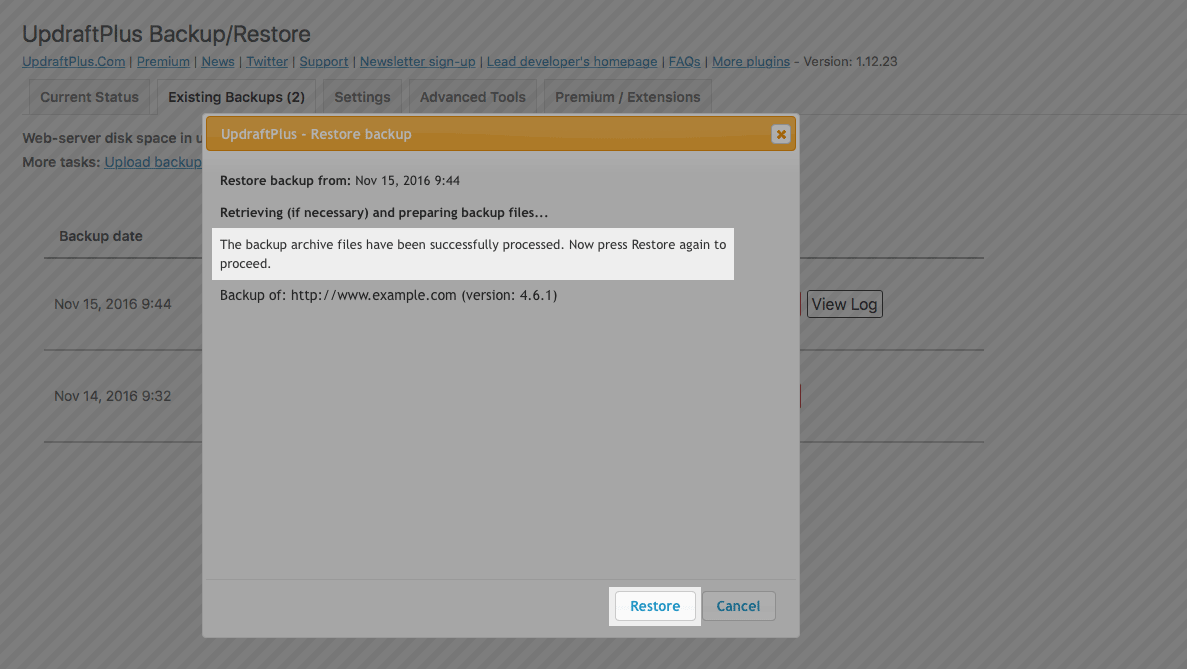
UpdraftPlus prepares the backup files for restoration, grabbing them from your remote storage if necessary. After a few seconds, you should see the message The backup archive files have been successfully processed. Click the Restore button in the popup window to begin the restore process:
Once the backup files have been processed, click Restore again to begin the restore.
You’ll probably see a fairly blank-looking screen while UpdraftPlus does the restore. Don’t panic! After a minute or so, you should see some messages appear:
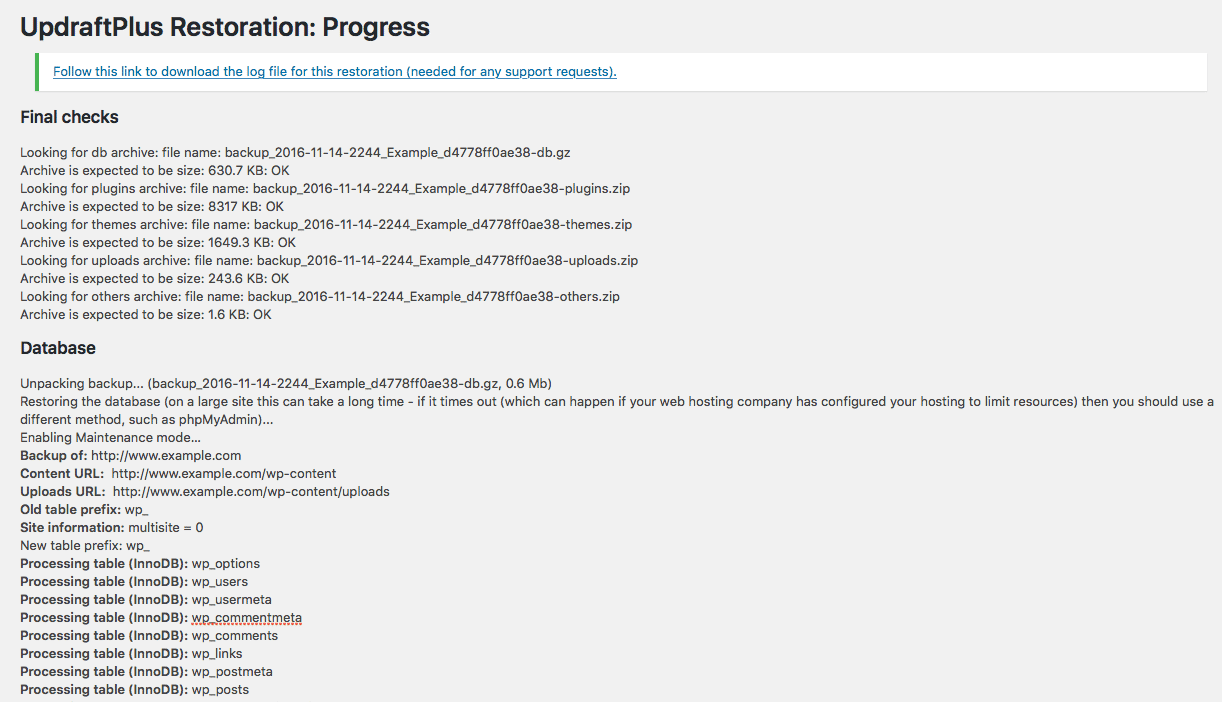
Eventually, you’ll hopefully see Restore successful! appear at the bottom of the page:
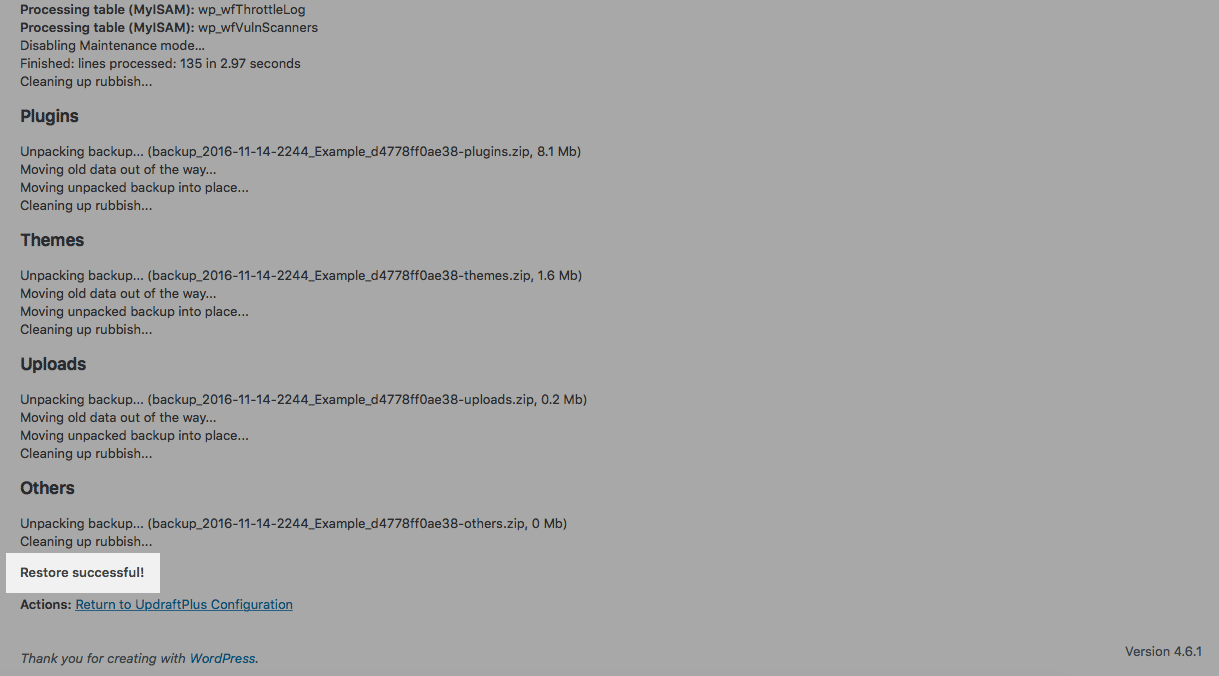
Now your site is restored, it’s time to check everything works OK and clean up. Follow these steps:
- Check your site.
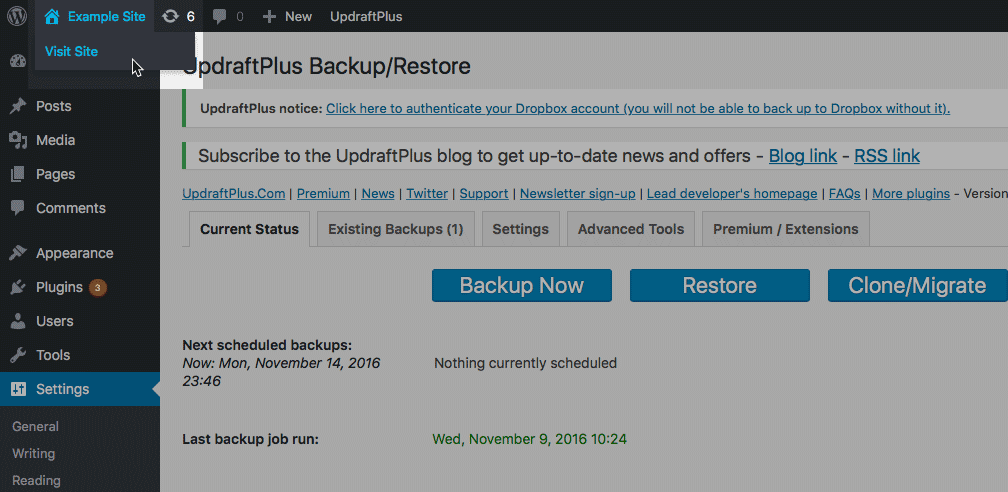
Move your mouse over your site name in the top admin bar, then click Visit Site. Make sure your site looks OK, and contains all your posts, pages, and comments.
Click the Visit Site link and make sure the public-facing side of your site all works OK. - Check your admin.
Again, move your mouse over your site name in the top bar, then click Dashboard to return to your WordPress admin. Choose Posts in the left-hand admin bar and make sure all your posts are there. Repeat for the Media, Pages and Comments menu items. You might also want to check your widgets are intact (Appearance > Widgets), and that your plugins (Plugins >Installed Plugins) and themes (Appearance > Themes) are there. Finally, of course, you should make sure that your UpdraftPlus settings are intact, and that backups are still scheduled (Settings > UpdraftPlus Backups, then click the Settings tab). - Delete old directories.
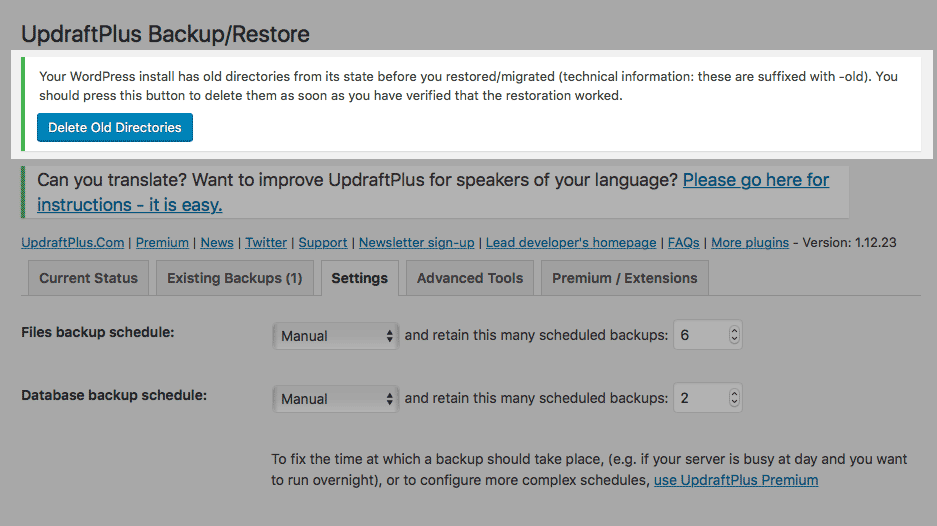
Before restoring your backup, UpdraftPlus renamed your existingplugins,themes, anduploadsfolders toplugins-old,themes-old, anduploads-old(in case anything went wrong with the restore). Once you’re happy that everything was restored OK, it’s a good idea to delete these old folders. To do this, choose Settings > UpdraftPlus Backups from the WordPress admin, then click the Delete Old Directories button at the top of the page:
If you’re happy that your site has been restored perfectly, go ahead and delete the old directories in the UpdraftPlus admin.
All done! UpdraftPlus has saved the day. 🙂
Keep your WordPress site safe with UpdraftPlus!
If you’ve read this far, you’re an UpdraftPlus expert! You know how UpdraftPlus works, how you can use it to make regular backups to your Dropbox, how to make sure your backups are working, and how to restore your backups in an emergency.
So go ahead and install UpdraftPlus, and start protecting your site today! Remember to check your backups regularly, and install another backup option for extra security.
Oh, and to keep your site as secure as possible, make sure you download our WordPress Security Checklist and work through the eight steps to protect your site.
Do you have any questions about UpdraftPlus, or are you having problems backing up or restoring? Feel free to ask me for help in the comments below!
[Image credits: Hands by Mona Tootoonchinia (CC0), cropped, edited. UpdraftPlus and the UpdraftPlus logo are trademarks of Simba Hosting Ltd.]


Hi Matt,
Really good article on UpdraftPlus. Thanks.
I have recently installed it on a website without problems, but I get the white space message once the backup has been made.
Having read a few blogs on it I tried deactivating plug-ins etc..but to no avail.
I am not familiar or confident enough with php to tackle this.
Any suggestions on how to tackle this?
Thanks Andrew!
Do you mean that you see a blank page after the backup? That could mean a number of things, but the first thing I’d probably try is increasing the memory_limit and max_execution_time values in your site’s php.ini:
http://php.net/manual/en/ini.list.php
If you’re still stuck, please feel free to email me and I can look into it for you:
https://www.elated.com/contact/
Thank you for this great article! Unfortunately, I couldn’t get through step 3. When I clicked the link to connect UpdraftPlus to my Dropbox account, I got a blank white screen. When I went back later to try again, that link was gone. According to the UpdraftPlus website, it should still be there for “re-authenticating” but it isn’t. I tried uninstalling and reinstalling the plug-in, but it saved my settings, so that didn’t work. I can’t click the “wipe settings” button because that is also missing (from the expert settings area). Any idea how I can connect to my Dropbox account without paying for UpdraftPremium? Thank you!
Thanks Joy!
The “wipe settings” option isn’t actually under Expert Settings. To get to it, choose Settings > UpdraftPlus Backups, then click the “Advanced Tools” tab. You’ll see “Wipe settings” in the list on the left. Click it, then click the “Wipe settings” button.
If you still have issues, then it could be a problem with your browser. Try a different browser — for example, if you normally use Chrome then try Firefox. If it works in the new browser then try disabling all the extensions/add-ons in your normal browser, as well as clearing your browser’s cache and cookies.
If you’re still stuck, feel free to reach out to me for help:
https://www.elated.com/contact/
Can you only have the two back up selections to restore from (from inside of the WordPress/Updraft panel)?
Can I have three? If I save a third will it delete one of the older ones (I don’t mean having more than one copy on my FTP or exported files for manual installs, but directly from inside of the WordPress dashboard)?
I have two in there, I don’t want to delete them, I want to keep them there, save a third backup and then restore to my second one. If the second one doesn’t work out I want to be able to restore to the third one/the backup I had just created. But I haven’t seen any pictures of anyone having more than two.
I am actually just wanting to replace my rev slider plugin with an older version. Somehow they got corrupt on my server and then my host deleted them. There was a brand new one put on (but not edited) – I want to go back to before the plugin was deleted. Should I delete the new one or leave it before doing an plugin recovery?
Also a separate issue sometimes I get a FTP login error in the pop up window in the second to last step when restoring.
Hi Gina,
Thanks for your questions.
You can create as many backups as you like, as far as I’m aware. Certainly much more than two.
What is the exact FTP login error you’re seeing? It may be that you need to re-enter your FTP login details, or that there is an issue with the FTP connection (such as a firewall issue or an unsupported FTP protocol).
Great article! I miss some information though on the security of the backups in case of your wordpress site getting hacked. How do I prevent hackers who have gained admin access to my site from deleting or overwriting the backups stored in Dropbox? This can be done from the plugin.
I know I can manually copy the backups to different other computers, but I’m looking for a secure automatic solution.
Thanks,
Oliver
Thanks for your question Oliver. Take a look at the Lock Settings add-on: https://updraftplus.com/shop/lockadmin/
It’s also a good idea to copy the backups elsewhere, as an added security measure. You might be able to use IFTTT to automate this – for example: https://ifttt.com/applets/a5QkGJTB-sync-new-file-uploads-to-google-drive-and-send-them-via-gmail