• Skip to main content
  • Skip to primary sidebar
  • Skip to footer

Matt Doyle | Elated Communications

Web and WordPress Development

  • About Me
  • Blog
    • Design & Multimedia
      • Photoshop
      • Paint Shop Pro
      • Video & Audio
    • Online Marketing
      • E-Commerce
      • Social Media
    • Running a Website
      • WordPress
      • Apache
      • UNIX and Linux
      • Using FTP
    • Web Development
      • HTML
      • CSS
      • JavaScript
      • PHP
      • Perl and CGI Scripting
  • Portfolio
  • Contact Me
  • Hire Me
Home / Blog / Design & Multimedia / Photoshop / Paths and the Pen Tool / Things You Can Do with Photoshop Paths

Things You Can Do with Photoshop Paths

1 March 2002 / Leave a Comment

After creating and editing your paths in Photoshop, what can you do with them? There are lots of uses for paths. Let’s look at some of the more common uses here.

Turning a path into a selection

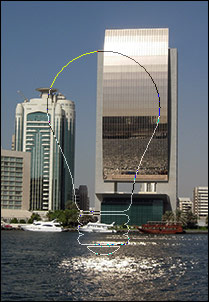
You can create a selection from your path. This means that you can select your complex, irregular objects precisely by outlining them with the Pen tool, then converting your path to a selection.

To do this, bring up the Paths palette by clicking on the Paths tab in the Layers palette (or select Window > Show Paths), then select the path you’d like to create a selection from (here we’ve chosen “Path 1”), then click on the Load Path as a Selection icon:

Turning a path into a selection

The selection marquee will then appear, in the shape of your path! You can now go ahead and work on your selected area, as if you’d selected it with the selection tools.

A path turned into a selection

Turning a selection into a path

You can also do the opposite! If you have an active selection, you can turn it into a path. Just click on the Make Work Path button:

Turning a selection into a path

You can also Alt+click (Windows) or Option+click (Mac) on the button to bring up the “Make Work Path” dialog. Set the desired Tolerance value (smaller numbers result in a more accurate tracing of the selection) and press OK.

Note that using the Make Work Path feature will overwrite your current work path, so be careful!

Filling and stroking a path

You can create a bitmap shape from your path by clicking on the Fill Path icon or the Stroke Path icon:

The Fill Path and Stroke Path icons

The Fill Path icon will fill the inside of the currently selected path with the current foreground colour, while the Stroke Path icon will stroke the outline of the path using the currently (or last) selected brush and foreground colour:

Filling and stroking a path

Using a path as a vector mask for a layer

In Photoshop, you can mask off the contents of a layer using a bitmap layer mask or a vector mask. These masks are a great way to shape a layer’s contents. Layer masks are good for complex bitmap shapes, while vector masks suit simpler shapes. The great thing about vector masks is that, like paths, you can resize them without loss of detail.

A shape layer, which you can create with the Shape and Pen tools, is essentially a layer with a vector mask applied to it.

To use an existing path as a vector mask, first create or load your path. Next, select the layer you want to apply the mask to. Then choose Layer > Vector Mask > Current Path. Photoshop creates a new vector mask for the layer using the current path, and the layer’s contents are revealed by the shape of the mask:

A path and a photo layer
A photo layer and a path…
Path used as vector mask for layer
The path applied as a vector mask to the photo layer

There are other things you can do with paths too, such as creating clipping paths. Check out the Photoshop online help for more details.

Filed Under: Paths and the Pen Tool Tagged With: clipping masks, current path, fill path, load path as a selection, make work path, stroke path

Reader Interactions

Leave a Reply Cancel reply

Your email address will not be published. Required fields are marked *

To include a block of code in your comment, surround it with <pre> ... </pre> tags. You can include smaller code snippets inside some normal text by surrounding them with <code> ... </code> tags.

Allowed tags in comments: <a href="" title=""> <abbr title=""> <acronym title=""> <b> <blockquote cite=""> <cite> <code> <del datetime=""> <em> <i> <q cite=""> <s> <strike> <strong> <pre> .

Primary Sidebar

Hire Matt!

Matt Doyle headshot

Need a little help with your website? I have over 20 years of web development experience under my belt. Let’s chat!

Matt Doyle - Codeable Expert Certificate

Hire Me Today

Call Me: +61 2 8006 0622

Stay in Touch!

Subscribe to get a quick email whenever I add new articles, free goodies, or special offers. I won’t spam you.

Subscribe

Recent Posts

  • Make a Rotatable 3D Product Boxshot with Three.js
  • Speed Up Your WordPress Website: 11 Simple Steps to a Faster Site
  • Reboot!
  • Wordfence Tutorial: How to Keep Your WordPress Site Safe from Hackers
  • How to Make Awesome-Looking Images for Your Website

Footer

Contact Matt

  • Email Me
  • Call Me: +61 2 8006 0622

Follow Matt

  • E-mail
  • Facebook
  • GitHub
  • LinkedIn
  • Twitter

Copyright © 1996-2023 Elated Communications. All rights reserved.
Affiliate Disclaimer | Privacy Policy | Terms of Use | Service T&C | Credits