Now you know how to create paths, we’ll take a look at how you can change your path after you’ve made it. This way you can alter the shape of your path and “fine-tune” those lines and curves until they’re just right!
Selecting paths
In this section we’ll take a look at ways to select your paths, or parts of your paths, for editing.
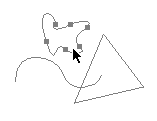
The Path Component Selection tool
This tool is designed for quickly selecting an entire path component. This is great when you want to move or resize a path component, for example.
The tool can be found under the black mouse pointer icon in the Tools palette:

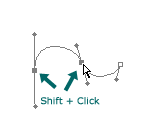
To select a component, just click anywhere in or on the component:
You can also Shift+click on more than one component, or click and drag a marquee, to select multiple components at the same time.
To deselect all components, click in an empty area of your document with the Path Component Selection tool, or press the Esc key.
The Direct Selection tool
You’ll find the Direct Selection tool under the Path Component Selection tool popup in the Tools palette (see above).
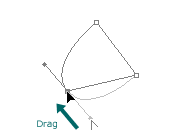
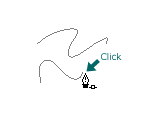
This tool lets you select individual path segments and anchor points for editing. To select a segment, click on the segment:
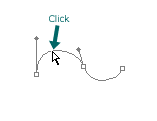
To select an anchor point, click on the point:
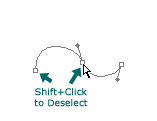
You can also Shift+click on more than one segment or point, or click and drag a marquee, to select many things at the same time.
To deselect all segments and points, click in an empty area of your document with the Direct Selection tool, or press the Esc key.
Some handy shortcuts
- You can temporarily activate the Path Component Selection tool when you’re using the Direct Selection tool by holding down the Control key (Windows) or Command key (Mac) while clicking with the mouse.
- You can also use the Direct Selection tool from all other drawing tools by holding down the Control key (Windows) or Command key (Mac) while clicking with the mouse. This is very useful for selecting and editing existing path components while you’re creating new components with the Pen tool.
- You can switch between the Path Component and Direct Selection tools by pressing Shift+A.
Now that you know how to select path components and segments, let’s look at how to alter them.
Altering path segments
Being able to accurately move and reshape path segments is the key to becoming a Pen tool expert! By knowing and understanding how the shape of path segments can be altered, you’ll be able to create any shaped path with a high level of precision. So pay careful attention! 🙂
To alter a path segment, you need to use the Direct Selection tool (described above). The easiest way to activate this tool while you’re drawing with the Pen tool is to hold down the Control key (Windows) or Command key (Mac).
Moving straight segments
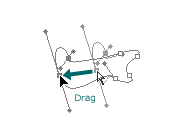
Straight segments are easy to move. Just click on the segment you want to move with the Direct Selection tool, and drag with the mouse:
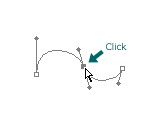
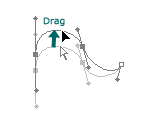
Moving curved segments
To move a curved segment, first click on the segment with the Direct Selection tool. You then need to Shift+click on both the segment’s anchor points to select them:
Once you have both anchor points selected, click on the curve and drag it to move it around:
Notice how you’re just changing the position of the curved segment here; you’re not altering its shape (although the shape of the neighbouring curve changes to keep up with the new curve’s position).
Reshaping curved segments
There are two ways to reshape a curved segment. The first technique just shrinks or stretches the curve, without reshaping the segments either side of it. The second technique involves altering the direction lines at an anchor point to change the shape of the segments on either side of the point.
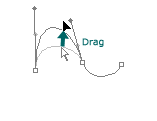
Technique 1. Shrinking and stretching
To shrink or stretch a segment, first click on the segment with the Direct Selection tool, then make sure that neither of its anchor points are selected, or that only one anchor point is selected (if both are selected then you will simply move the segment, as described above). You can deselect the anchor point(s) as necessary by Shift+clicking on them:
Then click on the curve and drag it to shrink or stretch it as required:
Technique 2. Altering the direction lines
By dragging the direction lines at an anchor point, you can change the shape of the curves on either side of the point. The best way to get the hang of this is just to practice!
To alter a direction line, click on the direction point at the end of the line with the Direct Selection tool, then drag it around:
Editing anchor points
As well as changing the curves and direction lines as shown above, you can also change the type of each anchor point in your path. This allows you to create any shape of path that you like!
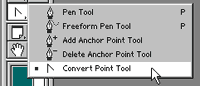
Most of the changes you’ll make to anchor points will be done with the Convert Point tool, available under the Pen Tool in the Tools Palette:
Converting from a corner point to a smooth point
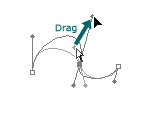
To turn a corner anchor point into a smooth anchor point, click on the point with the Convert Point tool, and drag away from the point to make the direction lines appear:
Converting from a smooth point to a corner point
There are 3 types of corner point you can create, allowing you to form different shapes of curves and lines.
Making a corner point without direction lines
To convert a smooth point to a corner point with no direction lines, simply click once with the Convert Point tool on the anchor point you wish to convert:
The direction lines will disappear, and you’ll be left with a corner point with two straight line segments on either side.
Making a corner point with direction lines
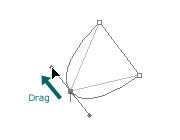
To turn a smooth point into a corner point with direction lines (in other words, to create a corner with curves rather than a corner with straight lines), click on either one of the direction points with the Convert Point tool, and drag the point around until you get the desired shape:
Notice that you have now “broken” the direction lines so that they work independently of each other, and the result is two curves that enter and leave the points at very different angles (a corner). Compare this to the original smooth point, where the direction lines moved together and were at 180 degrees to each other, and the curves moved smoothly through the point.
Making a corner point with only one direction line
It’s also possible to make a corner point with only one direction line. This will mean that the segment on the side of the point with the direction line will be a curve as it leaves the point, while the segment without the direction line will be a straight line as it leaves the point (though it may curve at the other end if it’s heading towards a smooth anchor point). Understanding this technique means you can easily switch from curves to straight lines and vice-versa at any anchor point. Very useful!
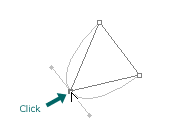
To make a corner point with one direction line, all you have to do is use the Convert Point tool to drag the unwanted direction point into the anchor point until it disappears. Click on the direction point you want to remove, and drag it until it’s on top of the anchor point:
Notice how the segment on one side of the point is now a straight line, while the other segment remains curved. Cool eh!
Dragging anchor points
You can of course drag anchor points around to reshape your paths. Use the Direct Selection tool to make sure that the point you want to move is selected (you can Shift+click to select multiple points, or to deselect points as required). Then just click on a point and drag!
Practice working with all these tools for editing path segments and anchor points, as these skills are the key to producing great paths.
Reopening and joining path components
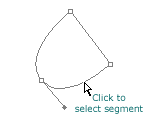
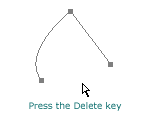
If you’ve closed a path component (by clicking on the first anchor point with the Pen tool to complete the loop), you can later re-open the path by using the Direct Selection tool to select one of the path segments (by clicking on it), then pressing the Delete key:
You can also join two separate path components together, provided they are both open. First, click on the end point of the first path, where you would like the join to start, with the Pen tool:
Then click on the end point of the second path, where you want the join to end. Your path components will then be joined into one continuous component:

Transforming and manipulating paths
You can use a lot of the same tools that you use for raster graphics on paths too, including:
- Cutting, copying and pasting
- Scaling
- Skewing, distortion and perspective
Just select the points, segments or components you want to manipulate, then apply the appropriate command. You’ll find all these manipulation commands under the Edit menu:
- Edit > Cut
- Edit > Copy
- Edit > Paste
- Edit > Free Transform
- Edit > Transform > Scale
- etc…
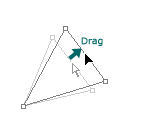
Remember, use the Direct Selection tool if you want to manipulate individual points or segments, and the Path Component Selection tool to select and manipulate entire path components.
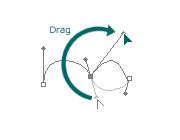
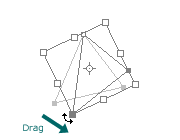
For example, here we’ve selected just the bottom two points of the triangle with the Direct Selection tool, and rotated them with Edit > Transform Points > Rotate:
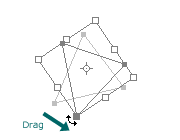
On the other hand, in this example we’ve selected the entire component with the Path Component Selection tool and rotated with Edit > Transform Path > Rotate:
Further reading
Now that you know how to create and edit paths, find out some of the handy things you can do with them!
Could you please explain the meaning of this :
“You can also use the Direct Selection tool from all other tools by holding down the Control key (Windows) or Command key (Mac) while clicking with the mouse. ”
I didnt get the meaning. Thanks.
Hi abhijit,
If you’re currently using another drawing tool (Pen, Freeform Pen, Path Selection, etc) then you can hold down Control/Command to use the Direct Selection tool temporarily.
It should really say “from all other drawing tools”! I’ll update the tutorial…
Without Photoshop can I Editing path, like: GIMP?
“Without Photoshop can I Editing path, like: GIMP?”
I have no idea what that sentence even means.