Once you’ve made your basic selection using one of Photoshop’s numerous selection tools, there are a lot of things you can do to play around with it. In this tutorial we’ll look at:
- feathering
- anti-aliasing
- adding and subtracting
- bordering
- smoothing
- expanding and contracting
Feathering
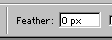
Many of the selection tools include a Feather option in the options bar:
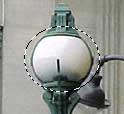
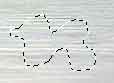
Feathering blurs the edges of the selection so that the selected area partially blends with the non-selected area:

To feather the selection, enter a value greater than zero in the Feather option before you create your selection. Alternatively, to feather a selection after it’s been created, use the Select > Feather… menu option.
Anti-aliasing
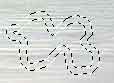
Anti-aliasing is the process of reducing the jagged “staircase effect” caused when a line or curve of pixels of one colour meets a line of pixels of another, contrasting colour. Anti-aliasing is achieved by averaging the colours of the edge pixels of a selection between the selected area’s colour and the background’s colour.
Note that, unlike feathering, only the edge pixels are changed. Anti-aliasing does not blur outwards from the edge like feathering does.
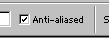
To use anti-aliasing when making a selection, check the Anti-aliased option before creating your selection:
Note that you must enable anti-aliasing before you draw your selection, as there is no way to add anti-aliasing afterwards!
Adding and subtracting
You can modify the shape of your selection by:
- Adding new areas to the selection
- Removing (subtracting) areas from the selection
- Creating intersections with the selection and a new area
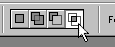
Adding
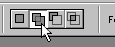
To add to an existing selection, hold down the Shift key while creating your new selection, or click on the Add to selection button:
Subtracting
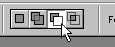
To subtract from an existing selection, hold down the Alt/Option key while creating your new selection, or click on the Subtract from selection button:
Intersecting
To intersect with an existing selection, hold down the Shift and Alt/Option keys while creating your new selection, or click on the Intersect with selection button:
Border
You can turn an existing selection into a border selection. A border selection selects just the edge of the original selection. To turn a selection into a border, pick the menu option Select > Modify > Border. In the “Width” box, enter how wide you would like the border to be (in pixels).
Smoothing
Smoothing rounds off the sharp edges of a selection by averaging the selected and non-selected pixels over a specified sample radius. This is great for creating smooth curvy selections, or for filling in bits that were missed out when using the Color Range tool.
To use smoothing, choose Select > Modify > Smooth. Enter a value for “Sample Radius” — the higher the value, the more pronounced will be the smoothing effect.


Expanding and contracting
You can change the size of your selection after you’ve created it. To make the selection bigger, choose Select > Modify > Expand and enter the number of pixels you’d like to expand the selection by.
Similarly, to make the selection smaller, choose Select > Modify > Contract and enter the number of pixels to contract the selection by.
Further reading
Of course, to be able to modify a selection, you first need to make a selection. The following tutorials take you through each of the main selection techniques in Photoshop:
Very knowledgeable, thanks