In this introductory tutorial, you’ll learn about Photoshop’s Paths feature. Paths are a powerful tool and a big topic to cover. They’re also quite tricky to get the hang of, but once you do, you’ll never look back!
Enjoy…
What are paths?
Paths are vector-based (line) drawings. This means that you can stretch and re-shape a path and it will not lose detail. Compare this with a standard raster image such as a photograph, which will become blocky when it’s stretched, and will lose detail when it’s reduced in size.
Paths are really useful. Once you’ve got the hang of using the Pen tool and the other path tools, you can create really complex freehand shapes such as symbols, drawings and icons. You can then turn these shapes into raster images at any resolution!
Paths are also great for selecting irregular objects. Because you can easily edit the shape of a path after it’s created, you can fine-tune it to exactly match an irregular border. Much better than messing about with the lasso tools!
Photoshop comes with a range of cool shapes that you can create, using the Shape tool. These shapes are also paths. However, once you learn how to use the path tools, you’ll be able to play with and modify these built-in shapes, as well as create your own shapes from scratch.
An example path
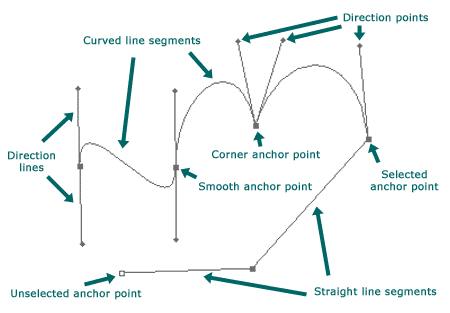
Here’s a typical path in Photoshop. Don’t be scared! 🙂

You’ll see that the path is composed of a number of line segments and anchor points. Line segments are the lines and curves that actually make up the path. Anchor points are movable points at the ends of the line segments that let you adjust the position and shape of the lines.
Types of line segments
There are two types of line segments:
- Straight line segments. These are the easiest to draw and understand. You’ll see that straight line segments do not have direction lines or direction points.
- Curved line segments. These are the tricky ones! The shape of each curve is controlled by the direction lines and direction points that you can see on the diagram above. More on these shortly.
Types of anchor points
Also, there are two types of anchor points:
- Smooth anchor points. When the curves on each side of an anchor point enter and leave the point at the same angle, you have a smooth anchor point. In other words, there is a smooth transition through the point from one curve to the next. You can see from the diagram that this type of point has two direction lines opposite each other (180 degrees apart).
- Corner anchor points. This type of point marks a sharp change of direction between one curve and the next. It is also used when connected to one or two straight lines. On the diagram, notice that the direction lines on the corner anchor points are not 180 degrees apart (or in the case of the straight line segments, that there are no direction lines at all).
About path components
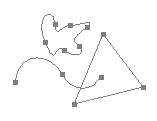
Let’s also take a quick look at path components. A path can consist of one or more path components. Each component is a series of segments and anchor points. Furthermore, each component is distinct and separate from all other components – that is, they don’t join up. Here’s an example of a path with 3 distinct path components:

Note that path components don’t have to be closed paths; they can have endpoints, like the wavy line above. Note also that although the wavy line and triangle overlap each other, they are not joined, so they are still separate path components.
Further reading
Now that you’ve learned the basics of paths, discover how to create them in the next tutorial, Drawing with Photoshop’s Pen tool.
Leave a Reply