What is a WYSIWYG HTML editor?
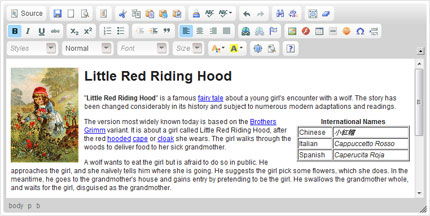
A WYSIWYG (What You See Is What You Get) HTML editor is a JavaScript-driven Web form field that lets users enter formatted text, much like using a word processor. The editor then converts this formatted text into HTML when the form is sent to the Web server. Here’s what a WYSIWYG HTML editor looks like:
Most WYSIWYG editors let you do at least the following:
- Add formatting such as bold, italic, and underlining
- Create headings (H1, H2 and so on)
- Create links
- Use different font faces, sizes, and colours
- Insert bulleted and numbered lists
- Create tables
- Left-align, right-align, centre, and justify text
- Embed images, Flash movies, and more
- Edit the HTML directly if desired
Many editors take things further, allowing you to upload images, Flash movies and other files to the Web server, and browse files on the server.
Advantages of a WYSIWYG editor
The nice thing about a WYSIWYG editor is that your site users don’t have to understand HTML in order to produce richly formatted content. This makes WYSIWYG editors great for content management systems, blogging systems, webmail applications, or any situation where you want people to be able to enter rich content via a Web form.
Even if you’re familiar with HTML, you’ll probably find it quicker to enter and format text using a WYSIWYG editor than hand-coding your HTML markup and CSS.
Disadvantages of a WYSIWYG editor
One problem with WYSIWYG HTML editors is that they tend to churn out poor-quality, bloated HTML, although recent editors have improved their HTML output considerably.
Another problem is that users of a content management system with a WYSIWYG editor can easily break the style conventions of a site by adding their own non-standard formatting (see Inline HTML editors ruin your brand). For example, the site’s style guide might stipulate that all headings should be green, but the user decides to create a red heading in the WYSIWYG editor. It’s hard to prevent this kind of problem using WYSIWYG HTML editors (although you can lock them down to a certain extent).
For a different way to enter and format content, see Textile and Markdown: 2 Nice Alternatives to WYSIWYG Editors.
The 2 popular editors: CKEditor and TinyMCE
Although there are many JavaScript WYSIWYG editors available today, the 2 most popular editors are CKEditor (formerly FCKeditor) and TinyMCE.
Both editors are free to use, and very feature-rich. Both are excellent choices, and there isn’t much to separate the two these days. The older FCKeditor was harder to work with and produced messier HTML than TinyMCE, but CKEditor is much better in these respects.
You can try out the live demos of CKEditor and TinyMCE and see which you prefer.
File management
Both CKEditor and TinyMCE have optional, paid plugins that allow you to upload files and manage files on the server:
- CKFinder for CKEditor
- MCFileManager and MCImageManager for TinyMCE
Alternatively, various free 3rd-party file manager/uploader plugins are available, including:
- KFM for CKEditor and TinyMCE
- Tinymce Ajax File Manager for CKEditor and TinyMCE
- TinyBrowser for TinyMCE
It’s also easy to write your own file manager plugin, assuming you’re comfortable with JavaScript and a server-side language such as PHP. Both editors make it very easy to integrate plugins. (Here’s a tutorial on writing your own CKEditor uploader in PHP.)
Installing the editors
Both editors are easy to install on your website. Essentially the steps are:
- Download and install the editor JavaScript code
- Create or edit a Web form that contains one or more
textareaelements - Add a small chunk of JavaScript to convert the
textareaelement(s) into WYSIWYG editor(s)
The next sections briefly explain how to install and use CKEditor and TinyMCE.
Installing CKEditor
Follow these steps to get CKEditor up and running, and embed a WYSIWYG editor in your form:
1. Download CKEditor
Download the CKEditor code from the download page, then extract the .zip or .tar.gz file to a ckeditor folder on your hard drive.
Now move the ckeditor folder into your website folder.
2. Include the CKEditor application code in your Web form
Open the HTML page or template containing the Web form that you want to use with CKEditor. This form should contain a textarea element.
In order to make your form work with CKEditor, you need to include the ckeditor.js file in the page containing the form. Add this line inside the page’s head element:
<script type="text/javascript" src="ckeditor.js"></script>
adjusting the path to your ckeditor.js file if required.
3. Convert your form’s textarea element into a CKEditor instance
The last step is to convert the textarea field into a CKEditor field. To do this, all you have to do is add a singe line of JavaScript to your form:
CKEDITOR.replace( 'fieldname' );
where fieldname is the name or ID of your textarea field.
This should be placed after your textarea field in the markup. Alternatively, you can place it in the head element, or as an onload event handler on the body element.
CKEditor Example
Here’s a complete example form showing how to integrate CKEditor. This is a simple article edit form for a fictional CMS. The CKEditor-related code is highlighted in bold:
<!DOCTYPE html PUBLIC "-//W3C//DTD XHTML 1.0 Transitional//EN" "http://www.w3.org/TR/xhtml1/DTD/xhtml1-transitional.dtd">
<html xmlns="http://www.w3.org/1999/xhtml">
<head>
<title>Edit Article</title>
<meta http-equiv="content-type" content="text/html; charset=utf-8"/>
<script type="text/javascript" src="ckeditor.js"></script>
</head>
<body>
<h1>Edit Article</h1>
<form action="form_handler.php" method="post">
<div>
<textarea cols="80" rows="10" id="content" name="content">
<h1>Article Title</h1>
<p>Here's some sample text</p>
</textarea>
<script type="text/javascript">
CKEDITOR.replace( 'articleContent' );
</script>
<input type="submit" value="Submit"/>
</div>
</form>
</body>
</html>
Here’s how the form looks:
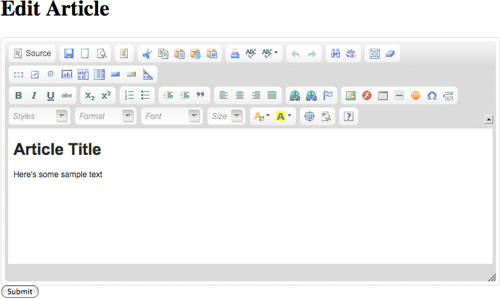
When the form is submitted in the above example, CKEditor converts the user-entered content into HTML and stores it in the articleContent field. This field is then sent to a server-side PHP script (form_handler.php) along with any other fields in the form. form_handler.php would then process the content as needed (probably storing it in a database).
When the user next wants to edit the article, the server-side script would retrieve the article content from the database and insert it between the <textarea> and </textarea> tags for editing. CKEditor will then display the content in WYSIWYG format so that the user can edit it.
Make sure your server-side script encodes HTML entities in the content inside the <textarea> / </textarea> tags. For example, < should be encoded as < and > should be encoded as >.
You can see that it’s very easy to get a basic CKEditor WYSIWYG field up and running. Next, you’ll probably want to configure the editor to add/remove options from the toolbar, alter the options in the Styles drop-down menu, tweak the HTML produced by the editor, and so on. Find out more on the CKSource documentation site.
Installing TinyMCE
Setting up TinyMCE is much like setting up CKEditor. The only difference is in the JavaScript that you add to your form. Here’s how to do it:
1. Download TinyMCE
Download the main TinyMCE package, then extract the .zip file to a tinymce folder on your hard drive.
Inside the tinymce folder you’ll find a jscripts folder containing a tiny_mce folder. Move this tiny_mce folder to your website folder.
2. Include the TinyMCE code in your Web form
To make your form work with TinyMCE, you include the tiny_mce.js file in the page containing the form. This file is inside the tiny_mce folder you moved into your website folder.
Add this line inside the page’s head element:
<script type="text/javascript" src="tiny_mce/tiny_mce.js"></script>
adjusting the path to your tiny_mce folder if required.
3. Convert your form’s textarea element into a TinyMCE instance
Finally, convert the textarea field into a TinyMCE field. To do this, add the following JavaScript to your form:
tinyMCE.init({
  theme : "advanced",
  theme_advanced_toolbar_location : "top",
  theme_advanced_toolbar_align : "left",
  mode : "exact",
  elements : "fieldname",
});
where fieldname is the name or ID of your textarea field.
The JavaScript above creates a TinyMCE editor using the “advanced” theme (all buttons enabled), and positions the toolbar top left. The "exact" mode tells TinyMCE to convert only the textarea elements specified in the elements argument.
You can place this code anywhere in your page body, or in the head element.
TinyMCE Example
Here’s the “article edit” form again, this time integrating TinyMCE. The TinyMCE-related code is highlighted in bold:
<!DOCTYPE html PUBLIC "-//W3C//DTD XHTML 1.0 Transitional//EN" "http://www.w3.org/TR/xhtml1/DTD/xhtml1-transitional.dtd">
<html xmlns="http://www.w3.org/1999/xhtml">
<head>
<title>Edit Article</title>
<meta http-equiv="content-type" content="text/html; charset=utf-8"/>
<script type="text/javascript" src="tiny_mce/tiny_mce.js"></script>
</head>
<body>
<h1>Edit Article</h1>
<form action="form_handler.php" method="post">
<div>
<textarea cols="80" rows="10" id="articleContent" name="articleContent">
<h1>Article Title</h1>
<p>Here's some sample text</p>
</textarea>
<script type="text/javascript">
tinyMCE.init({
theme : "advanced",
theme_advanced_toolbar_location : "top",
theme_advanced_toolbar_align : "left",
mode : "exact",
elements : "articleContent"
});
</script>
<input type="submit" value="Submit"/>
</div>
</form>
</body>
</html>
Here’s how the form looks:
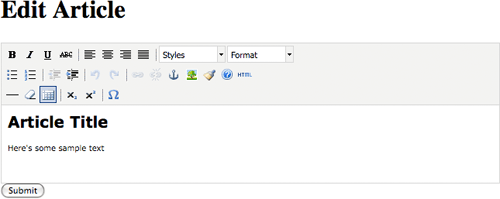
As with CKEditor, when the form is submitted the content is sent to the server as HTML.
TinyMCE is very flexible and easy to customize. Check out the list of configuration options, as well as the wide range of bundled plugins. For more info see the TinyMCE documentation.
Summary
In this article you looked at the concept of JavaScript WYSIWYG HTML editors, and learned about their advantages and drawbacks. You explored the 2 most popular editors available today — CKEditor and TinyMCE — and you learned how to integrate both editors with a simple Web form.
Have fun!
I have successfully added ckeditor to my Question Answers script at: http://www.aboutcivil.com/answers , Thanks to your nice tutorial.
The WYSIWIG editor now shows up instead of the text field but is not accepting the data. Like when i press submit button, it says “Your answer cannot be empty” , means its not taking the input and wont process it. Can u please help me on this issue??
@haseebjamal: I can’t see the WYSIWYG field in your page. Where’s your call to CKEDITOR.replace()?
Cheers,
Matt
@Matt
After you have registered, please click on any question, when the answer button shows up below the question, click it and then the ckeditor shows up, working fine but the form is not submitting.
Thanks for your time Matt
Excellent tutorial and dead easy to follow, I have very basic knowledge and managed to add tinymce in minutes – great work!! Thanks!
@matt2002: You’re welcome – thanks for the feedback 🙂
Thank You, Dead Easy To Follow, Thanks for being such a good teacher…
Hello Matt,
First of all thanks for your tut on CMS. I am trying to add ckeditor into textarea field of edit article page of CMS (downloaded by your site). But no changes is showing there.
I’ve added
to head tag and add CKEDITOR.replace( ‘content’ ); after the
tag.
Tell what is the problem. I know i am missing out something but dont know actually.
Help me!
@vny009: There is a discussion in the comments for the CMS tutorial about integrating CKEditor:
http://www.elated.com/forums/topic/5114/
Just search the page for “ckeditor”.
Hi,
This link – http://www.elated.com/forums/topic/5114/ isnt there. Can you provide the link if it has changed
https://www.elated.com/cms-in-an-afternoon-php-mysql/#comments
Thanks for your reply but I’ve no problem with CKeditor now.
I solved it already. Thanks again for your tutorials.
Can you make a tutorial for how to make a complete basic site by drupal.
I have searched many contents regarding it but not satisfied with that.
@vny009: Glad to hear it. Never used Drupal but I might have a go at some point – could be a fun project!
Dear Matt,
Thanks for another great article.
Can i print this article. kindly send me printable link if possible.
Thanks in advance.
 <script type="text/javascript">
tinyMCE.init({
  theme : "advanced",
  theme_advanced_toolbar_location : "top",
  theme_advanced_toolbar_align : "left",
  mode : "exact",
  elements : "content"
});
</script>
This little piece of code I placed at the top doesn’t allow my form’s content to be submitted to the database. When I removed it, the form’s content was submitted, how do I sort this out? Thanks a lot.
@papadammy: You’ll need to post the URL of your form so we can take a look.
Hi-Thanks for this nice tutorial (from wayback when-December 2009!).
I am looking at tinymce editor at the moment.
Currently I am echoing the editor content in form_handler.php with:
I really want to try & save the editor content to a file but this is proving difficult for me (see my post on StackOverflow here:
http://stackoverflow.com/questions/13660978/saving-tinymce-textarea-content-to-file/13662092#comment18751239_13662092
[Edited by Richard_Paul on 02-Dec-12 11:15]
http://www.tizag.com/phpT/filewrite.php
Hi–
I feel dumb asking this since it seems fairly fundamental and no one else has mentioned it so its most likely something I’m doing wrong… but:
——————————————————
<textarea cols=”80″ rows=”10″ id=”content” name=”content”>
<h1>Article Title</h1>
<p>Here’s some sample text</p>
</textarea>
<script type=”text/javascript”>
CKEDITOR.replace( ‘articleContent’ );
</script>
——————————————————
It’s a snippet of code from the CKEditor example that you’ve shown above. As you can see, the ID or Name of the textbox is “content” and if my understanding is correct, this is the ID or Name that needs to go into the CKEDITOR.replace call. In this case, “articleContent” is written there when it should be “content”? I’m kind of confused about this. Please help. Thank you.
what i haven’t been able to find during numerous searches on the web is how to add the code generated to a portion of my web page without the said web page changing the formatting
Change the class names and IDs of the CSS styles, so they are unique to the editor.
[Edited by chrishirst on 17-Jun-15 13:30]
ENG
It’s a good document.
Thank you so much…
TinyMCE is ok,
CKEditor is ok.
My question is: How can I include my site “Gutenberg” in my PHP site?
TR
Güzel bir döküman olmuş.
Çok teşekkürler…
TinyMCE tamam,
CKEditor tamam.
Sorum şu: PHP siteme ” Gutenberg ” nasıl dahil edebilirim?
Hmm, good question! Since Gutenberg is written in React/JS and uses the WordPress REST API, I’d imagine it’s theoretically possible to decouple it and use it on your own site. This has certainly been done with Drupal.
This is probably a good place to start.
Thank you! This Guide was very helpful.
No problem! Glad it helped 🙂
thank you, that helped me a lot !
You’re welcome 🙂
Matt, thanks for this invaluable article and your companion piece on lightweight markup languages. This is far more useful as a starting place than the ‘get started’ documentation on the TinyMCE site. In the light of developments since you published these, have you any new thoughts? In particular:
Has the quality of generated HTML improved significantly for either TinyMCE or CKEditor?
Are there any new entrants to the (free) WYSIWYG market that you’d recommend?
@Matt
Your tutorial is very impressive!
However, I’m confused when applying in Tinymce with cgi. I wonder how can I load a text file from server into . Could you point me to the direction 🙂
Thanks
I’ve been trying to add CKEditor to your “CMS In One Afternoon” script, but it’s not working. I can get CKEditor to show up, but it’s outside of the content textarea of your CMS script, and submitting anything creates nothing.
Can you explain how to integrate CKE into your script? FYI, the installation for CKE has change since you wrote these tutorials, so that’s definitely an issue.
Thanks in advance!
P.S. – I’m working on this in a local dev environment, so it’s not possible for you to have a look at what’s happening.
Hello,
Is somebody help me to make redirect link that can be edit
example: there is small box that you just paste the link then click save button and done.