Smart Objects are an often-overlooked, yet handy feature of Photoshop. Introduced in CS2, Smart Objects let you store all kinds of different image content within a single, layer-like object. A Smart Object can store:
- Any number of Photoshop layers, including bitmap, type, shape, adjustment, and fill layers
- Vector artwork created in Illustrator
- An imported image file, including JPEGs, TIFFs, Illustrator files, and even PSD files
In effect, a Smart Object is like having a separate Photoshop or Illustrator document encapsulated in a layer.
Smart Objects sit in the Layers panel just like regular layers. In fact, you can treat a Smart Object much like a bitmap layer — for example, you can move it, resize it, apply layer effects to it, and so on.
When you want to edit the Smart Object’s original content, you just double-click the Smart Object’s thumbnail to open the embedded “document”, make your changes to the document in a separate window, and save. The Smart Object then updates to reflect your edits.
In this tutorial, you’ll look at:
- The benefits of Smart Objects
- Creating Smart Objects
- Editing Smart Objects
- Duplicating Smart Objects
- Converting Smart Objects to regular layers
What can you do with Smart Objects?
Smart Objects give you a number of benefits:
- Transform bitmap images without losing quality. Whenever you scale, rotate, skew, or warp a Smart Object, Photoshop works with a fresh copy of the original content stored in the Smart Object. This means that you don’t progressively degrade the content as you apply additional transformations.
- Make global changes easily. You can create many duplicates of a Smart Object — for example, you might duplicate a logo Smart Object several times in a document. Then, when you change the contents of 1 Smart Object, all the others update automatically.
- Use Smart Filters. As of CS3, Smart Objects let you apply non-destructive, editable filters, called Smart Filters. (I’ll cover these in a later tutorial.)
Here’s a neat trick: Since Smart Objects are effectively embedded Photoshop documents, you can create additional Smart Objects inside a Smart Object, thereby nesting Smart Objects. This can be useful if, for example, you’re creating a complex logo that you might want to tweak globally later.
Creating a Smart Object
There are 3 ways to create a Smart Object:
- From 1 or more Photoshop layers
- From Illustrator artwork
- From an image file
Creating from layers
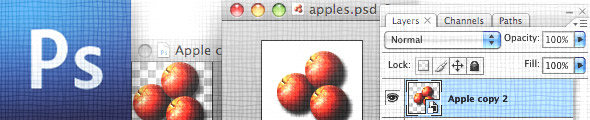
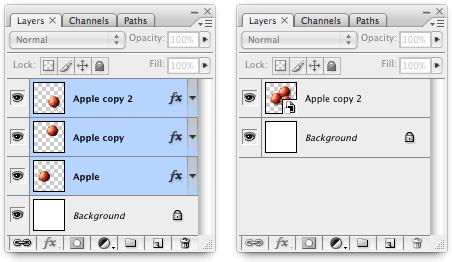
To create a Smart Object from 1 or more layers, first select the layer(s) you want to convert. Then do one of the following:
- Choose Layer > Smart Objects > Convert to Smart Object
- Choose Convert to Smart Object from the Layers panel menu
- Right-click the layer(s) and choose Convert to Smart Object
Once you’ve done that, your layer(s) will be replaced by a Smart Object containing those layers:
Creating from Illustrator artwork
Photoshop lets you import artwork from Illustrator and embed it in a Smart Object. This means you can manipulate the artwork in Photoshop, and still have the freedom to edit the original artwork in Illustrator if you wish.
Here’s how to create a Smart Object from Illustrator artwork:
- Set up Illustrator to copy and paste the artwork correctly. In Illustrator, choose Preferences > File Handling & Clipboard, then make sure the PDF and AICB (no transparency support) options are selected.
- Copy and paste the artwork. Open the Illustrator and Photoshop files. Select the artwork in Illustrator, then copy it (Edit > Copy). Now paste it into your Photoshop document (Edit > Paste). In the Paste dialog that appears, choose the Smart Object option.
- Position the artwork in the Photoshop document. You’ll see your artwork appear in Photoshop, overlaid with a blue cross. Drag the artwork to position it, or use the transform handles to scale, rotate, skew, or warp the artwork (much like using Edit > Free Transform). When you’re done, press Enter/Return to create the Smart Object.
You can also drag Illustrator layers or objects into Photoshop to create Smart Objects.
Creating from a file
Finally, you can create a Smart Object by importing an image file. Photoshop lets you import practically any type of image format, including PSD, JPEG, PNG, GIF, TIFF, PDF, EPS, and more.
There are 2 ways to create a Smart Object from an image file:
- Choose File > Open As Smart Object. This creates a new Photoshop document containing the opened image file as a Smart Object.
- Choose File > Place. This imports an image file as a new Smart Object in the currently-open Photoshop document. When you import an image this way, you’ll get a chance to reposition and transform the object, as described in “Creating from Illustrator artwork” above.
When you import an image file as a Smart Object, a copy of the image file is embedded in the Smart Object. The original image file is untouched.
Editing a Smart Object
Once you’ve created your Smart Object, you can treat it much like a regular layer. For example, you can:
- Rename it or reorder it
- Change its Opacity and Fill settings
- Transform it using the commands under Edit > Transform
- Apply layer effects to it
When you transform a Smart Object, you’re working on a fresh copy of the original Smart Object data. This means you can transform a Smart Object as many times as you like without degrading the image further each time. Very handy!
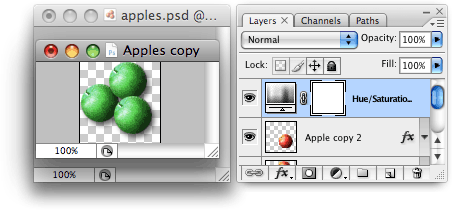
As well as editing the Smart Object as a layer, you can, at any time, edit the Smart Object’s actual contents. To do this, do one of the following:
- Double-click the Smart Object’s thumbnail in the Layers panel
- Right-click the Smart Object in the Layers panel and choose Edit Contents
- Select the Smart Object in the Layers panel and choose Layer > Smart Objects > Edit Contents (or choose Edit Contents from the Layers panel menu)
When you do this, Photoshop opens your Smart Object’s contents in a separate Photoshop document, ready for editing. (If the contents are Illustrator artwork then Photoshop opens the artwork in Illustrator instead.) Make your changes in the document, then save and close the document. Photoshop then updates the Smart Object to reflect your edits:

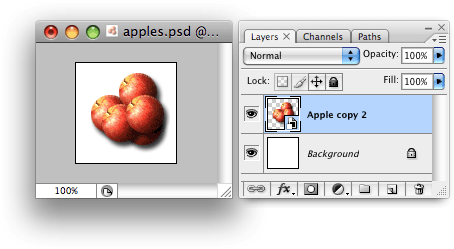
When you edit a Smart Object, Photoshop saves the Smart Object’s contents as a temporary file and opens the file for editing. You then make your edits to this file. When you save the file and close it, Photoshop copies the contents of the file back into the Smart Object, then deletes the temporary file.
You delete a Smart Object in the same way as a regular layer — for example, you can drag it to the Layers panel’s trash icon, or right-click it and choose Delete Layer. As you’d expect, deleting a Smart Object also deletes its contents.
Duplicating a Smart Object
You can duplicate a Smart Object just like you duplicate a layer. For example, you can do any of the following:
- Drag the Smart Object in the Layers panel down to the New Layer icon at the bottom of the panel.
- Select the Smart Object, then choose Layer > Duplicate Layer (or choose Duplicate Layer from the Layers panel menu).
- Right-click the Smart Object and choose Duplicate Layer.
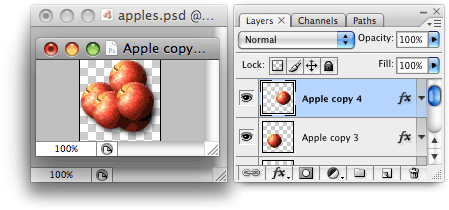
Unlike regular layers, however, the duplicate Smart Object is linked to the original. This means that if you change the contents of one Smart Object, the other Smart Object also changes:
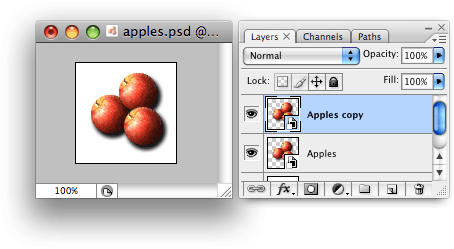
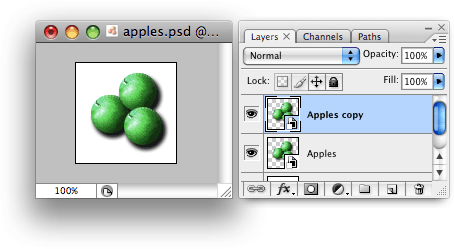
Only the contents of the Smart Objects are linked. You can still change other properties of each Smart Object — such as opacity, blend mode, and layer effects — independently.
What if you don’t want the duplicate Smart Objects to be linked? To create an independent duplicate, select the Smart Object and choose Layer > Smart Objects > New Smart Object via Copy. Alternatively, right-click the Smart Object in the Layers panel and choose New Smart Object via Copy.
Also, if you copy a Smart Object by dragging it into another document, the 2 Smart Objects remain independent.
Converting a Smart Object to a regular layer
Useful though Smart Objects are, they can take up a lot of RAM and hard drive space — particularly if they contain many high-res layers. Furthermore, there are some operations — such as the Distort and Perspective transforms — that you can’t use with Smart Objects.
For these reasons, you’ll sometimes want to convert a Smart Object into a regular bitmap layer. You can do this in any of the following ways:
- Select the Smart Object, then choose Layer > Smart Objects > Rasterize.
- Select the Smart Object, then choose Layer > Rasterize > Smart Object.
- Right-click the Smart Object in the Layers panel and choose Rasterize Layer.
This turns any vector layers and layer effects in the Smart Object into bitmap layers, then flattens all the Smart Object’s layers into a single bitmap layer, discarding the original contents of the Smart Object.
If you’ve applied any Smart Filters to your Smart Object, these filters are permanently applied to the Smart Object when you convert it to a regular layer.
Summary
In this tutorial, you’ve seen how to use Photoshop’s Smart Objects to create and edit complex content easily. You’ve learned:
- Why Smart Objects are useful
- How to create, edit and delete Smart Objects
- How to duplicate Smart Objects, and how to create both linked and independent copies
- How to rasterize a Smart Object to save space
I hope you enjoyed reading this tutorial. Happy Photoshopping!
Leave a Reply