A database is an essential part of most websites and blogs, but setting up and using a database can be a daunting task for the beginner web developer.
In this tutorial you’ll learn — in simple terms — how to install, set up, and use a MySQL database on your computer. This will give you a good grounding in MySQL that you’ll find useful when you start developing database-driven websites using PHP, Ruby, or your language of choice.
You’ll explore the following areas in this tutorial:
- The concept of a database, and why databases are useful
- The advantages of using MySQL to manage your databases
- How to install MySQL on your computer
- Using the MySQL Monitor program to send commands to your MySQL server
- How to create a database and table
- SQL (Structured Query Language), and what it’s used for
- Adding records to a table, and retrieving records from a table
Ready to start exploring MySQL? Let’s go!
What is a database?
A database is a structured collection of data. Here are some typical examples of databases:
- An online store database that stores products, customer details and orders
- A database for a web forum that stores members, forums, topics and posts
- A database for a blog system, such as WordPress, that stores users, blog posts, categories, tags, and comments
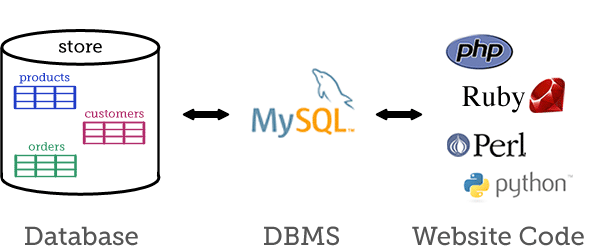
The software that manages databases is known as a database management system, or DBMS. MySQL is an example of a DBMS. Rather confusingly, DBMSs are often called databases too. Strictly speaking though, the database is the data itself, while the DBMS is the software that works with the database.
There are many different ways to organize data in a database, known as database models. One of the most popular is the relational model, which is what MySQL uses (along with PostgreSQL, Oracle, Microsoft SQL Server, and other common systems). Consequently, MySQL is known as a relational database management system, or RDBMS.
The following diagram shows how a database, the DBMS, and your website’s code interact with each other.
Why use a database?
If you haven’t used a database for your website before, you may have stored data in text files such as comma-separated value (CSV) files. Here’s an example of a CSV file:
username,password,emailAddress,firstName,lastName
"johnsmith","brickwall53","[email protected]","John","Smith"
"maryjones","garden37","[email protected]","Mary","Jones"
While this technique is fine for simple data structures and small amounts of data, you quickly run into problems as your site grows. Searching and updating a very large text file is slow and prone to corruption. What’s more, things start to get messy when you want to link records together, such as linking a customer record to the orders that the customer has made, and then linking each order record to the products that are in the order.
Relational databases are designed to take care of all these problems. Here are some reasons to use a database instead of text files:
- They’re fast. Databases use indexes, or keys, to find records of data extremely quickly. For example, once you add a key to an
emailAddressfield for member records in a database, you can retrieve a member record based on the member’s email address almost instantly, no matter how many millions of members you may have in your database. - They’re reliable. A DBMS ensures that the data in the database is read and written reliably, without corrupting the data. Many DBMSs allow you to use techniques like locking and transactions to ensure that records are inserted and updated in a predictable way.
- They let you link records together. Relational databases let you store different types of data in groups known as tables. You can then link data together across tables. For example, you can create a
customerstable and anorderstable, then link a customer record to all the order records associated with the customer. The ability to link records across tables lets you create complex databases with lots of different types of related data.
Why use MySQL?
You now know why databases are useful, and how they can help you build complex websites and web apps. But why use MySQL in particular?
There are many great DBMSs out there, including MySQL, PostgreSQL, SQLite, Oracle, and SQL Server, and all of them can be used for most web development purposes.
That said, MySQL does have a few advantages for web developers compared to some other systems:
- It’s open source, which means it’s free for anyone to use and modify.
- It’s widely available. MySQL can be installed on many different platforms, and it usually comes standard with most web hosting setups.
- It’s easy to use. Setting up and working with MySQL databases is relatively straightforward.
- It works well with PHP. As of version 5.3, PHP has a native MySQL driver that is tightly coupled with the PHP engine, making it a good choice for PHP coders.
Each DBMS has its own strengths and weaknesses. For example, PostgreSQL is also open source, is very stable, and has a great community behind it. SQLite is extremely fast and self-contained (and is also free), while Oracle and SQL Server have a lot of enterprise-level features that make it a good choice for large organizations.
Installing MySQL
As I mentioned above, most web hosting accounts come with MySQL pre-installed. However, if you’re developing websites using MySQL, you also want to have the MySQL server running on your own computer, so that you can create and test your databases and code without needing to upload files to your live server all the time.
There are two main components to MySQL:
- The MySQL database server,
mysqld. This is the MySQL DBMS that does the actual work of managing your databases. It runs all the time in the background, accepting connections from client programs, web scripts and so on. - Various client and utility programs. These include
mysql, the command-line MySQL Monitor client that you’ll use later in the tutorial to issue commands to the server. You’ll also find programs likemysqladminfor administering MySQL databases, andmysqldumpfor exporting and backing up databases.
In addition, many MySQL installs include documentation, header files for developers, and the MySQL test suite.
There are many ways to install the MySQL server and associated programs. Here are three ways you can do it:
- Using an official MySQL installation package. There are prebuilt packages available for many different operating systems, including Windows, Mac OS X and Linux. The basic procedure is to download the package file, extract it, and run the installer. See the documentation for the exact steps.
- Using a Linux package manager. Many Linux distros come with a package manager — for example, Ubuntu includes the Ubuntu Software Centre — that makes it easy to install MySQL, along with PHP, Apache and other web development software. See your distro’s documentation for details.
- Installing an entire LAMP/WAMP/MAMP package. This is arguably the easiest way to install a complete MySQL-based development setup on your computer. These packages contain all you need to start building database-driven sites, including the Apache web server, MySQL, and PHP/Perl, hence the acronym “AMP”. (The L, W and M stand for Linux, Windows and Mac OS X respectively.) Since everything’s installed in one go, you’ll find that Apache, MySQL and PHP/Perl all play nicely together, with little or no further configuration required.
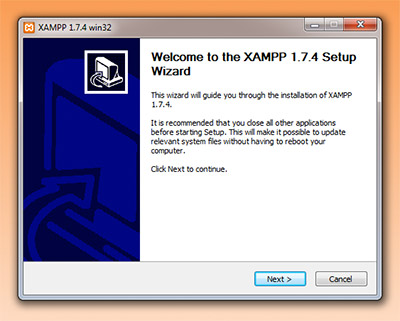
If you want to get up and running as quickly and easily as possible, I’d personally recommend downloading and installing XAMPP. This LAMP/WAMP/MAMP package is available for Linux, Windows, Mac OS X and Solaris, and automatically installs and sets up Apache, MySQL, PHP and Perl on your computer. What’s more, it’s easy to uninstall everything later if you want to.
To install XAMPP:
- Visit the XAMPP homepage and click the link for your operating system (Linux, Windows, Mac OS X or Solaris).
- Follow the steps on the page to download, install, start, and test the XAMPP system on your computer.
Other popular packages similar to XAMPP include WampServer and EasyPHP for Windows, and MAMP for Mac OS X.
Issuing commands to MySQL
Assuming you’ve now installed and started your MySQL server using one of the above techniques, how do you interact with the server? When you installed the MySQL server, you also installed mysql, the MySQL Monitor. This is a command-line client program that you can use to connect to the server and issue commands.
So let’s try firing up the MySQL Monitor and see what it can do. Follow these two steps:
- Open a terminal window:
-
- Windows 7: Click the Windows logo, then choose All Programs > Accessories > Command Prompt.
- Mac OS X: Open a Finder window, then choose Applications > Utilities > Terminal.
- Ubuntu: Choose Applications > Accessories > Terminal, or if you’re using the Unity desktop, click the Ubuntu logo and type terminal. (More info)
-
- Run the
mysqlprogram in the terminal window:-
- Windows 7: Assuming you installed XAMPP, type cd c:xamppmysqlbin and press Enter, then type mysql -u root and press Enter.
- Mac OS X and Ubuntu: Just type mysql -u root and press Enter.
The
-u rootparameter tells the MySQL Monitor to connect to the MySQL server using the root user, which is always available with MySQL. By default, MySQL’s root user doesn’t need a password. This is OK for a development setup on your computer, but a terrible idea for a live server! If you’re installing MySQL on a live server, make sure you secure it properly. XAMPP also comes with some security scripts that can automatically make your XAMPP installation more secure. -
Once the MySQL Monitor runs, you’ll see something like this in your terminal window:
Welcome to the MySQL monitor.  Commands end with ; or g.
Your MySQL connection id is 3893
Server version: 5.5.8 Source distribution

Type 'help;' or 'h' for help. Type 'c' to clear the current input statement.

mysql> _
The last line, mysql>, is the MySQL prompt. This is where you type your commands to send to the MySQL server.
Let’s try out a couple of commands. Type the following at the mysql> prompt, then press Enter:
select now();
This tells MySQL to get the current date and time and display it. You’ll see something like this appear:
+---------------------+
| now()               |
+---------------------+
| 2011-08-24 11:36:40 |
+---------------------+
1 row in set (0.00 sec)
Now try another command:
show databases;
This command lists all the MySQL databases on your computer. Since you’ve just installed MySQL, there will just be a few default databases, similar to the following:
+--------------------+
| Database           |
+--------------------+
| information_schema |
| mysql              |
| performance_schema |
| test               |
+--------------------+
4 rows in set (0.00 sec)
Now that you know how to send commands to your MySQL server, you’re ready to create your own database and start adding data to it. You’ll do this in the following sections.
When you’re finished with the MySQL Monitor, you can quit it by typing exit at the prompt and pressing Enter.
If you’re not comfortable with the command line, there are other ways to administer MySQL and issue commands. MySQL Workbench is a free graphical app that can connect to any MySQL server and administer it. There’s also the web-based phpMyAdmin, which is included in many LAMP/WAMP/MAMP packages.
Creating a database
Let’s create a simple database for an imaginary book store. At your mysql> prompt, type the following and press Enter:
create database bookstore;
If all goes well, you’ll see something like this:
Query OK, 1 row affected (0.05 sec)
MySQL has now created your database. You can check this by typing show databases again:
mysql> show databases;
+--------------------+
| Database           |
+--------------------+
| information_schema |
| bookstore         |
| mysql              |
| performance_schema |
| test               |
+--------------------+
4 rows in set (0.00 sec)
Congratulations — you’ve just created your first MySQL database!
Some SQL basics
All of the commands you’ve issued so far — select now(), show databases, and create database bookstore — are SQL statements. SQL, or Structured Query Language, is the language you use to communicate with most DBMSs, including MySQL. Using SQL, you can create and delete databases and tables; insert new data into tables; update data; delete data; and retrieve data.
Statements that retrieve data from a database are also commonly called queries, hence the name “Structured Query Language”.
You’ll use SQL in the rest of this tutorial as you create a table in your new database, add a record, and retrieve a record.
Creating a simple table

As with all relational databases, MySQL organizes its data in tables. A table holds one or more records of related data, in a similar way to an associative array in JavaScript or PHP. A table consists of:
- One or more fields. Each field holds a specific type of information. For example, in a
bookstable, you might have one field for the book title, another field for the book’s author, and so on. - One or more records. A record is a set of field values that stores all the information about a particular entity in the table. In a
bookstable, a record would store all the field values for a specific book.
The easiest way to understand fields and records is to see how they look when laid out in a table. Let’s set up a books table to hold books in our book store:
id |
title |
author |
price |
|---|---|---|---|
1 |
The Grapes of Wrath |
John Steinbeck |
12.99 |
2 |
Nineteen Eighty-Four |
George Orwell |
8.99 |
3 |
The Wind-Up Bird Chronicle |
Haruki Murakami |
7.99 |
The top row of the table holds the field names: id, title, author, and price. The next three rows are the three book records in our table. Each record has its own field values: for example, the first record’s title field contains “The Grapes of Wrath”, while the second record’s title field contains “Nineteen Eighty-Four”.
Since a single column in a table holds all the different record values for a specific field, fields are also commonly known as columns. Similarly, the records in a table are commonly called rows.
So how do you actually create this table in MySQL? To do this, you need to create a schema for the table. This is a text file containing a series of SQL statements that create the table and define the table’s fields.
Here’s the schema — save it as a file called books.sql somewhere on your computer:
USE bookstore;

DROP TABLE IF EXISTS books;
CREATE TABLE books
(
  id              int unsigned NOT NULL auto_increment, # Unique ID for the record
  title           varchar(255) NOT NULL,                # Full title of the book
  author          varchar(255) NOT NULL,                # The author of the book
  price           decimal(10,2) NOT NULL,               # The price of the book

  PRIMARY KEY     (id)
);
Let’s take a look at the SQL statements in this file and see what they do:
USE bookstore
This tells MySQL to switch to thebookstoredatabase that you created earlier. MySQL will then carry out all further operations on this database.DROP TABLE IF EXISTS books
This deletes any previousbookstable from the database, since you can’t redefine a table if it already exists.Be careful when using
DROP TABLE. When you delete a table like this, any data in the table is gone forever!CREATE TABLE books ( ... )
This statement creates a new table calledbooks. The stuff in between the parentheses defines the table’s fields and its primary key, as we’ll see next.id int unsigned NOT NULL auto_increment
The first field we define isid. This is a special type of field that assigns a unique numeric ID to each book record in the table. Most of the time, you’ll want your table to have a unique field of some sort, so that you can easily identify a particular record. We give the field anint unsignedtype, which can hold large, positive integer numbers. We also add theauto_incrementattribute to the field — now, whenever we add a new record to the table, MySQL will automatically assign a new, unique value to the record’sidfield (starting with 1).The
NOT NULLconstraint prevents the field containingNULLvalues. In MySQL,NULLis a special type of value that can be useful in some situations. However, it can also be quite confusing for beginners, so we won’t use them in this tutorial.title varchar(255) NOT NULL
Next we define the field to hold each book’s title. We give it avarchar(255)type, which means it can hold a text string up to 255 characters long.author varchar(255) NOT NULL
The next field is the book’s author. As with thetitlefield, we give it thevarchar(255)type.price decimal(10,2) NOT NULL
The last field is the book’s price. We give this field adecimal(10,2)type, which means that the field can hold a 10-digit decimal number, with 2 of the digits sitting to the right of the decimal point.PRIMARY KEY (id)
Finally, we create a primary key based on the table’sidfield. A primary key uniquely identifies records in the table; a table can have only one primary key. MySQL also creates an index using the primary key — this lets you retrieve a book record extremely quickly by referencing itsidfield, even if the table contains millions of rows.
Now that we’ve created our schema statements, we need to run them through MySQL to create the actual table. To do this, switch back to the MySQL Monitor and type the following command at the mysql> prompt:
source /path/to/books.sql
…where /path/to/books.sql is the full path to your books.sql file. (If you ran mysql in the same folder as your books.sql file then you can just type source books.sql.)
You should see the following output in MySQL Monitor:
Database changed
Query OK, 0 rows affected, 1 warning (0.00 sec)

Query OK, 0 rows affected (0.10 sec)
To check that your books table was created, you can type show tables:
mysql> show tables;
+---------------------+
| Tables_in_bookstore |
+---------------------+
| books               |
+---------------------+
1 row in set (0.00 sec)
You can even inspect the table schema to make sure it’s correct. To do this, use the explain command, like this:
mysql> explain books;
+--------+------------------+------+-----+---------+----------------+
| Field  | Type             | Null | Key | Default | Extra          |
+--------+------------------+------+-----+---------+----------------+
| id     | int(10) unsigned | NO   | PRI | NULL    | auto_increment |
| title  | varchar(255)     | NO   |     | NULL    |                |
| author | varchar(255)     | NO   |     | NULL    |                |
| price  | decimal(10,2)    | NO   |     | NULL    |                |
+--------+------------------+------+-----+---------+----------------+
4 rows in set (0.00 sec)
Adding records
You’ve now created a database called bookstore, and added a books table to it. Let’s try adding a record to the books table.
To add a record to a table, you use the SQL INSERT statement, passing in the record’s field names and values. Type the following line in the MySQL Monitor to insert a book record into your table:
INSERT INTO books ( title, author, price )
  VALUES ( "The Grapes of Wrath", "John Steinbeck", 12.99 );
You should see the following output, indicating that MySQL has added the row to the table:
Query OK, 1 row affected (0.06 sec)
As you can see, we’ve used an INSERT statement to add the book “The Grapes of Wrath” to the table. We specified INTO books to tell MySQL which table to insert the record into, then listed the field names that we want to supply values for in parentheses, followed by the keyword VALUES, followed by the field values in the same order as the field names, again in parentheses.
Notice that we haven’t specified a value for the id field. Since it’s an auto_increment field, MySQL generates the field value automatically.
Let’s add another couple of books to the table:
mysql> INSERT INTO books ( title, author, price )
  VALUES ( "Nineteen Eighty-Four", "George Orwell", 8.99 ),
         ( "The Wind-Up Bird Chronicle", "Haruki Murakami", 7.99 );
Query OK, 2 rows affected (0.00 sec)
Records: 2  Duplicates: 0  Warnings: 0
As you can see, you can insert multiple rows at once by supplying multiple sets of field values, enclosed in parentheses and separated by commas.
Retrieving records
Now that we’ve added some records to the table, how can we retrieve them? This is where SQL queries come in. The SQL SELECT statement lets you retrieve one or more records from a table — or even multiple tables at once — based on criteria that you supply. The basic syntax is:
SELECT fieldNames FROM tableName [WHERE criteria]
There’s a lot more to the SELECT statement than this, but we’ll keep things simple in this tutorial!
Let’s try a basic SELECT query on our books table using the MySQL Monitor:
mysql> SELECT * FROM books;
+----+----------------------------+-----------------+-------+
| id | title                      | author          | price |
+----+----------------------------+-----------------+-------+
|  1 | The Grapes of Wrath        | John Steinbeck  | 12.99 |
|  2 | Nineteen Eighty-Four       | George Orwell   |  8.99 |
|  3 | The Wind-Up Bird Chronicle | Haruki Murakami |  7.99 |
+----+----------------------------+-----------------+-------+
3 rows in set (0.00 sec)
This SELECT query retrieves all fields (*) from the books table. Since we haven’t supplied any additional criteria, the query retrieves all the records in the table, and displays the field values in the MySQL monitor.
As you can see, MySQL has auto-generated the values for the id field, beginning with 1.
What if we want to retrieve just one record from the table, such as the book “Nineteen Eighty-Four”? To narrow down the selection, we can add a WHERE clause, like this:
mysql> SELECT * FROM books WHERE id = 2;
+----+----------------------+---------------+-------+
| id | title                | author        | price |
+----+----------------------+---------------+-------+
|  2 | Nineteen Eighty-Four | George Orwell |  8.99 |
+----+----------------------+---------------+-------+
1 row in set (0.00 sec)
As well as selecting by the id field, we can select by any other field we like:
mysql> SELECT * FROM books WHERE title = "Nineteen Eighty-Four";
+----+----------------------+---------------+-------+
| id | title                | author        | price |
+----+----------------------+---------------+-------+
|  2 | Nineteen Eighty-Four | George Orwell |  8.99 |
+----+----------------------+---------------+-------+
1 row in set (0.01 sec)
We can also use other operators, such as < (less than), > (greater than), and the boolean AND operator, to retrieve a range of records:
mysql> SELECT * FROM books WHERE price < 10 AND price > 5;
+----+----------------------------+-----------------+-------+
| id | title                      | author          | price |
+----+----------------------------+-----------------+-------+
|  2 | Nineteen Eighty-Four       | George Orwell   |  8.99 |
|  3 | The Wind-Up Bird Chronicle | Haruki Murakami |  7.99 |
+----+----------------------------+-----------------+-------+
2 rows in set (0.00 sec)
Finally, instead of retrieving all fields using *, we can specify just the field or fields we want to retrieve. Here’s an example:
mysql> SELECT title, author FROM books;
+----------------------------+-----------------+
| title                      | author          |
+----------------------------+-----------------+
| The Grapes of Wrath        | John Steinbeck  |
| Nineteen Eighty-Four       | George Orwell   |
| The Wind-Up Bird Chronicle | Haruki Murakami |
+----------------------------+-----------------+
3 rows in set (0.00 sec)
As you can see, SELECT queries make it easy to retrieve just the records and fields you want from your table.
Summary
This tutorial has introduced you to databases in general, and MySQL in particular. You’ve covered the following topics:
- The concept of a database, which lets you easily store large amounts of structured data for your websites and web apps.
- Why databases are a good idea compared to, say, flat text files of data.
- Some reasons to choose MySQL for your DBMS.
- How to install MySQL in three different ways: installing the official packages, using a Linux package manager, and installing a LAMP/WAMP/MAMP package such as XAMPP.
- How to use the MySQL Monitor program,
mysql, to connect to your MySQL server and issue commands. - How to create databases with the
CREATE DATABASEcommand. - How to create tables with the
CREATE TABLEcommand. - A few MySQL data types, including
int,varchar, anddecimal. - The concepts of
NULLvalues, auto-increment fields, unique fields, and primary keys. - Adding records to a table using the
INSERTstatement, and - Retrieving records from a table with the
SELECTstatement.
MySQL databases are a big topic, and there are lot more important areas to explore, including updating and deleting records; table relationships; normalization; joining tables; and grouping results. However, I hope you’ve found this article useful as a general introduction to MySQL.
If you want to learn more, the MySQL manual has a decent tutorial section, including more details on using the MySQL Monitor, creating databases, and adding tables and data. It also includes some common queries that you can take and adapt for your own uses. You might also like to read my article Build a CMS in an Afternoon with PHP and MySQL to learn how to use PHP and MySQL together in practice.
Have fun!
[Photo credit: koalazymonkey]
Nice tutorial. Thanks.
Nice article. What type of exercises would you recommend for learning MySQL and SQL?
Thanks for the positive feedback guys 🙂
@Raven: Good question! In my PHP book ( http://www.amazon.com/Beginning-PHP-5-3-Matt-Doyle/dp/0470413964 ) I give a fairly simple membership site example, with a Members table and an AccessLog table. I always find it helps to build a practical example – for example, a music database with artists, albums and tracks, or a shopping list manager with ingredients and recipes. Anything that involves real-world things, and uses a couple of tables that you join together, will give you a good grounding in SQL queries.
Thanks Matt, I really like the examples you gave me. For the longest I’ve been coding HTML and CSS, and tampering with PHP. But I’ve yet to actually dig in and build an application or component, this is just the inspiration I needed!
@Raven: You’re welcome, and good luck! 🙂
ok I set up the database and tried the set table command: source books.sql and I get an error: failed to open books.sql error 2
Books.sql being a notepad file where I copied the code in the tutorial and saved as a file in xampp/mysql/book.txt changing the .txt extension to .sql. What am I not doing right?
@jacknet: Make sure you’re running the mysql command from the folder that contains your books.sql file. Also make sure it’s called books.sql not book.sql.
@matt: Yes it’s in the folder/path c:xamppmysqlbooks.sql. I’m sorry but I misspelled it in my email but it’s correct in the folder. I type: mysql> source /books.sql And still get the error. Can’t figure it out.
This tutorial doesn’t work and when you try to get help everyone ignores you.
@jacknet: I was about to help you some more, but then I saw your latest comment and it kinda put me off. 🙁
But I’ll just add that you don’t want that slash (/) before books.sql.
Matt – I apologize for my remark yesterday. I’m just frustrated because I followed your tutorial to the letter (more than once) and just couldn’t get it to work, and still can’t. I saw you answering other folks and felt ignored even after I sent an email. But again I apologize and know in life that you don’t start a relationship with remarks like that and it was totally inappropriate for me to say what I did and expect further help. I really want to learn this. I have a great opportunity to join a marketing firm if I can prove I can do this stuff. I programmed in RPG several years ago and got out of computers, as a business, for awhile, then got back in about a year ago as a hardware/network tech for the local Boys and Girls Club. Now I work at the local library doing the same but miss programming and want to get back into it. So if you can forgive me and start over I’d like to learn your book. Thanks for your consideration.
Jack
@jacknet: No problem – just bear in mind that I’m often busy doing other things and don’t always have the time to check the forums every few hours. I do my best to offer my help for free on these forums and mostly answer every question, but it’s difficult when you have other commitments. 🙂
I usually answer all posts in the order they were posted, so if you see me answering other posts first then it’s usually because they were posted before yours.
Now, with your MySQL problem, I can see that you’ve put your books.sql file in the wrong directory:
c:xamppmysqlbooks.sql
It should be in the same directory as your mysql binary:
c:xamppmysqlbinbooks.sql
Alternatively, simply provide the full path to your books.sql file:
source c:/path/to/books.sql
Does that fix your problem?
Many thanks Matt, great tutorial. I have been looking into getting started with some MySQL and PHP, but didn’t know where to start. Managed to get Beginning PHP 5.3 book, it’s a great start to learning the basics and enjoying it so far.
@Matt: Well….I know you are going to think I’m crazy or my ‘puter is. I tried every path possible from the Mysql prompt. I put the books.sql file in bin like you suggested which means I should be able to just type mysql> source books.sql and get the table to set up but all I get still is: Failed to open file ‘books.sql’ error: 2. I try every combination of commands you suggested in your tutorial and your forum message to me above. It just won’t work. I have the file in the c:xamppmysql folder and the c:xamppmysqlbin folder. I don’t know if you can suggest anything else. I know it’s probably frustrating for you as it is for me. Thanks, Jack
@matt: Conversely when I just run the commands: mysql> USE bookstore; That works. When I run: mysql> DROP TABLE IF EXISTS books; I got: Query OK, 0 rows affected, 1 warning <0.00 sec>. So I thought I’d setup the table with the CREATE TABLE books; command and when I entered the long string you have in the file book.sql it doesn’t work so I’m probably leaveing one little thing out or it’s different at the command line than in the file. I’m also setting this all up in another box running ubuntu so maybe I’ll have better luck there. Comments?
Well Matt – You’re gonna love this. I’m over on my linux box now and get the same results. Created the source file books.sql and put it in my c:HomeusernameDocumentsbooks.sql folder because I can’t find the bin folder in Mysql. So I ran the command mysql> source c:homejacknetDocumentsbooks.sql; and same results as before. So I must be doing something wrong on both computers. Just wish I could figure our what that something is. Peace…
@jacknet: You can’t use a path like c:homejacknetDocumentsbooks.sql on a Linux box. Unix has no concept of a drive letter. Also the Unix path separator is ‘/’ not ”.
The error you’re getting (assuming it’s the same error in each case) is that MySQL can’t find the file, so you’re using the wrong path in each case.
@grimmdanny: Thanks for the kind words. I’m glad you’re enjoying the book!
@Matt: I agree the program/command “source” can’t find the file books.sql. So let me go through the whole setup: I loaded xampp in the c drive. C:xampp. In this folder is the folder “mysql”. I put a copy of the file books.sql in that folder. In the folder mysql is a folder: bin. I also copied the file books.sql into that folder. So whether I run the command as follows: Mysql> source c:xamppmysqlbooks.sql; or Mysql> source c:xamppmysqlbin books.sql; or Msql> source books.sql; forward slash, backward slash it doesn’t matter. I get the same error everytime “ERROR:
Failed to open file ‘books.sql’, error: 2
mysql>” This conversation is talking about on my windows 7 machine only. Do you see anything wrong in this. Thanks, Jack
@Matt: Just to clarify more I created the file books.sql by copy/paste the code from your tutorial. My books.sql file looks like this:
USE bookstore;
DROP TABLE IF EXISTS books;
CREATE TABLE books
(
id int unsigned NOT NULL auto_increment,
title varchar(255) NOT NULL,
author varchar(255) NOT NULL,
price decimal(10,2) NOT NULL,
PRIMARY KEY (id)
);
Ok; so I just got the idea to run the commands in the file.
This is what I got:
Current database: bookstore
+——————–+
| Database |
+——————–+
| information_schema |
| bookstore |
| cdcol |
| mysql |
| performance_schema |
| phpmyadmin |
| test |
| webauth |
+——————–+
8 rows in set (0.21 sec)
mysql> USE bookstore;
Database changed
mysql> DROP TABLE IF EXISTS books;
Query OK, 0 rows affected, 1 warning (0.00 sec)
mysql> CREATE TABLE books
-> (
-> id int unsigned NOT NULL auto_increment,
-> title varchar(255) NOT NULL,
-> author varchar(255) NOT NULL,
-> price decimal(10,2) NOT NULL,
-> PRIMARY KEY (id)
-> );
Query OK, 0 rows affected (0.33 sec)
mysql>
Does this mean I have finally set up the database books?
Yes it does, to wit:
mysql> show tables;
+———————+
| Tables_in_bookstore |
+———————+
| books |
+———————+
1 row in set (0.30 sec)
mysql> explain books;
+——–+——————+——+—–+———+—————-+
| Field | Type | Null | Key | Default | Extra |
+——–+——————+——+—–+———+—————-+
| id | int(10) unsigned | NO | PRI | NULL | auto_increment |
| title | varchar(255) | NO | | NULL | |
| author | varchar(255) | NO | | NULL | |
| price | decimal(10,2) | NO | | NULL | |
+——–+——————+——+—–+———+—————-+
4 rows in set (0.06 sec)
but this does not explain the mystery of the source command finding the file books.sql.
Well I certainly have used up this thread pretty good. Just to let you know I completed the tutorial on both boxes and as long as I leave that file books.sql alone I’m ok, but I sure wish I could solve that mystery because I’m sure I’ll need it in the future. On to build a CMS in an afternoon. Please if you get a chance though Matt let me know your final thoughts on the books.sql mystery. Thanks, Jack
@jacknet: “Does this mean I have finally set up the database books?”
Yes. You can always just copy & paste SQL into the MySQL monitor.
No idea why you’re having so many problems with your paths. I don’t usually use Windows, but on my Win7 VM I can get it working no problem. You must use ‘/’ not ” in the MySQL monitor.
Feel free to start a new topic if you’re still having path problems:
http://www.elated.com/forums/authoring-and-programming/topic/new/
Matt-
Thanks for posting this tutorial, I am trying to learn the basics here and am looking forward to completing your walk-through. One problem though- when I get to the part after you install XAMPP and try to start mysql (I’m on a Mac), I go to terminal and enter “mysql -u root”, it just returns “-bash: mysql: command not found”.
Any ideas? I’ve tried googling this problem and cannot find anyone else having the exact same issue. Lots of people having problems starting mysql but none with the same issue.
Hoping that I’m screwing something simple up here…
Any help is GREATLY appreciated!!!
@srafferty: I’m guessing you’re running Lion? Apple removed MySQL by default in Lion (it now uses PostgreSQL). Therefore the default Apple mysql command line program will no longer be in your path, so you’ll need to explicitly use the XAMPP version instead.
Try:
/Applications/XAMPP/xamppfiles/bin/mysql -u root
If that works, you can add /Applications/XAMPP/xamppfiles/bin/ to your path, then you can just type mysql next time!
Cheers,
Matt
this is a very good tutorial for beginners. can we have one for php as well?
@joy39: You might find these helpful:
http://www.elated.com/articles/cat/php/
Thanks for clear and easy to follow tutorial, it helps.
@belamoor: That’s good to hear – thanks 🙂
Thank you so much once again! I first found your blog when I wanted to make my own Blogger template a few months ago and you absolutely taught me how to do that. Now I am learning databases with you. Your blog is fantastic! I am your devoted reader now.
I am seeing some people had problems with path to books.sql I had too. I was lazy to look for answers so I clicked on Xampp Control Panel PHP MyAdmin and somewhere there I found bookstore database and insert button. This worked and I was able to continue the tutorial.
Hi Buddies,
Well jst wanna say now we have a handy reference of SQL in android market named SQL guru for free …….go through tweaks in the tips and walkthroughs given…..its pretty cool.
https://play.google.com/store/apps/details?id=com.dopdroid.mysqlguru
Hi Matt, really appreciate this article – it is the simplest and most straightforward definition and explanation of MySQL that I have been able to find on the web. Keep up the good work!
Thank you for the excellent tutorial! You’ve got a great writing style.
Thanks for all the positive feedback – much appreciated. 🙂
Thank you for your effort.. works for me ..
can I ask your help in loading a data file into the table “books”
this works:
INSERT INTO books ( title, author, price ) VALUES ( “Roses ” , “Jane Peters ” , 10.99 ) ;
mysql> LOAD DATA LOCAL INFILE /root/data INTO books;
ERROR 1064 (42000): You have an error in your SQL syntax; check the manual that corresponds to your MySQL server version for the right syntax to use near ‘/root/data INTO books’ at line 1
mysql>
I running RHEL 6.4
this is my data file
]# more data
“The Birds” “Alan H. Green” 12.99
“Stones” “Brad L. Lewis” 7.99
“The Turning Tides” “Scott Griss” 20.99
“Back Street” “Brian L. Scott” 15.99
“Roses” “Lynn George” 11.99
can you share some thought on why unable to input..
Thanks, Stephen
Great tutorial and at long last I thought I was actually going to create my first database but cannot get past the first part of setting up the table!
I’m not a rebellious sort but decided to create a database named USERS rather than BOOKSTORE but I don’t think that’s the issue!
So I look at where the db is saved and can only find the following path;
xampp/mysql/data/users/db.opt
surely I should have found
xampp/mysql/data/users.sql
and as you can imagine when I put in the path as you advise into the MySQL Monitor mysql prompt then I just get nothing only the prompt winking at me!
I guess I’ve done something wrong further back so am hopeful you can point me in the right direction so that I can still accomplish the setting up of my first database.
Cheers
What do you get if you type
show databases;
Into a mysql command window?
Hi Chris
Thanks for helping…this is what I get
+——————–+
| Database |
+——————–+
| information_schema |
| cdcol
| mysql |
| performance_schema |
| phpmyadmin
| test |
| users |
| webauth |
+——————–+
8 rows in set (0.37 sec)
Cheers
Fozz52
Ok so your user database has been created
The db.opt file is the “characteristics” of the database and contains information about the character set, structure, collation etc. MySQL does not work like Access or Excel where you have a database ‘file’ per se, the folder is the data location and the data is then held in the ‘table’ datafiles.
When you start creating tables the data files will be created in the dbname folder.
tablename.MYD are the datafiles
tablename.MYI are the table index(es)
tablename.frm are the format files for the tables.
These will not exist until you create tables and add data to them. You only need to be concerned with the file structure unless you have to do a manual recovery, hopefully that will not happen,
A .sql file is a text file that contains a set of command lines to rebuild the database, table structures and data, that is used for exporting, importing or taking backups of the database.
Does that help?
[Edited by chrishirst on 05-Feb-14 19:39]
Hi Chris
Does it help… well Yes and No I still can’t create the table!
I’m still getting the same reaction when I put the following into the mysql monitor so how do I create my table in the users database if the users.sql text file was saved in xammp/mysql/
I’ve put into the command line…
/xammp/mysql/users.sql
but it does nothing and just goes to the next line showing the prompt ->
what am I doing wrong?
To tell mysql to run the command you have to terminate the line with a semicolon ‘;’ this is because you can type in several lines of a query seperated by the <enter> key but the mysql server will not parse the input until it gets ;<enter> as an input line.
Or if you prefer a Windows GUI as MySQL CLI takes a bit of getting used to download and install HeidiSQL ( http://www.heidisql.com/ )
You can see the CLI command assemble in the “command” pane and learn how it works.
to load a .sql command script at the mysql comman prompt
http://dev.mysql.com/doc/refman/5.0/en/mysql-batch-commands.html
Hi Chris
Ok sorry about that should have noticed…. however…. after putting the following into the command line
/xammp/mysql/users.sql;
I get this error message…
ERROR 1064 (42000): You have an error in your SQL syntax; check the manual that corresponds to your MYSQL server version for the right syntax to use near ‘/xammp/mysql/users.sql’ at line 1
I’m really confused now!
.sql files are not like batch (.bat) or command (.cmd) files in Windows you have to tell the mysql daemon what to do with it.
the command line to import a text file is
Which is equivalent to
The mysql command is to start the mysql CLI daemon so it can accept instructions
The USE command says “Open ‘db_name’ and set it as the current working database.
The SOURCE command says Open the named file and execute the commands in the sequence they appear.
[Edited by chrishirst on 07-Feb-14 09:12]
Hi Chris
Not sure what’s going on here but perhaps this was the problem before and hadn’t realised.
I did a show databases; command and got the following;
+——————–+
| Database |
+——————–+
| information_schema |
| test |
+——————–+
2 rows in set (0.01 sec)
Where did the other databases go including the users.sql !
So decided to restart my laptop and create a new database. This time I followed the instructions and created a database called bookstore.sql but then got this error message !
=====================================================================
ERROR 1044 (42000) Access denied for user ‘’@’localhost’ to database ‘bookstore’
=====================================================================
Puzzled as to what’s happening but I’m sure you will be able to help…
You are logged as a user without sufficient privileges to see them or change them.
Hi Chris
Without wishing to be flippant you’re stating the obvious… I realise what the error message is saying but as I’m the only user of the computer but nothing has changed since I started working through this tutorial a few days ago and created the original user.sql database.
So have you any idea as to why it’s suddenly telling me I don’t have permission and if you do could you set out the steps I should take ?
For mysql in a “WAMP” environment it does not matter how many users are on the machine, or who is logged in to Windows. It is who is logged in at the mysql command window that matters.
MySQL has an entirely seperate user list to the Windows user list, and uses a UNIX privilege/permissions hierarchy NOT the comparatively weak Windows permissions hierarchy.
When you installed MySQL it will have asked you for a root user password, it is THAT user / password combination that you need to login to the command window with, otherwise you are simply a “user” with no privileges beyond USE to open a database and running SELECT queries against that DB.
Once you are logged in to a ‘root’ command window (called a ‘shell’ in UNIX parlance) you will then have full privileges to see, read, change and ‘drop’ (delete) databases and tables, create users and set privileges to specific databases or actions.
First of all a big thank you for this very helpful guide which understands what it means to begin. It gives clear conceptual ideas without swamping (this beginner) with too much detail.
Now to my first question.
Having successfully installed XAMPP.1.8.3-3 on a mac I have it all up and running perfectly.
I used terminal to set passwords for xampp, mySQL/phpAmin, mySQL root and FTP “daemon”.
Now I tried mysql -u root and I get “command not found”
Is this because I’m not using terminal as a root user?
If so how do I log in as a root user.
Thanks – Paul
Ah now I have it! With apologies I didn’t read enough of the previous conversations and I realise my question has been answered with:-
/Applications/XAMPP/xamppfiles/bin/mysql
to accommodate the current Mac OS
Thanks and let me save you a reply.
Working through commands I have success until I try to create a data base. Then I get (see below) Working on an iMac with mysql on an external drive but all appearing to work normally.
ERROR 1044 (42000): Access denied for user ”@’localhost’ to database ‘bookstore’
mysql>
start the mysql CLI with a user that has ‘create’ pivileges
e.g;
Brilliant thank you. Paul
That was real beginner stuff. It was great. Now the problem is, how to go further
Jnani
http://dev.mysql.com/doc/
Hi.. Im at the very beginning. I installed XAMPP and have the mySQL Database Server running. I’m using a MAC and when I go into the Terminal and enter “mysql -u root” and hit ENTER, I get mysql: command not found
Is there something I’m missing?
Quite probably the path to your mysql executable is not in the PATH environment variable.
use the full path to the executable IN the command line or add the location to $PATH
Hi, i liked your guide. But faced an immediate problem. I get this error message “Error 1045 <28000> ‘Access denied for user ‘root’@’localhost’ (using password = NO) ” when i type mysql -u root in c:xamppmysqlbin . Please help
Use:
mysql -u root -p [root password]
and provide the correct password for the mysql ‘root’ user
You can ALSO find the answer to this very question SIX posts back and is dated 10-Mar-14.
Also see, https://docs.oracle.com/cd/E17952_01/refman-5.6-en/resetting-permissions.html
There is also a cool MySQL GUI dbForge Studio for MySQL for database management, administration and development. It’s available to download at https://www.devart.com/dbforge/mysql/studio/download.html
Hi,
Its really good to learn and also got to learn some new things,Thanks
I got a bok about MYSQL from the library … and I was lost by page 10. This article explains it all in simple details as ‘related’ to using a flatfile database, (which I currently use in development, using 5 flat files per affiliate per month! That is 60 flat files each affiliate / folder, by (say) 1000 affiliates … or 60,000 flat files!)
Methinks I’ve got to investigate using mySQL !
** Realise there is more to it, such as cross referencing one table with data in another, but this is a great start.
Hi,
I am getting this error while creating a cluster and have google’d for it but got nothing on it. Can you please help me, I am not able to make head or tail out of this error. The last statement “User ‘root’ can only connect from ‘localhost’.” is confusing since I am connected as root only.
—————————–
MySQL localhost:3306 ssl JS > var cluster = dba.createCluster(‘devCluster’);
A new InnoDB cluster will be created on instance ‘localhost:3306’.
Validating instance configuration at localhost:3306…
ERROR: New account(s) with proper source address specification to allow remote connection from all instances must be created to manage the cluster.
Dba.createCluster: User ‘root’ can only connect from ‘localhost’. (RuntimeError)
——————————–
Thanks
Moorthy