
(Open on your iPhone or iPad!)
jQuery Mobile is a great framework for building mobile web apps, and as the 1.0 release gets nearer it’s really starting to mature into a stable platform.
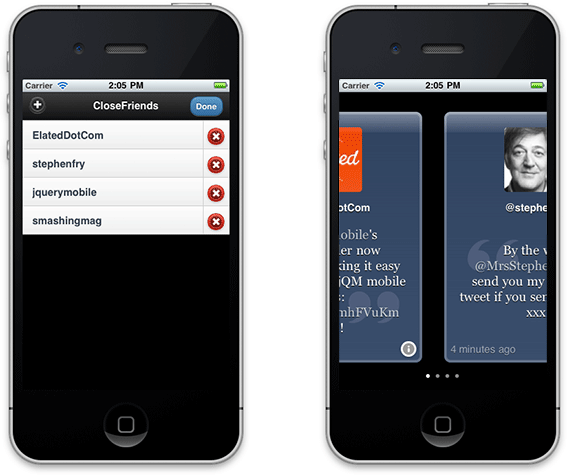
In my previous jQuery Mobile article, I gave a quick overview of jQuery Mobile’s headline features. In this tutorial you’ll delve deeper into jQuery Mobile. You’ll build a simple, nice-looking, easy-to-use iPhone Twitter app called “CloseFriends” that displays your closest Twitter friends’ latest tweets.
You’ll explore the following topics as you work through the tutorial:
- How to build a web app using just HTML, CSS and JavaScript (no server-side code).
- Making an app that can be installed and launched from the iPhone home screen.
- Creating rich mobile interfaces using jQuery Mobile, including page transitions, list views, buttons and dialogs.
- Using Scott Jehl’s excellent pagination plugin to create a sequence of draggable “latest tweet” pages, much like the native iOS Weather app.
- Tweaking the pagination plugin to create a nicer swipe experience.
- Working with the Twitter API using JavaScript.
- How to use HTML5 local storage to store data persistently in the browser.
- Creating your own jQuery Mobile swatches to theme your app.
- Working with jQuery Mobile events.
- Adapting to different device screen sizes and orientations.
- …and lots more!
You can try out the finished app on your iOS device by tapping the View Demo button above, and download the complete code and image files by clicking the Download Code button.
To get the most from this tutorial, it helps to have some familiarity with JavaScript, jQuery and jQuery Mobile. A great way to get up to speed quickly with jQuery Mobile is to read my comprehensive eBook, Master Mobile Web Apps with jQuery Mobile.
Ready to build the CloseFriends app? Let’s go!
Step 1: Download the pagination plugin
The app will link directly to the jQuery and jQuery Mobile files on the Google CDN, so you don’t need to download those files. However, the pagination plugin isn’t hosted on a CDN, so you need to grab it and save it on your computer.
You need to download two files from the plugin’s GitHub page:
jquery.mobile.pagination.cssjquery.mobile.pagination.js
Create a folder for your app called CloseFriends somewhere on your computer, and save these two files inside that folder.
Step 2: The markup
Pretty much all web apps start with some markup, usually in the form of an index.html page that sets up the basic DOM and loads all the required JavaScript and CSS files.
Save the following file as index.html in your CloseFriends folder:
<!doctype html>
<html lang="en">
<head>
	<meta charset="utf-8">
	<meta name="viewport" content="width=device-width, initial-scale=1, maximum-scale=1">
  <meta name="apple-mobile-web-app-capable" content="yes">
  <link rel="apple-touch-icon" href="icon.png"/>
	<title>CloseFriends</title>
	<link rel="stylesheet" href="http://code.jquery.com/mobile/1.0rc2/jquery.mobile-1.0rc2.min.css" />
	<link rel="stylesheet" href="jquery.mobile.pagination.css">
	<link rel="stylesheet" href="CloseFriends.css">
	<script src="http://code.jquery.com/jquery-1.6.4.min.js"></script>
	<script src="http://code.jquery.com/mobile/1.0rc2/jquery.mobile-1.0rc2.min.js"></script>
	<script src="jquery.mobile.pagination.js"></script>
	<script src="CloseFriends.js"></script>
</head>
<body>

<div data-role="page" id="manageFriends" data-theme="a">

  <div data-role="header">
    <h2>CloseFriends</h2>
    <a href="#addFriendDialog" id="addFriend" data-icon="plus" data-iconpos="notext">Add Friend</a>
    <a id="done" data-theme="b" value="Done" class="ui-btn-right">Done</a>
  </div>

  <ul data-role="listview" id="friendsList" data-split-icon="delete" data-split-theme="f">
  </ul>

</div>

<div data-role="dialog" id="addFriendDialog" data-theme="b">

  <div data-role="header">
    <h2>Add Friend</h2>
  </div>

  <div data-role="content">

    <div data-role="fieldcontain">
      <label for="screenName">Twitter Screen Name:</label>
      <input type="text" name="screenName" id="screenName">
    </div>

    <p><a href="#" id="addFriendConfirm" data-role="button" data-transition="slidedown">Add Friend</a></p>
    <p><a href="#manageFriends" data-role="button" data-rel="back">Cancel</a></p>

  </div>

</div>

<div id="dots"></div>

</body>
</html>
The index.html file contains the following sections:
- The
headsection. This contains aviewportmetatag to ensure that the page zooms into 100% on the device; anapple-mobile-web-app-capablemetatag, which tells the iPhone that this app can be installed as an icon on the home screen; and anapple-touch-iconlinktag that tells the iPhone what icon to use for the app on the home screen. (You’ll create this icon later in the tutorial.) Theheadsection also includes links to the various stylesheets and JavaScript files required for the jQuery and jQuery Mobile libraries, as well as the pagination plugin and our CloseFriends app code.Find out more about mobile viewports, and the
viewportmetatag, in Responsive Web Design Demystified. - The “Manage Friends” page. The first element inside the page body is a jQuery Mobile
data-role="page"div, with anidofmanageFriends. This page will display the list of Twitter friends that the user has added in the app. Thedivhas a jQuery Mobiledata-theme="a"attribute to make the page use the “a” (white-on-dark-grey) swatch. The page’s header contains the app name, a “plus” button to add a new friend, and a “Done” button to return to the tweet pages. The main part of the page contains a jQuery Mobile list view widget — created using thedata-role="listview"attribute — with anidoffriendsList. This widget will hold the list of Twitter usernames. - The “Add Friend” dialog. The body also contains a
divwith anidofaddFriendDialog. This appears when the user taps the “plus” button in the “Manage Friends” page. Thedivhas adata-role="dialog"attribute which makes jQuery Mobile style the page as a dialog, and adata-theme="b"attribute to give the dialog the “b” (black on light grey) swatch. The dialog comprises an “Add Friend” header, ascreenNamefield for entering the new friend’s Twitter screen name, an#addFriendConfirmbutton to add the friend, and a Cancel button that just closes the dialog.The “plus” button in the “Manage Friends” page links to this dialog using
<a href="#addFriendDialog">...</a>. When the user taps the button, jQuery Mobile intercepts the tap, notices that the targetdivusesdata-role="dialog", and automatically opens thedivas a dialog. No JavaScript required! - A container for the dots. Lastly, the body contains a
divwith anidofdots. This will contain the small pagination dots that sit below the tweet pages, allowing the user to orient themselves in the list of pages.
Step 3: The CSS
As well as the stylesheets for jQuery Mobile and the pagination plugin, the index.html file also links to a custom stylesheet for the CloseFriends app. Let’s create this stylesheet now.
Save the following code as CloseFriends.css inside your CloseFriends folder:
/* The page body colours */

body {
  background: #222;
  color: #fff;
}


/* Stretch mobile pages to fill the browser window */

.ui-page {
  height: 100%;
}


/* Main content in tweet page */

.tweetPageContent {
  width: 87%;
  height: 83%;
  margin: 30px auto;
  border-radius: 10px;
  border: 4px solid #627188;
  background: 			#354866;
  color: 					#fff;
  text-shadow: 0 1px 0 #000;
  font-weight: normal;
  background-image: -webkit-gradient(linear, left top, left bottom, from(#304360), to(#3a4e6c));
  background-image: -webkit-linear-gradient(top, #304360, #3a4e6c);
  background-image:    -moz-linear-gradient(top, #304360, #3a4e6c);
  background-image:     -ms-linear-gradient(top, #304360, #3a4e6c);
  background-image:      -o-linear-gradient(top, #304360, #3a4e6c);
  background-image:         linear-gradient(top, #304360, #3a4e6c);
  text-align: center;
}


/* Gloss effect on tweet page */

.gloss {
  width: 87%;
  height: 7%;
  margin: 0 auto;
  left: 0;
  right: 0;
  top: 30px;
  padding: 0 4px;
  position: absolute;
  z-index: 9999;
  background-image: -webkit-gradient(linear, left top, left bottom, from(rgba(255,255,255,.4)), to(rgba(255,255,255,.05)));
  background-image: -webkit-linear-gradient(top, rgba(255,255,255,.4), rgba(255,255,255,.05));
  background-image:    -moz-linear-gradient(top, rgba(255,255,255,.4), rgba(255,255,255,.05));
  background-image:     -ms-linear-gradient(top, rgba(255,255,255,.4), rgba(255,255,255,.05));
  background-image:      -o-linear-gradient(top, rgba(255,255,255,.4), rgba(255,255,255,.05));
  background-image:         linear-gradient(top, rgba(255,255,255,.4), rgba(255,255,255,.05));
  border-radius: 10px 10px 0 0;

}


/* Tweet timestamp in bottom left corner of tweet page */

.tweetTime {
  position: absolute;
  bottom: 7px;
  left: 6px;
  opacity: .5;
}


/* Manage Friends 'i' button in bottom right corner of tweet page */

.manageFriendsButton {
  position: absolute;
  bottom: -3px;
  right: 0px;
  color: #333;
  background: #fff;
  border: none;
}


/* Twitter profile image */

.profileImage {
  width: 100px;
  height: 100px;
  margin: 20px auto;
  border-radius: 5px;
}


/* Twitter screen name */

.tweetPageContent h1 {
  text-align: center;
  font-size: 100%;
  margin-top: -10px;
}


/* Tweet */

.tweetPageContent .recentTweet {
  margin: -10px 20px;
  font-family: "Georgia", "Times New Roman", serif;
  font-size: 125%;
  min-height: 55%;
  background: url("quoteMarks.png") no-repeat 50% 50%;
  display: -webkit-box;
  display: -moz-box;
  display: box;
  -webkit-box-align: center;
  -moz-box-align: center;
  box-align: center;

}

.tweetPageContent .recentTweet blockquote {
  text-align: center;
  width: 100%;
  margin: 0;
}


/* Links within the tweet */

.tweetPageContent blockquote a {
  color: #fff;
  opacity: .7;
  text-decoration: none;
}


/* Put the pagination buttons at the bottom and make them invisible */

.ui-pagination {
  position: absolute;
  top: auto;
  z-index: 9999;
  bottom: 52px;
}

.ui-pagination .ui-pagination-prev, .ui-pagination .ui-pagination-next {
  top: 0;
  width: 49%;
}

.ui-pagination .ui-pagination-prev {
  left: 0;
}

.ui-pagination .ui-pagination-next {
  right: 0;
}

.ui-pagination .ui-pagination-prev .ui-btn, .ui-pagination .ui-pagination-next .ui-btn {
  width: 100%;
  height: 80px;
  margin-top: 0;
  opacity: 0;
}


/* The pagination dots at the bottom of the page */

#dots {
  position: absolute;
  z-index: 9999;
  bottom: 8px;
  height: 30px;
  line-height: 0;
  color: #888;
  width: 100%;
  text-align: center;
  font-size: 55px;
  letter-spacing: 1px;
}

#dots .highlight {
  color: #fff;
}


/*** Media queries to handle different iOS devices and orientations ***/


/* iPhone, standalone */

@media only screen and (max-device-width: 480px) and (orientation: portrait) {
  .tweetPageContent { height: 380px; }
}

@media only screen and (max-device-width: 480px) and (orientation: landscape) {
  .tweetPageContent { height: 230px; font-size: 95%; }
  .profileImage { width: 60px; height: 60px; }
  .tweetPageContent .recentTweet { min-height: 80px; font-size: 95%; background-size: 25%; }
}


/* iPhone, running in Safari */

@media only screen and (max-height: 360px) and (orientation: portrait) {
  .tweetPageContent { height: 330px; font-size: 85%; }
  .tweetPageContent .recentTweet { font-size: 120%; margin-top: -20px; }
  #dots { bottom: -50px; }
  .ui-pagination { bottom: 65px; }
}

@media only screen and (max-height: 260px) and (orientation: landscape) {
  .tweetPageContent { font-size: 95%; margin-top: 10px; }
  .profileImage { width: 60px; height: 60px; }
  .gloss { top: 10px; }
  #dots { bottom: -63px; }
  .ui-pagination { bottom: 72px; }
}


/* iPad */

@media only screen and (device-width: 768px) and (orientation: portrait) {
  .tweetPageContent { height: 92%; font-size: 150%; }
}

@media only screen and (device-width: 768px) and (orientation: landscape) {
  .tweetPageContent { height: 89%; font-size: 150%; }
}


/*** jQuery Mobile swatches ***/

/* A swatch */
.ui-body-a {
  background: #000;
}

/* F swatch */

.ui-btn-up-f {
  border: 1px solid #b11;
  background: #a00;
  font-weight: bold;
  color: #fff;
  cursor: pointer;
  text-shadow: 0 -1px 1px #000;
  text-decoration: none;
  background-image: -moz-linear-gradient(top, #e55, #a00);
  background-image: -webkit-gradient(linear,left top,left bottom, color-stop(0, #f66), color-stop(1, #a00));
  -ms-filter: "progid:DXImageTransform.Microsoft.gradient(startColorStr='#f66', EndColorStr='#a00')";
}
.ui-btn-up-f a.ui-link-inherit {
  color: #fff;
}
.ui-btn-hover-f {
  border: 1px solid #a00;
  background: #b11;
  font-weight: bold;
  color: #fff;
  text-shadow: 0 -1px 1px #000;
  text-decoration: none;
  background-image: -moz-linear-gradient(top, #f66, #b11);
  background-image: -webkit-gradient(linear,left top,left bottom, color-stop(0, #f66), color-stop(1, #b11));
  -ms-filter: "progid:DXImageTransform.Microsoft.gradient(startColorStr='#f66', EndColorStr='#b11')";
}
.ui-btn-hover-f a.ui-link-inherit {
  color: #fff;
}
.ui-btn-down-f {
  border: 1px solid #800;
  background: #e55;
  font-weight: bold;
  color: #fff;
  text-shadow: 0 -1px 1px #000;
  background-image: -moz-linear-gradient(top, #800, #e55);
  background-image: -webkit-gradient(linear,left top,left bottom, color-stop(0, #800), color-stop(1, #e55));
  -ms-filter: "progid:DXImageTransform.Microsoft.gradient(startColorStr='#800', EndColorStr='#e55')";
}
.ui-btn-down-f a.ui-link-inherit {
  color: #fff;
}
.ui-btn-up-f,
.ui-btn-hover-f,
.ui-btn-down-f {
  font-family: Helvetica, Arial, sans-serif;
}
Let’s take a brief look at each ruleset in the CSS:
- The page body colours: This sets the document’s
bodybackground to dark grey so that it matches the “a” swatch used for pages in the app. - Stretch mobile pages to fill the browser window: This ruleset ensures that the jQuery Mobile page stretches vertically to fill the browser window, which lets us use percentage heights for other page elements.
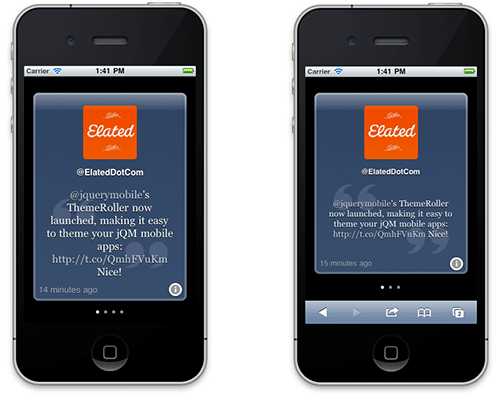
- Main content in tweet page: This styles the
.tweetPageContentdivs, which are the blue rounded rectangles containing the user’s profile picture, screen name, tweet, timestamp and info button. We make these containers fill most of the browser window; add a rounded blue border; and set a white foreground colour and a blue gradient background. - Gloss effect on tweet page: This adds the shiny gloss effect at the top of the tweet page, much like the iOS Weather widget. It’s positioned absolutely on top of the other page content, and centred horizontally. We give it a semitransparent gradient using the
rgbacolour format, which lets us add an alpha (opacity) value to each colour stop, where 1 is 100% opaque and 0 is 100% transparent. - Tweet timestamp in bottom left corner of tweet page: We position this absolutely, and make it semitransparent so it doesn’t distract from the tweet text.
- Manage Friends ‘i’ button in bottom right corner of tweet page: Again, this is positioned absolutely. We tweak the standard jQuery Mobile button style slightly to make the button blend in with the page design.
- Twitter profile image: This sits at the top of the tweet page. It’s centred horizontally and given rounded corners.
- Twitter screen name: This goes below the profile image. It’s also centred, and we give it a negative top margin to move it closer to the image.
- Tweet: The tweet text itself is set in large Georgia font, centred horizontally, and given a background “quote marks” image (which you’ll create later). We use the CSS3
display: boxandbox-align: centerproperties to centre the text vertically on top of the “quote marks” image.Read more about the CSS3 flexible box model.
- Links within the tweet: These are made semitransparent so that they stand out from the other tweet text.
- Put the pagination buttons at the bottom and make them invisible: By default, the pagination plugin creates tappable previous/next buttons on the left and right side of the screen. We want our app to behave more like the iOS Weather app, where you can tap the areas to the left and right of the dots at the bottom of the screen to move between pages. So this CSS moves the pagination buttons down to the bottom, and makes them invisible (but still tappable).
- The pagination dots at the bottom of the page: We’ll create these simply by inserting
'.'characters in the#dotsdiv. We position thedivat the bottom centre of the page, usez-indexto raise it above the other page elements, set various dimensions, and give it a mid grey font colour. - Media queries to handle different iOS devices and orientations: Although the earlier
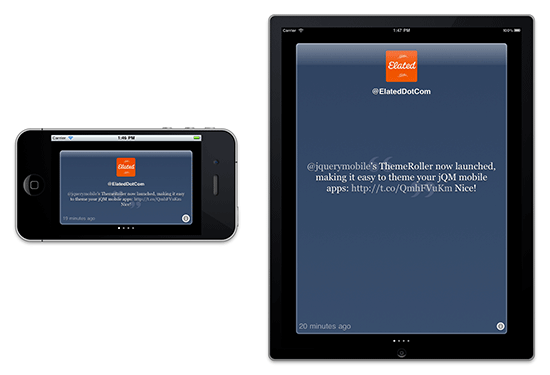
.tweetPageContentruleset is flexible enough to work OK across different screen sizes — even desktop browsers — we want everything to look just right on an iPhone, in both portrait and landscape orientations. In addition, there are some auto-hiding address bar quirks when running the app in iPhone’s Safari browser — as opposed to running full-screen from the home screen — so we need to deal with those also. While we’re at it, we might as well make the app look good on iPads too. Fortunately, CSS3 media queries make it easy to do all these things. The CSS contains six media queries, as follows:-
@media only screen and (max-device-width: 480px) and (orientation: portrait) { ... }
This media query targets iPhones running the app from the home screen in portrait orientation. It adjusts the height of the.tweetPageContentdivto sit perfectly within the phone’s screen.@media only screen and (max-device-width: 480px) and (orientation: landscape) { ... }
This media query is triggered for iPhones running the app from the home screen in landscape orientation. It adjusts the profile image size, tweet box and tweet font size to fit the available space.@media only screen and (max-height: 360px) and (orientation: portrait) { ... }
This query specifically targets iPhones running the app in Mobile Safari in portrait orientation, by looking at the available viewport height. Due to the interaction between jQuery Mobile and Safari’s auto-hiding URL bar, we need to tweak the app’s page layout to reduce the tweet page’s height and adjust the vertical positions of the dots and pagination buttons. We also reduce the font size to squeeze the page content into the new smaller layout.@media only screen and (max-height: 260px) and (orientation: landscape) { ... }
This does much the same as the previous query, but it reduces the size of the page content area even further to fit into the small space available on Mobile Safari in landscape orientation.@media only screen and (device-width: 768px) and (orientation: portrait) { ... }
This query targets iPad devices in portrait orientation. It simply adjusts the content height and font size to sit nicely on an iPad screen.@media only screen and (device-width: 768px) and (orientation: landscape) { ... }
This does the same as the previous query, but for portrait orientation.
The figures below show how these media queries help the app to accommodate different iOS devices and orientations.
Find out more about media queries in Responsive Web Design Demystified.
-
- jQuery Mobile swatches: The last section of the stylesheet deals with jQuery Mobile swatches, which let you customize the look of your app by tweaking colours, fonts and other elements. The first ruleset adjusts the page body style for the “a” swatch so that it has a black background (the default is a dark grey gradient). The remaining rulesets create a new white-on-red “f” swatch that we’ll use later to style the “delete” buttons in the app.
Step 4: The closeFriends() function
Now that you’ve created the markup and CSS for the app, you’re ready to start writing the JavaScript code. Create a file called CloseFriends.js inside your CloseFriends folder. Start by adding the following function to the file:
/**
 * The CloseFriends app code. It's wrapped in a function
 * to provide namespacing.
 */

function closeFriends() {

  var PROFILE_IMAGE_CACHE_TIMEOUT = 60 * 60 * 1000; // in milliseconds
  var friends = ['ElatedDotCom'];
  var currentFriend = friends[0];

  init();

}

// All set! Run the app.
$( closeFriends );
This is the main function that will contain all of our app code. We start by adding a constant, PROFILE_IMAGE_CACHE_TIMEOUT, to specify how long to cache the profile image URLs (1 hour by default). We also create an array, friends, to hold the user’s Twitter friends list, and add a default friend to the array, 'ElatedDotCom'. Next we create a variable, currentFriend, to hold the array index of the tweet page that the user is currently viewing. We set this to 0 initially, which refers to the ElatedDotCom friend.
Now that the closeFriends() function has set up these values, it calls the init() function to start the app itself. You’ll create this function next.
Once we’ve defined the closeFriends() function, we tell jQuery to run closeFriends() when the DOM is ready by calling $(closeFriends).
Step 5: The init() function
You’ve now created your bare-bones closeFriends() function. It’s time to add the rest of the app’s code to the function.
Start by defining the init() function. Add this inside the closeFriends() function, right after the call to init(), like this:
function closeFriends() {

  var PROFILE_IMAGE_CACHE_TIMEOUT = 60 * 60 * 1000; // in milliseconds
  var friends = ['ElatedDotCom','simonmeek','stephenfry'];
  var currentFriend = friends[0];

  init();


  /**
   * Initializes the app. Called when the document is ready.
   */

  function init() {

    // Improve scrolling responsiveness
    $.mobile.touchOverflowEnabled = true;

    // If the user already has a friends list in local storage,
    // grab it, as well as the current friend they were viewing previously
    if ( localStorage['friends'] && JSON.parse( localStorage['friends'] ).length > 0 ) {
      friends = JSON.parse( localStorage['friends'] );
      if ( localStorage['currentFriend'] ) currentFriend = localStorage['currentFriend'];
    }

    // Store the friends list and current friend in local storage
    localStorage['friends'] = JSON.stringify( friends );
    localStorage['currentFriend'] = currentFriend;

    // Add some click handlers to various buttons
    $('.manageFriendsButton').live( 'click', manageFriends );
    $('#addFriendConfirm').live( 'click', addFriend );
    $('#done').live( 'click', showTweetPages );

    // Clear the "screen name" field in the "Add Friend" dialog when it opens
    $('#addFriendDialog').live( 'pagebeforeshow', function() {
      $('#screenName').val('');
    } );

    // Create and show the tweet pages
    showTweetPages();
  }

}
Why do we put all our app’s code inside the closeFriends() function, rather than in the top level of the CloseFriends.js file? The answer is that it lets us create a namespace for all the variable and function names in our app, to keep them separate from other JavaScript code that might be included in the page. For example, if we had created the init() function outside the closeFriends() function then its name might have clashed with another function called init(), created by a different script in the page.
We can do this because JavaScript lets us create nested functions — a great feature of the language.
Let’s look at the sections of code inside the init() function:
- Improve scrolling responsiveness
The function starts by setting the jQuery Mobile option$.mobile.touchOverflowEnabledtotrue. This is a new feature as of jQuery Mobile Beta 3 that allows smoother page transitions for mobile browsers that support theoverflowandoverflow-scrolling: touchCSS properties (at the time of writing, only iOS 5 supports these properties). Setting this value totruehelps to speed up the swipe and drag actions in the app. - If the user already has a friends list in local storage,
grab it, as well as the current friend they were viewing previously
In order to make our app settings persist even when the app is closed, we need to store them in the browser. We do this using HTML5’s local storage feature. This is easy to use: the browser provides alocalStoragearray in which we can store the values that we want to persist. The only caveat is that the array can only hold string values, so to store ourfriendsarray we need to use the JavaScript JSON functionsstringify()andparse()to convert the array to a string when storing it, and back to an array when retrieving it.So the code first looks to see if the
friendselement exists in thelocalStoragearray. If it does, the code turns the element’s string value into an array by callingJSON.parse(). If the resulting array has at least one element, then we retrieve the array’s values and store them in our localfriendsarray. At the same time, if thecurrentFriendelement exists in local storage then we retrieve that value too, and store it incurrentFriend. - Store the friends list and current friend in local storage
If this is the first time the user has run the app, there won’t be any values in local storage. Therefore the function now stores the current values offriendsandcurrentFriend, so they’re available next time the app starts. Sincefriendsis an array, the function callsJSON.stringify()to turn it into a string before storing it. - Add some
clickhandlers to various buttons
Next, the function uses the jQuerylive()method to add variousclickhandlers to buttons that will be created in the page. The “Manage Friends” button will trigger themanageFriends()function when clicked; the “Add Friend” dialog button will triggeraddFriend(); and the “Done” button in the Manage Friends page will triggershowTweetPages(). You’ll create all these functions in a moment. - Clear the “screen name” field in the “Add Friend” dialog when it opens
Since jQuery Mobile keeps pages cached in the DOM, the “screen name” field in the “Add Friend” dialog retains its value, even after the dialog is closed and reopened. We want the field to be empty each time the dialog opens, so that the user can add a new friend. So we create a simple event handler function for the dialog page’spagebeforeshowevent that clears the field’s value.pagebeforeshowis a jQuery Mobile event that is triggered just before the page — or, in this case, the dialog — is displayed. - Create and show the tweet pages
Finally, theinit()function callsshowTweetPages()to start creating and showing the friends’ tweet pages. You’ll create this function in the next step.
Step 6: The showTweetPages() function
The next function to create is showTweetPages(). Add this code inside the closeFriends() function, right after the init() function you created in the previous step:
  /**
   * Prepares the DOM, adds the tweet pages, and displays the
   * current friend's tweet page.
   */

  function showTweetPages() {

    // Don't do anything if there are no friends
    if ( friends.length == 0 ) return;

    // Remove all old tweet pages
    $('.tweetPage').remove();

    // Add the new tweet pages
    addPages();

    // Switch to the current friend's tweet page
    $.mobile.changePage( "#" + currentFriend, { transition: 'flip', reverse: true } );
  }
This function is very simple. First, if there are no friends to display for some reason, the function exits immediately. Assuming there are friends in the list, the function first removes all previous tweet pages from the DOM by selecting all elements with the CSS class tweetPage, then calling the jQuery remove() method on the resulting set. Then it calls addPages() to add the new tweet pages to the DOM. You’ll create this function in the next step.
Finally, the function calls the jQuery Mobile changePage() method to display the current friend’s tweet page; this page’s ID will be set to the screen name of the friend, so we locate it using '#' + currentFriend. We display the page using the reverse ‘flip’ transition.
Although jQuery Mobile automatically intercepts links and form submissions to create smooth transitions between mobile pages,
changePage() is a handy way to trigger a page change and transition using JavaScript when required. Find out more about changePage() in my book or in the online documentation.
Step 7: The addPages() function
The addPages() function’s job is to create all the “current tweet” pages for the friends in the friends array. Here’s the code — add it inside the closeFriends() function, after the showTweetPages() function:
  /**
   * Adds all the tweet pages to the DOM, populating them as it goes.
   * Called from showTweetPages().
   */

  function addPages() {

    // Store a reference to the previously added page
    var prevPage = null;

    // Create each page's markup
    for ( var i=0; i<friends.length; i++ ) addPage( friends[i] );

    // Render the pages
    for ( var i=0; i<friends.length; i++ ) $("#"+friends[i]).page();

    // Add a handler that runs whenever the tweet page is shown...
    $(".tweetPage").bind( "pageshow", function() {

      // Update the dots at the bottom of the screen to
      // highlight the new current page

      $("#dots").empty();

      for ( var i=0; i<friends.length; i++ ) {
        if ( friends[i] == this.id ) {
          $("#dots").append( '<span class="highlight">.</span>' );
        } else {
          $("#dots").append( '.' );
        }
      }

      // Store the page's associated screen name in currentFriend
      currentFriend = localStorage['currentFriend'] = $.mobile.activePage.attr('id');
    } );

    // Hide the dots if there's only one page
    if ( friends.length < 2 ) {
      $("#dots").hide();
    } else {
      $("#dots").show();
    }

  }
Let’s look at each section in the addPages() function:
- Store a reference to the previously added page
We set up a variable calledprevPageto record the ID of the previously-added page. We’ll use this to add the “Next” link to the previous page’s markup. Since we haven’t created any pages yet, we setprevPagetonull. - Create each page’s markup
Next the function loops through each element in thefriendsarray, calling theaddPage()function with the element’s value, which is the friend’s screen name.addPage()creates the markup for a single tweet page; you’ll create this function in the next step. - Render the pages
Now that each page’s markup has been created and added to the DOM, we need to make sure that jQuery Mobile goes through the markup and enhances the page, adding appropriate CSS classes and creating the necessary widgets. Normally this happens automatically when the HTML page first loads, but since we’ve added our own markup using JavaScript, we need to tell jQuery Mobile to enhance it. To do this, we call jQuery Mobile’spage()method on each friend page in turn. - Add a handler that runs whenever the tweet page is shown
Next the function binds a handler function to each tweet page’spageshowevent. This is a jQuery Mobile event that triggers after a page has been transitioned to.The handler starts by clearing out any previous dots from the#dotsdivat the bottom of the tweet page, then adding the dots back into thediv, highlighting the current page’s dot by wrapping a span with a class of highlight around it. (This class is given a white colour in the CSS.)Once it’s done that, the handler updates the
currentFriendvariable — and its counterpart in local storage — with the ID of the new current tweet page. It retrieves the current tweet page from the jQuery MobileactivePageproperty, which contains the DOM element of the currently shown mobile page. - Hide the dots if there’s only one page
Finally, theaddPages()function checks how many friends are currently in the list. If there’s only one friend, the function calls the jQueryhide()method on the#dotsdivto hide the dots. Otherwise, it calls theshow()method to display the dots.
Step 8: The addPage() function
You’re now ready to create the addPage() function to add an individual tweet page to the DOM. Put this function inside the addPages() function you created in Step 7, after the rest of the addPages() code:
    /**
     * Adds a single tweet page to the DOM, and populates it with
     * the info from Twitter.
     * Called from its parent function, addPages().
     */

    function addPage( pageId ) {

      // Don't add the page if it's already in the DOM
      if ( document.getElementById( pageId ) ) return;

      // Create the basic markup for the new page
      var pageMarkup = '<div class="tweetPage" data-role="page" data-theme="a" id="' + pageId + '" data-url="' + pageId + '" data-title="CloseFriends">';
      pageMarkup += '<div class="gloss"></div>';
      pageMarkup += '<div class="tweetPageContent">';
      pageMarkup += '<a href="http://twitter.com/' + pageId + '"><img class="profileImage" src="loading.png" alt="Profile image"></a>';
      pageMarkup += '<h1>@' + pageId + '</h1>';
      pageMarkup += '<div class="tweetTime"></div>';
      pageMarkup += '<a href="#" class="manageFriendsButton" data-role="button" data-icon="info" data-iconpos="notext" data-transition="flip">Manage Friends</a>';
      pageMarkup += '</div>';
      pageMarkup += '<ul data-role="pagination">';
      if ( prevPage ) pageMarkup += '<li class="ui-pagination-prev"><a href="#' + prevPage + '">Prev</a></li>';
      pageMarkup += '</ul>';
      pageMarkup += '</div>';

      // Add the page to the DOM
      $('body').append( $(pageMarkup) );

      // If this isn't the first page we've added,
      // add a  "Next" link to the previous page's nav
      if ( prevPage ) {
        var nextLinkMarkup = '<li class="ui-pagination-next"><a href="#' + pageId + '">Next</a></li>';
        $('#' + prevPage + ' ul:jqmData(role="pagination")').append( nextLinkMarkup );
      }

      // Is there a fresh copy of the friend's profile image URL in local storage?
      if ( !localStorage['profileImage_'+pageId] || ( new Date().getTime() - localStorage['profileImage_'+pageId+'_timestamp'] > PROFILE_IMAGE_CACHE_TIMEOUT ) ) {

        // No: fetch the image URL and add it to the page when fetched.
        // Also store the (possibly changed) image URL and fetch time in local storage.
        $.ajax( {
          url: "http://api.twitter.com/1/users/show.json?screen_name=" + pageId,
          success: function(data) {
            var profile_image_url = data['profile_image_url'].replace( /_normal/, "" );
            $('#'+pageId+' .tweetPageContent .profileImage').attr( 'src', profile_image_url );
            localStorage['profileImage_'+pageId] = profile_image_url;
            localStorage['profileImage_'+pageId+'_timestamp'] = new Date().getTime();
          },
          dataType: "jsonp"
        } );

      } else {
        // Yes: add the cached image URL to the page
        $('#'+pageId+' .tweetPageContent .profileImage').attr( 'src', localStorage['profileImage_'+pageId] );
      }

      // Get the friend's latest tweet

      $.ajax( {
        url: "http://search.twitter.com/search.json?q=from%3A" + pageId,
        success: function(data) {

          // Add the tweet text to the page
          var latestTweet = data["results"].length ? data["results"][0]["text"] : "No recent tweets found.";
          var exp = /(b(https?|ftp|file)://[-A-Z0-9+&@#/%?=~_|!:,.;]*[-A-Z0-9+&@#/%=~_|])/ig;
          latestTweet = latestTweet.replace( exp,"<a href='$1'>$1</a>" );
          exp = /@(w+)/ig;
          latestTweet = latestTweet.replace( exp,"<a href='http://twitter.com/$1'>@$1</a>" );
          $('#'+pageId+' .tweetPageContent').append( '<div class="recentTweet"><blockquote>' + latestTweet + '</div></blockquote></div>' );

          // Add the tweet timestamp to the page
          var tweetTime = new Date( data["results"][0]["created_at"] ).getTime();
          var currentTime = new Date().getTime();
          var tweetTimeDiff = "";
          var tweetTimeString = "";

          if ( currentTime - tweetTime < 60 * 1000 ) {
            tweetTimeDiff = Math.floor( ( currentTime - tweetTime ) / 1000 ) ;
            tweetTimeString = tweetTimeDiff + " second" + ( tweetTimeDiff == 1 ? "" : "s" ) + " ago";
          } else if ( currentTime - tweetTime < 60 * 60 * 1000 ) {
            tweetTimeDiff =  Math.floor( ( currentTime - tweetTime ) / ( 60 * 1000 ) );
            tweetTimeString = tweetTimeDiff + " minute" + ( tweetTimeDiff == 1 ? "" : "s" ) + " ago";
          } else if ( currentTime - tweetTime < 60 * 60 * 24 * 1000 ) {
            tweetTimeDiff =  Math.floor( ( currentTime - tweetTime ) / ( 60 * 60 * 1000 ) );
            tweetTimeString = tweetTimeDiff + " hour" + ( tweetTimeDiff == 1 ? "" : "s" ) + " ago";
          } else {
            tweetTimeDiff =   Math.floor( ( currentTime - tweetTime ) / ( 60 * 60 * 24 * 1000 ) );
            tweetTimeString = tweetTimeDiff + " day" + ( tweetTimeDiff == 1 ? "" : "s" ) + " ago";
          }

          $('#'+pageId+' .tweetTime').html( tweetTimeString );
        },
        dataType: "jsonp"
      } );

      // All done - this page now becomes the new "previous page"
      prevPage = pageId;
    }
We’ve put addPages() inside addPage() mainly so that it has access to addPage()‘s prevPage local variable. A function nested inside a parent function has access to the scope of its parent. This approach also nicely encapsulates addPage() inside addPages(), since only addPages() needs to know about addPage().
addPage() is quite a meaty function. Let’s break it down step by step to see how it works:
- Don’t add the page if it’s already in the DOM
addPage()accepts a single parameter:pageId, the ID (screen name) of the page to add. The first thing the function does is usegetElementById()to check if the tweet page already exists in the DOM. If it does then there’s nothing to do, so the function exits. - Create the basic markup for the new page
Next the function creates apageMarkupvariable that stores the basic markup for the tweet page. This consists of:-
- A jQuery Mobile
data-role="page"wrapperdivwith a class oftweetPageand an ID matching the screen name. We also give thedivthedata-theme="a"attribute to set the page’s swatch to “a”; adata-urlattribute with the page ID as its value; and adata-titleattribute with the value"CloseFriends", which ensures that “CloseFriends” always appears in the browser’s title bar.data-urllets jQuery Mobile know the unique URL of the page. Normally jQuery Mobile sets this attribute itself, but since we’re creating the markup dynamically, we need to add this attribute ourselves. Find out more aboutdata-urlin Appendix A of my book, or in the online docs.The wrapper
divcontains: - A
divwith with a class ofglossto create the gloss effect. - A
.tweetPageContentdivcontaining the actual tweet page content: the profile image (linked to the friend’s Twitter URL); the screen name; the tweet timestamp; and the “Manage Friends” button. (Noticeably absent is the tweet itself, which we’ll pull from the Twitter API asynchronously in a moment.)The profile image’s
srcattribute is initially set toloading.png, a placeholder image. Once the profile image has been loaded from Twitter, it will replace the placeholder. You’ll create this placeholder image later in the tutorial. - An unordered list with the
data-role="pagination"attribute. Within this list we create anliwith a class ofui-pagination-prevthat links to the previous page (if any). This attribute and class are picked up automatically by the pagination plugin and used to create the pagination buttons, as well as link the tweet pages together.
- A jQuery Mobile
-
- Add the page to the DOM
Now that we’ve created our basic page markup, we add the page to the DOM by wrapping the markup in the jQuery function,$(), then callingappend()on the page’sbodyelement to append the pagedivto the body. - If this isn’t the first page we’ve added, add a “Next” link to the previous page’s nav
IfprevPageisn’tnullthen we’ve added a previous page to the DOM already. In this case, the function creates markup for the “Next” navigation link that points to the current page, and stores the string innextLinkMarkup. Then it selects thedata-role="pagination"ulelement in the previous page, and callsappend()to add the newly-createdlielement to it. - Is there a fresh copy of the friend’s profile image URL in local storage?
Now the function checks the local storage for an element with the index'profileImage_'+pageId, which stores the cached profile image URL. If it finds one, it checks the time stored in the corresponding'profileImage_'+pageId+'_timestamp'element, and compares it to the current time. If it’s older thanPROFILE_IMAGE_CACHE_TIMEOUTmilliseconds then the URL is no longer considered fresh.-
- No: fetch the image URL and add it to the page when fetched. Also store the (possibly changed) image URL and fetch time in local storage.
If the image URL didn’t exist in local storage, or wasn’t fresh, then the function fetches the image URL using the Twitter REST API. It uses jQuery’sajax()method to make an Ajax call tohttp://api.twitter.com/1/users/show.json?screen_name=pageId, wherepageIdis the page ID / screen name of the user we’re creating the tweet page for.Ajax calls are asynchronous, which means we need to supply a “success” function that will be called as soon as the data is returned from the Twitter server. The success function extracts the profile image URL from the returned data, and removes the"_normal"part of the URL string — this converts the “normal” size image URL into the URL for the “large” profile image. Then the success function sets the profile image’ssrcattribute in the tweet page to the new URL, thereby placing the image in the page. It then stores the new URL and timestamp in local storage so that it can be retrieved next time.We cache the profile image URLs like this because the Twitter API has a rate limit on calls to the REST API. Currently this is around 150 requests per hour. If we pulled the user data from the REST API each time we built the tweet pages then we would quickly exceed this limit.
Notice that we also set the
dataTypeoption of the Ajax call to"jsonp". This makes jQuery use a JSONP request instead of a standard JSON request. A JSONP request is needed in this case because we’re making an Ajax call to a domain (dev.twitter.com) that is different from our web page’s domain. With regular Ajax requests, the current page and the requested resource both need to be in the same domain. - Yes: add the cached image URL to the page
If the image URL was already in our local storage cache, and it’s still fresh, then we simply set the profile image’ssrcattribute to this image URL, without requesting the URL from Twitter.
- No: fetch the image URL and add it to the page when fetched. Also store the (possibly changed) image URL and fetch time in local storage.
-
- Get the friend’s latest tweet
The next chunk of code makes another Ajax request — this time using Twitter’s Search API — to retrieve the friend’s latest tweet. To do this, it retrieves the URLhttp://search.twitter.com/search.json?q=from:pageId, wherepageIdis the friend’s screen name. As with the profile image Ajax call above, the call is asynchronous, so we provide a “success” function to handle the response. This function does two things:-
- Add the tweet text to the page
The “success” function starts by retrieving the first entry in the response data’sresultsobject, and storing this entry’stextproperty in alatestTweetvariable. (If theresultsobject is empty thenlatestTweetis set to “No recent tweets found.” instead.) Then the function passes the text through two regular expressions to convert URLs and Twitter screen names in the text to tappable links, before appending the text to the tweet page, wrapped in<blockquote>and<div class="recentTweet">elements. - Add the tweet timestamp to the page
Finally, the “success” function retrieves the tweet timestamp from the entry’screated_atproperty, and subtracts it from the current time. It then converts this time difference to an appropriate text string — for example, “6 seconds ago” or “45 minutes ago” — and inserts the resultingtweetTimeStringvariable into the page’s.tweetTimediv.
- Add the tweet text to the page
As before, we set the Ajax request’s
dataTypeoption to"jsonp"to send a JSONP request to Twitter, rather than a standard JSON request. -
- All done – this page now becomes the new “previous page”
We’ve now finished adding the tweet page. The last line of ouraddPage()function sets theprevPagevariable to the page’s ID, so that the next call toaddPage()can update this page’s “Next” navigation link.
Step 9: The manageFriends() function
manageFriends() is called when the user taps the “Manage Friends” (info) button in the bottom right corner of a tweet page. It creates the list view containing the Twitter friends that the user has added in the app, and displays the “Manage Friends” page, including the list view.

Add this function inside your closeFriends() function, after the addPages() function:
  /**
   * Displays the "Manage Friends" page when the user clicks the
   * "info" button.
   */

  function manageFriends() {

    // Get the "friends" list view and empty it
    var friendsList = $('#friendsList');
    friendsList.empty();

    // Add the friends to the list view
    for ( var i=0; i<friends.length; i++ ) {
      var li = $( '<li><a href="#" class="view">' + friends[i] + '</a><a href="#" class="delete">Delete</a></li>' );
      friendsList.append( li );
      li.find('a[class="view"]').jqmData( 'screenName', friends[i] ).click( viewFriend );
      li.find('.delete').jqmData( 'screenName', friends[i] ).click( deleteFriend );
    }

    // Display the Manage Friends page and update the list view widget
    $.mobile.changePage( '#manageFriends', { transition: "flip" } );
    friendsList.listview('refresh');
    $('#dots').empty();
  }
manageFriends() is fairly straightforward. Here’s how it works:
- Get the “friends” list view and empty it
First the function retrieves the list view’sulelement, which has anidoffriendsList, and stores it in a variable calledfriendsList. It then removes all the childlielements from the list by calling jQuery’sempty()method. - Add the friends to the list view
Next the function loops through the friends in thefriendsarray. For each friend, it creates anlielement containing the screen name, as well as two links: one with a class ofview, which the user can tap to view the friend’s tweet page, and the other with a class ofdelete, which the user can tap to remove the friend from the list. It then adds thislielement to thefriendsListulelement. Finally, the block of code uses the jQueryfind()method to locate the two links. For each link, it uses thejqmData()method to attach ascreenNamedata item to the link, containing the friend’s screen name, then adds a click handler to the link to call theviewFriend()ordeleteFriend()method as apprpriate.jqmData()is a special jQuery Mobile version of jQuery’sdata()method. It works much likedata(), except it also allows for any jQuery Mobile namespace that may be in use. - Display the Manage Friends page and update the list view widget
Finally, themanageFriends()function calls the jQuery MobilechangePage()method to reveal the “Manage Friends” page using the “flip” transition; calls therefreshmethod of the jQuery Mobilelistviewplugin on the list view; and removes the dots from the bottom of the page, since these should only appear on the tweet pages.Why the call to
listview('refresh')? Normally, jQuery Mobile turns anyulelement with adata-role="listview"attribtue into a list view automatically when the page loads. However, since we’ve updated the items inside the list view using JavaScript after the page has loaded, we need to call therefreshmethod so that jQuery Mobile can enhance and style the new list items.
Step 10: The addFriend() function
addFriend() is responsible for adding a new friend to the user’s friends list. It’s called when the user taps the “Add Friend” button after entering the friend’s Twitter screen name in the “Add Friend” dialog (see figure below).
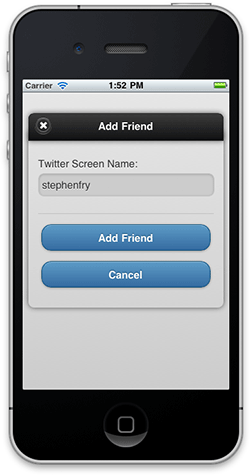
addFriend() runs when the user enters a friend’s screen name and taps the “Add Friend” button.Here’s the code — as usual, place it in the closeFriends() function at the end:
  /**
   * Adds a new friend to the user's friends list.
   * Called when the user taps the "Add Friend" button
   * in the "Add Friend" dialog.
   */

  function addFriend() {

    // Get the screen name that the user entered
    var screenName = $("#screenName").val().replace(/W/ig, "");

    // Does the friend already exist in the list?
    if ( friends.indexOf( screenName ) == -1 ) {

      // No: add the friend to the list
      friends.push( screenName );

      // Close the "Add Friend" dialog
      $('#addFriendDialog').dialog('close');

      // Add an item for the friend in the list view and update the widget
      var li = $( '<li><a href="#" class="view">' + screenName + '</a><a href="#" class="delete">Delete</a></li>' );
      var friendsList = $('#friendsList');
      friendsList.append( li );
      li.find('a[class="view"]').jqmData('screenName', screenName ).click( viewFriend );
      li.find('.delete').jqmData( 'screenName', screenName ).click( deleteFriend );
      friendsList.listview('refresh');

      // Make sure the "Done" button isn't greyed out
      $('#done').css('opacity',1);

      // Store the updated friends list in local storage
      localStorage['friends'] = JSON.stringify( friends );
    } else {

      // Yes: warn the user and do nothing
      alert( "You've already added that friend to your list." );
    }
  }
Here’s how this function works:
- Get the screen name that the user entered
First, the function retrieves the screen name of the friend to add from the#screenNamefield in the dialog. It passes it through a regular expression to remove any non-word characters that the user may have entered (such as an'@'symbol), then stores the result in ascreenNamevariable. - Does the friend already exist in the list?
Next the function uses the JavaScriptindexOf()function to see if the screen name already exists in thefriendsarray.indexOf()returns the array index if the screen name was found, or-1if it wasn’t.-
- No: add the friend to the list
Assuming the friend isn’t already in the array, the function first adds the friend to the array using thepush()method. - Close the “Add Friend” dialog
Next the function closes the dialog by calling theclosemethod of the jQuery Mobile dialog plugin. This automatically returns the user to the “Manage Friends” page that opened the dialog. - Add an item for the friend in the list view and update the widget
This code is similar to the code inmanageFriends(). It adds anliitem to the list view, containing the friend’s screen name and the links to view and delete the friend, then refreshes the list view to update the widget. - Make sure the “Done” button isn’t greyed out
Since the “Done” button in the header may have been greyed out by thedeleteFriend()function (see Step 11), we make sure it isn’t greyed out any more by setting its opacity to 1. - Store the updated friends list in local storage
The list of friends has changed, so this line of code stores the new list in local storage so it’s available to the app after restarting. - Yes: warn the user and do nothing
If the friend did already exist then we display an alert box to the user to warn them.
- No: add the friend to the list
-
Step 11: The deleteFriend() function
deleteFriend() removes a friend from the user’s friends list. It’s called when the user taps a Delete button in the Manage Friends page.
Save the following code inside the closeFriends() function, after the addFriend() function:
  /**
   * Deletes a friend from the user's friends list.
   * Called when the user taps a "Delete" button
   * in the "friends" list view.
   */

  function deleteFriend() {

    // Get the delete button that was tapped
    var deleteButton = $(this);

    // Retrieve the array index of the friend to delete
    var friendIndex = friends.indexOf( deleteButton.jqmData("screenName") );

    // Remove the friend from the array
    friends.splice( friendIndex, 1 );

    // Remove the item from the list view and update the widget
    deleteButton.parent().remove();
    $('#friendsList').listview('refresh');

    // If there are no more friends in the list, grey out the Done button
    if ( friends.length == 0 ) $('#done').css('opacity',.5);

    // Store the updated friends list in local storage
    localStorage["friends"] = JSON.stringify( friends );

    // Reset the current friend to the first friend in the list
    currentFriend = localStorage["currentFriend"] = friends[0];
  }
deleteFriend() works like this:
- Get the delete button that was tapped
The function starts by retrieving the button element that was clicked from thethisvariable, turning it into a jQuery object for easier manipulation, and storing the object indeleteButton.When an event occurs on a DOM element — such as a click on a button — JavaScript usually makes the element available to the event handler in the
thisvariable. - Retrieve the array index of the friend to delete
Next, the function retrieves the screen name associated with the Delete button using thejqmData()method, then searches thefriendsarray for the screen name, storing the found element’s index infriendIndex. - Remove the friend from the array
Now that we have the index of the friend to remove, it’s easy to remove it from the array using JavaScript’ssplice()method. This takes the index to start removing elements from, and the number of elements to remove (1 in this case). - Remove the item from the list view and update the widget
Next the function finds the parentliitem that contains the button, removes it from the list, and calls the list view’s “refresh” method to update the list view. - If there are no more friends in the list, grey out the Done button
The friends list needs to have at least one friend in it for the app to work properly, so if the user has deleted all their friends, we grey out the Done button by setting its opacity to 0.5. (If the user then attempts to tap the Done button, the first line of code inshowTweetPages()prevents the user returning to the tweet pages.) - Store the updated friends list in local storage
As withaddFriend(), we need to update the copy of the friends array in local storage, since the array has been altered. - Reset the current friend to the first friend in the list
Since the current friend may have been deleted, we change the current friend to be the first friend in the friends list, and store the new value in local storage.
Step 12: The viewFriend() function
The viewFriend() function is very short. It simply sets the current friend to the screenName value stored in the list item that was tapped, then calls showTweetPages() to display the friend’s tweet page.
Here’s the code — place it inside closeFriends(), after the deleteFriend() function:
  /**
   * Displays the selected friend's tweet page.
   * Called when the user taps a friend item
   * in the "friends" list view.
   */

  function viewFriend() {
    currentFriend = $(this).jqmData('screenName');
    showTweetPages();
  }
Step 13: Handling orientation changes
We need to make one more small tweak to the app. When running the app inside Safari on the iPhone, rotating the device from portrait to landscape doesn’t always re-render the page correctly. Therefore, we need to write a short handler function for the jQuery Mobile orientationchange event. Add this code inside the closeFriends() function, after viewFriend():
  /**
   * If the user rotates their device, and we're running
   * the app inside Mobile Safari, then reload the page to
   * avoid rendering glitches.
   */

  $(window).orientationchange( function( e ) {
    if ( !window.navigator.standalone ) window.location.reload( false );
  } );
This function is triggered whenever the user rotates their device to a different orientation. It checks the window.navigator.standalone property, which iOS devices set to true if the app is running from the home screen (outside Safari). If this value is false then the app is running in Safari, so the function reloads the page to re-render it.
Step 14: Improving the pagination plugin
The pagination plugin works pretty well, but it does have one drawback. In order to move between pages by swiping, you have to swipe more than 50% of the way from left to right (or right to left). It would be nice if you could change pages with quick, short swipes, as well as dragging the pages slowly if you prefer.
To achieve this, we can modify the code that decides whether to move to the previous or next page after the swipe has completed. If the swipe happened quickly — in under, say, 600 milliseconds — then we move to the new page, even if the swipe wasn’t more than 50% of the way across the screen.
First, in jquery.mobile.pagination.js, add a line of code to the touchstart handler to record the time that the drag started:
              if( !dragStart ){
                dragStart = true;
                $page.trigger( "dragstart.pagination" );
                this.dragStartTime = new Date().getTime();
              }
Then change this chunk of code:
          //bind touch handlers
          $page
            .bind( "gesturestart.pagination touchend.pagination", function(){
              $page.unbind( ".pagination" );
            })
            .bind( "touchmove.pagination", moveHandler )
            .one( "touchend", function( e ){
              var pOffset = $page.offset().left,
                absOS = Math.abs( pOffset ),
                toGo  = $page.width() - absOS;

              snapTo( absOS > 150 ? pOffset + ( pOffset > 0 ? toGo : -toGo ) : 0, absOS < 10 );
            });
…to this:
          //bind touch handlers
          $page
            .bind( "gesturestart.pagination touchend.pagination", function(){
              $page.unbind( ".pagination" );
            })
            .bind( "touchmove.pagination", moveHandler )
            .one( "touchend", function( e ){
              var pOffset = $page.offset().left,
                absOS = Math.abs( pOffset ),
                toGo  = $page.width() - absOS;

              var newOffset = absOS > 150 ? pOffset + ( pOffset > 0 ? toGo : -toGo ) : 0;

              // If the swipe was quick then always snap to the previous/next page,
              // even if the swipe was over a short distance
              if ( new Date().getTime() - this.dragStartTime < 600 ) {
                newOffset = absOS > 10 ? pOffset + ( pOffset > 0 ? toGo : -toGo ) : 0;
              }

              snapTo( newOffset, absOS < 10 );
            });
Step 15: Creating the images
We’ve now built our app. Let’s add a bit of polish by creating a few images:
loading.png: The profile image placeholder in tweet pagesquoteMarks.png: The “quote marks” image that sits behind the tweet text in tweet pagesicon.png: An icon for the app when it’s added to the iOS home screen
loading.png should be 100 x 100 pixels, and quoteMarks.png needs to be about 200 x 130 pixels. icon.png should be 114 x 114 pixels, which is the required icon size for iOS retina displays. (iOS automatically scales the icon down for lower-resolution screens.)
You can create the images yourself in Photoshop, or grab the ones I made:


![]()
![]()
Save the three image files as transparent PNG-24 images in your CloseFriends folder.
Step 16: Try it out!
Your app is all finished, so you’re now ready to try it out. There are a few different ways you can run the app:
- In a desktop browser: You can just double-click your
index.htmlfile to open the app in a desktop browser. This should work OK, at least in WebKit browsers, although you won’t be able to swipe due to the lack of touch events. (You can still click below the tweet pages, or use the left and right arrow keys, to move between pages.) It also won’t look that great due to the unpredictable dimensions of your browser window. - In an iOS device: You’ll need to upload your
CloseFriendsfolder to a publicly-accessible website. Then browse to the app’s URL on your iPhone or iPad. For best results, tap the icon at the bottom of the Safari window and choose “Add to Home Screen” (see figure below), then run the app full-screen from your home screen. - Using the iOS Simulator: This option is good if you don’t have a publicly-accessible site to upload your app to. The iOS Simulator comes with Xcode, and lets you simulate iPhone and iPad devices in any resolution and orientation. It’s also faster than using a real iOS device. Just fire up the simulator, then drag your app’s
index.htmlfile on top of the simulator to open in Safari. Then add the app to your home screen as above.
If you’re in a hurry then you can, of course, try out my copy of the app hosted on the Elated server. Just open this article in Mobile Safari on your iPhone, iPad or iOS Simulator; tap the button below to open the app; then add it to your home screen:
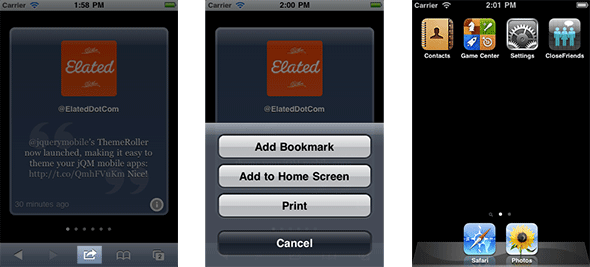
index.html file in Mobile Safari, tap the icon shown above, then tap “Add to Home Screen”. Tap the icon on the home screen to run the app.Once you’ve launched the app, click the “i” button and start adding some Twitter friends, as shown in the figure below. Drag a tweet page slowly right-to-left to see it move smoothly to the next page. You can also swipe quickly, or tap the bottom left or bottom right areas of the screen, to move quickly between pages.
Summary
In this detailed tutorial, you’ve walked through all the steps needed to create a simple, but fully functional iPhone app, using HTML, CSS, JavaScript, jQuery Mobile, and the pagination plugin. You’ve:
- Downloaded and installed the pagination plugin
- Created the
index.htmlfile for the app - Built the app’s CSS stylesheet
- Created the main
closeFriends()function - Added the
init()function to kick off the app - Written the
showTweetPages()function, which is called whenever we need to display the tweet page - Created the
addPages()function for adding all the tweet pages to the DOM - Built the
addPage()function, which creates and adds a single tweet page - Written the
manageFriends()function, which displays the “Manage Friends” page - Created the
addFriend()function for adding new friends to the list - Added the
deleteFriend()function, which removes a friend from the list - Added the
viewFriend()function for viewing an individual friend’s latest tweet - Written a handler to re-render the page after orientation changes
- Modified the pagination plugin for nicer swiping
- Created the app images, and
- Tested the final product.
Along the way, you’ve explored various jQuery Mobile features, including mobile pages, dialogs, buttons and list views, as well as various events, methods and properties of the jQuery Mobile API, such as the pagebeforeshow, pageshow and orientationchange events; the changePage() method; and the activePage property.
Although this app is quite simple, and is designed purely for iOS devices, it gives you a starting point for building more feature-rich, cross-device web apps. For example, it should be possible to adapt the app to work well on Android devices too. (I concentrated on iOS mainly because I don’t have an Android device to develop and test with, and the Android emulator is painfully slow!)
I hope you enjoyed reading this tutorial, and that it has inspired you to have a go at creating some mobile web apps using the excellent jQuery Mobile framework. Happy coding!

hello there… =)
i’m interested in this topic…hmm, can i possibly create this kind of app? because i have doubts if i can make this thing…. hope you can help me….
This app is just kind of a website, interesting!
This code does not seem to work properly anymore. Could it be outdated?
It was written 11 years ago, so almost definitely 🙂 For one thing, Twitter’s API 1.0 is no longer usable.