
For years, us web designers and coders were stuck with a pretty poor range of fonts that we could use across all platforms: Times, Arial, Verdana, and a handful more. If you wanted anything more original then you had to create your text as an image in Photoshop.
Well, times they are a-changin’, in the form of web fonts. These are online font files that you link to from within your page. The browser downloads the font you linked to, and you can then use that font for text within your web pages, just as if it was a regular system font. Lovely!
Web fonts are really starting to take off now, with services such as Typekit, Font Squirrel and Ascender giving you access to a range of free and paid web fonts.
In this tutorial I’ll show you how to use the Google Font API to add nice-looking web fonts to your pages. This service is a relative newcomer to the scene, but it has a couple of big strengths:
- All the fonts are free
- It’s very easy to use
So, let’s see how we can use the Google Font API to add pretty fonts to our web pages — in less than 5 minutes!
Step 1: Choose a font
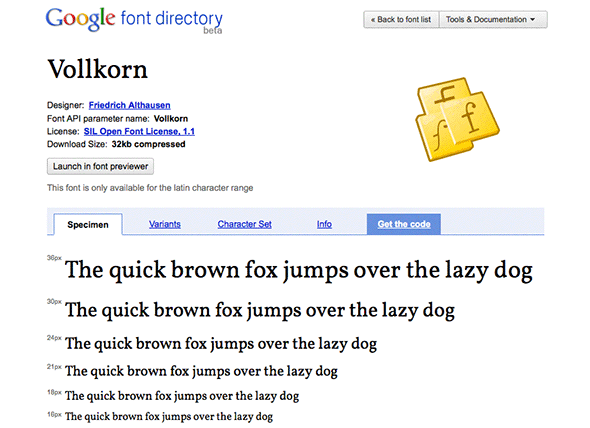
The first thing to do is browse the Google Font Directory and find a font that you’d like to use. I decided to use Vollkorn for the body text in my demo page.
Click the font you’re interested in to view more details of the font, and view specimens at various sizes:
Some fonts, such as PT Sans, have several families to choose from. When you click the font in the list, you’ll see all the families appear. Just click the family you’d like to use.
Step 2: Embed your chosen font
When you’re ready to use the font, click the Get the code link on the font detail page. You can usually select other variants of the font that you’d like to use — such as Light or Bold — by selecting the appropriate checkboxes.
Below the checkboxes, you’ll see a line of code that begins:
<link href='http://fonts.googleapis.com/css?...
For example, my line of code looks like this:
<link href='http://fonts.googleapis.com/css?family=Vollkorn&subset=latin' rel='stylesheet' type='text/css'>
Copy and paste that line of code into the <head> ... </head> section of your web page — for example:
<!doctype html>
<html lang="en">
<head>

<title>Free Pretty Web Fonts with Google Font API</title>
<meta http-equiv="Content-Type" content="text/html;charset=utf-8">

<link href='http://fonts.googleapis.com/css?family=Vollkorn&subset=latin' rel='stylesheet' type='text/css'>

</head>
If you have a static site with regular .html pages then you’ll need to paste this line of code into every page of your site where you want to use the font. However, if you’re using PHP, ASP or a content management system of some sort then you can just put it in the include file for your page header. For example, in WordPress you can add it to /wp-content/themes/(theme-folder)/header.php.
As well as embedding the font, you can also download the .ttf font files from the font detail page. This is handy when it comes to mocking up your page designs for clients in Photoshop.
Embedding multiple fonts
Want to embed more than 1 web font? Just separate the font family names with the pipe (‘|‘) symbol in your <link> tag. For example, I decided to use the lovely IM Fell DW Pica SC font for my headings, so I simply changed my <link> tag to include this font too:
<link href='http://fonts.googleapis.com/css?family=IM+Fell+DW+Pica+SC|Vollkorn&subset=latin' rel='stylesheet' type='text/css'>
As you can see, if the font name has spaces in it then you need to replace the spaces with '+' signs in the <link> tag. (If you’re ever unsure of exactly what to put in your <link> tag, just grab the code for the font as explained in Step 2 above.)
It’s best not to have too many web fonts in your page, as they can make the page slower to load. Try to stick to 1 or 2 if you can.
Step 3: Style your text using the font
Now that you’ve embedded the font, you can use it in your CSS, just like a regular font. For example, I added CSS rules to make the default body text use Vollkorn, and the headings use IM Fell DW Pica SC, as follows:
body {
  font-family: 'Vollkorn', 'Georgia', serif;
}

h1, h2, h3 {
  font-family: 'IM Fell DW Pica SC', 'Palatino', serif;
}
It’s always a good idea to include browser-safe fonts like Arial, Times or Georgia in your font stack as a fallback, as well as generic fonts such as “serif” or “sans-serif”, as I’ve done above. Here’s a useful list of cross-platform browser-safe fonts.
That’s really all there is to it! Check out my example page — view the page source if you want to see how it works.

Summary
In this tutorial I’ve shown you how to embed nice-looking web fonts in your pages using the Google Font API. The nice thing about the API is that you don’t need to use any JavaScript at all. You just include the <link> tag, and Google’s server does the rest, returning the appropriate CSS rules based on the user’s browser. Easy — and it even works in IE6!
If you need more control over the way fonts are loaded, or you want to include fonts from other providers such as Typekit, then you’ll need to get your hands dirty with some JavaScript and use the Google WebFont Loader. Fortunately there’s some pretty thorough documentation for this on their website.
Have fun!
This looks like a quick and easy way to spice up pages. Thanks for the tute!
What is the browser compatibility effectiveness with this? Does it work with all late version browsers?
@cat: Thanks, glad you liked it!
@GMCDesign: Yes, pretty much anything vaguely modern: http://code.google.com/apis/webfonts/faq.html#Browsers_Supported
Very very nice! Thank you!
@impelmedia: You’re welcome – thanks for the feedback 🙂
Pretty slick. Love getting help and ideas from your site.
@john_m: Thanks 🙂