Just starting out with HTML? Here are 10 essential HTML tags that you’ll need to know when building your web pages. If you learn how these 10 tags work then you’ll have enough knowledge to put together a basic page.
At the end of the tutorial you’ll find code for an example web page that includes all 10 tags, so that you can see how to use them.
Tags and elements
An HTML tag is a special word or letter surrounded by angle brackets, < and >. You use tags to create HTML elements, such as paragraphs or links.
Many elements have an opening tag and a closing tag — for example, a p (paragraph) element has a <p> tag, followed by the paragraph text, followed by a closing </p> tag.
Some elements don’t have a closing tag. These are called empty elements. For example, the br element for inserting line breaks is simply written <br>.
If you’re working with XHTML then you write empty elements using self-closing tags — for example, <br />.
Now let’s look at those 10 tags!
1. <html> … </html> — The root element
All web pages start with the html element. It’s also called the root element because it’s at the root of the tree of elements that make up a web page.
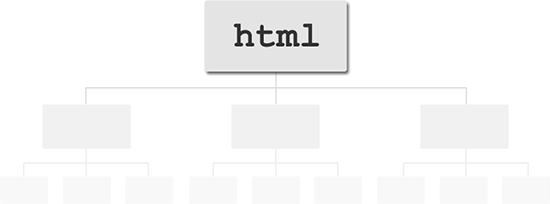
html element sits at the root of the tree of elements in a web page.To create the html element, you write an opening <html> tag followed by a closing </html> tag. Everything else in your web page then goes between these 2 tags:
<html>
  (all other page elements go here)
</html>
2. <head> … </head> — The document head
The head element contains information about the web page, as opposed to the web page content itself. There are many elements that you can put inside the head element, such as:
title(described below)link, which you can use to add style sheets and favicons to your pagemeta, for specifying things like character sets, page descriptions, and keywords for search enginesscript, for adding JavaScript code to the page
Here’s a typical head element:
<head>
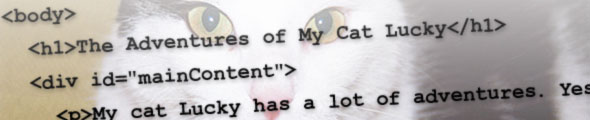
<title>The Adventures of My Cat Lucky</title>
<meta http-equiv="Content-Type" content="text/html; charset=utf-8">
<meta name="description" content="The adventures of my favourite pet cat Lucky, with stories, pictures and movies.">
<meta name="keywords" content="cat,Lucky,pet,animal">
<link rel="stylesheet" type="text/css" href="/style.css">
<link rel="shortcut icon" href="/favicon.ico">
</head>
3. <title> … </title> — The page title
The title element contains the title of the page. The title is displayed in the browser’s title bar (the bar at the top of the browser window), as well as in bookmarks, search engine results, and many other places.
The title should describe the page’s content succinctly and accurately. Try to give each page of your site its own unique title.
Here’s an example:
<title>The Adventures of My Cat Lucky</title>
4. <body> … </body> — The page’s content
The body element appears after the head element in the page. It should contain all the content of your web page: text, images, and so on. All web pages have 1 single body element, with the exception of frameset pages, which contain frame elements instead.
Here’s the general format of the body element:
<body>
  (all page content goes here)
</body>
5. <h1> … </h1> — A section heading
Headings let you break up your page content into readable chunks. They work much like headings and subheadings in a book or a report.
HTML actually supports 6 heading elements: h1, h2, h3, h4, h5, and h6. h1 is for the most important headings, h2 is for less important subheadings, and so on. Typically you won’t need to use more than h1, h2 and h3, unless your page is very long and complex.
Here’s an example of an h1 heading element:
<h1>The Adventures of My Cat Lucky</h1>
6. <p> … </p> — A paragraph
The p element lets you create paragraphs of text. Most browsers display paragraphs with a vertical gap between each paragraph, nicely breaking up the text.
While you can create “paragraphs” of text just by using <br> tags to insert blank lines between chunks of text, it’s better to use p elements instead. Not only is it neater, but it gives browsers, search engines and other non-humans a better idea of how your page is structured.
Here’s an example of a paragraph:
<p>My cat Lucky has a lot of adventures. Yesterday she caught a mouse, and this morning she caught two!</p>
A good rule of thumb when writing text for the web is to make sure that each paragraph contains a single point, topic or thought. If you want to talk about 2 different things, use 2 paragraphs.
7. <a> … </a> — A link
One of the most important elements in a web page, the a element lets you create links to other content. The content can be either on your own site or on another site.
To create a link, you wrap <a> and </a> tags around the content you want to use for the link, and supply the URL to link to in the <a> tag’s href attribute.
Here’s how to create some text that links to www.example.com:
<a href="http://www.example.com/">Visit this great website!</a>
8. <img> — An image
The img element lets you insert images into your web pages. To insert an image, you first upload the image to your web server, then use an <img> tag to reference the uploaded image filename. Here’s an example:
<img src="myphoto.jpg" alt="My Photo">
The alt attribute is required for all img tags. It’s used by browsers that don’t display images to give alternative text to the visitor.
Find out more about using images in web pages.
9. <div> … </div> — A block-level container for content
The div element is a generic container that you can use to add more structure to your page content. For example, you might group several paragraphs or headings that serve a similar purpose together inside a div element. Typically, div elements are used for things like:
- Page headers and footers
- Columns of content and sidebars
- Highlighted boxes within the text flow
- Areas of the page with a specific purpose, such as ad spots
- Image galleries
By adding class and/or id attributes to your div elements, you can then use CSS to style and position the divs. This is the basis for creating CSS-based page layouts.
Here’s an example that uses a div to contain the content for a sidebar in the page:
<div id="sidebar">
  <h1>Sidebar Heading</h1>
  <p>Sidebar text</p>
  <p>More sidebar text</p>
</div>
10. <span> … </span> — An inline container for content
The span element is similar to div in that it’s used to add structure to your content. The difference is that div is a block-level element, while span is an inline element:
- Block-level elements, such as
div,h1, andp, are elements that are designed to hold relatively large or stand-alone blocks of content, such as paragraphs of text. A block-level element always starts on a new line. - Inline elements, such as
span,a, andimg, are designed to hold smaller pieces of content — such as a few words or a sentence — within a larger block of content. Adding an inline element doesn’t cause a new line to be created. Block-level elements can contain inline elements, but inline elements can’t contain block-level elements.
As with a div, you often add a class and/or id attribute to a span so that you can style it using CSS.
The following example uses span elements to indicate product names within a paragraph. These product names could then be highlighted using CSS. A custom search engine could also potentially use the information provided by the span elements to identify the products within the page.
<p>Some of our products include <span class="product">SuperWidgets</span>, <span class="product">MegaWidgets</span>, and <span class="product">WonderWidgets</span>.</p>
Bringing it all together
Now that you’ve learned these 10 essential HTML tags, let’s put them all together in a single web page:
<html>
  <head>
    <title>The Adventures of My Cat Lucky</title>
    <meta http-equiv="Content-Type" content="text/html; charset=utf-8">
    <meta name="description" content="The adventures of my favourite pet cat Lucky, with stories, pictures and movies.">
    <meta name="keywords" content="cat,Lucky,pet,animal">
    <link rel="stylesheet" type="text/css" href="/style.css">
    <link rel="shortcut icon" href="/favicon.ico">
  </head>
  <body>
    <h1>The Adventures of My Cat Lucky</h1>
    <div id="mainContent">
      <p>My cat Lucky has a lot of adventures. Yesterday she <a href="mouse.html">caught a mouse</a>, and this morning she caught two!</p>
      <p>Here's a picture of Lucky:</p>
      <img src="lucky.jpg" alt="Lucky">
    </div>
    <div id="sidebar">
      <h2>Buy our stuff!</h2>
      <p>Some of our products include <span class="product">SuperWidgets</span>, <span class="product">MegaWidgets</span>, and <span class="product">WonderWidgets</span>.</p>
    </div>
  </body>
</html>
As you can see, you can build an entire web page using just these 10 HTML tags. You’re now ready to learn some more tags by browsing our other HTML tutorials. Have fun!
You actually don’t need to include an <html>/</html> or <body>/</body> tag in HTML (but not XHTML). You also don’t need to use </p> tags.
http://code.google.com/speed/articles/optimizing-html.html
@apexskier: True, and this is also the case with HTML5: http://www.w3.org/TR/html5/syntax.html#syntax-tag-omission
That said, most people usually include closing tags for the sake of clarity.
i read the topic ,very nicely explained
can u tell me how to code for for a table in html using javascript to obtain aleternate color of row. like first row is blue 2nd is red ,again 3rd is blue 4rth row is red .like tht until we end the table.
thanks ………
It’s very easy to write a code for that
——-
For rows
Do like
Why don’t you just use CSS to do that. Easy.
@kaushik: You can do this with CSS3 these days – no need for JS:
tr:nth-child(odd) { background-color: #eee; }
tr:nth-child(even) { background-color: #fff; }
Works in FF, Safari, Chrome, Opera. Should work in IE9 too.
If you really need it in IE <=8 then you could use a jQuery fallback:
<script src="http://code.jquery.com/jquery-1.4.4.min.js"></script>

<script>
$(document).ready( function() {
  $('tr:nth-child(odd)').css( 'background-color', '#eee' );
  $('tr:nth-child(even)').css( 'background-color', '#fff' );
} );
</script>
Matt
[Edited by matt on 21-Nov-10 22:46]
Very nice way to learn HTML. I really like the way you mentioned. Thanks.
Thank you it is very nice to meet people on the net that are willing to share as you have…again great job and Thanks a lot…
Thanks Tim 🙂
Thanks Buddy.
Got some help to brush up the basics.
I am very new to web dev and still at the early stages of learning. I just wanted to say that the way you write really helps me understand these concepts much more than other tutorials. Thank you so much!!!
You’re welcome Will, thanks for the feedback!
I need to ask you a question about the elements and components of html so can you please help me
Thanks a bunch dude! Excellent info for a beginner like me.
Hi I am a student and I am very interested in coding especially HTML it is very good tutorial and thank you so much for the tutorial
You’re welcome 🙂 Good luck with your studies!
In the bring it all together,I noticed that the <div id tage…was embedded in tag and closed with same tag. While tag was embedded in Tag and closed with tag. Please I am confused with that.
Hi Sir, I am a student and I am very interested in coding especially HTML it is very good tutorial and thank you so much for the tutorial..
Super!!!
Can you please post all the tags which are present in HTML?
I love it