Dragging and dropping can be a very intuitive way for users to interact with your site or web app. People often use drag-and-drop for things like:
- Moving email messages into folders
- Reordering lists of items
- Moving objects in games around, such as cards and puzzle pieces
Drag-and-drop with JavaScript used to be very hard to do — in fact, getting a decent cross-browser version working was next to impossible. However, with modern browsers and a smattering of jQuery, drag-and-drop is now a piece of cake!
In this tutorial we’ll take a look at how to create drag-and-drop interfaces with jQuery, and we’ll finish with a complete drag-and-drop example: a simple number cards game for kids.
jQuery UI
![]()
![]()
To add drag-and-drop functionality to your pages, you need to include both the jQuery library and the jQuery UI plugin. jQuery UI is a fantastic plugin for jQuery that adds all sorts of useful user interface widgets, effects and behaviours — including drag-and-drop.
The easiest way to include both libraries is to use Google’s CDN, as follows:
<head>
...

<script type="text/javascript" src="https://ajax.googleapis.com/ajax/libs/jquery/1.5.0/jquery.min.js"></script>
<script type="text/javascript" src="https://ajax.googleapis.com/ajax/libs/jqueryui/1.8.9/jquery-ui.min.js"></script>

...
</head>
Making elements draggable

When you add an element to a web page — such as a div or an image — then that element is fixed in the page. However, using jQuery UI, it’s easy to make any element draggable with the mouse.
To make an element draggable, simply call the draggable() method on it. Here’s a simple example:
<!doctype html>
<html lang="en">
<head>

<style>
#makeMeDraggable { width: 300px; height: 300px; background: red; }
</style>

<script type="text/javascript" src="https://ajax.googleapis.com/ajax/libs/jquery/1.5.0/jquery.min.js"></script>
<script type="text/javascript" src="https://ajax.googleapis.com/ajax/libs/jqueryui/1.8.9/jquery-ui.min.js"></script>

<script type="text/javascript">

$( init );

function init() {
  $('#makeMeDraggable').draggable();
}

</script>

</head>
<body>

<div id="content" style="height: 400px;">
  <div id="makeMeDraggable"> </div>
</div>

</body>
</html>
Adding draggable options
You can pass lots of options to draggable() to customize the behaviour of the draggable element, like this:
$('#makeMeDraggable').draggable( {
    option1: value1,
    option2: value2,
    ...
  } );
Here are some options that you’ll probably want to use often:
containment
- By default, you can drag a draggable element anywhere in the page. Usually, though, you want to constrain the element to a certain portion of the page.
You can do this by setting the
containmentoption to various values:'parent'- Constrains the draggable to the parent element
'document'- Constrains the draggable to the page
'window'- Constrains the draggable to the browser window
- A selector
- Constrains the draggable to the selected element
- Array of 4 values (
[x1,y1,x2,y2]) - Constrains the draggable to the specified rectangle
cursor
- Changes the mouse cursor during dragging. For example, you can set this option to
'move'to turn the mouse pointer into a move cursor when dragging the element.
snap
- Set this to a selector (e.g.
snap: '#snapToMe') to snap the draggable element to the edges of the selected element. You can also set this option totrueto snap the element to any other draggable element in the page.
stack
- If you’re making a group of elements draggable — such as a set of cards — you usually want the currently-dragged element to appear on top of the other elements in the group. By setting the
stackoption to a selector that matches the group of elements, you can make sure this happens. jQuery UI adjusts thez-indexproperties of the elements so that the currently-dragged element is brought to the top.
Let’s modify our draggable square example above, and set a few options. Here’s the changed code:
function init() {
  $('#makeMeDraggable').draggable( {
    containment: '#content',
    cursor: 'move',
    snap: '#content'
  } );
}
Notice how the box is now constrained to, and snaps to the edges of, the #content div. The cursor also changes to a move cursor while dragging.
Using a helper

Helpers are elements that are dragged instead of the original element. They are useful when you want to leave the original element in place, but still allow the user to drag something from the element to somewhere else in the page. For example, you might want to let the user drag colours from a colour palette on top of objects to colour them.
You use the helper option to set a helper element for the drag operation. Possible values are:
'original'- The default value. The dragged element is effectively the helper, and it moves when the user drags it.
'clone'- Makes a copy of the element, and moves the copy instead.
- A function
- Lets you create a custom helper. You specify a function which accepts an
eventobject and returns the markup for the helper element (or elements). This element is then moved instead of the original.
The following example uses a function to create a custom helper element for the drag operation. Again, this is based on the previous examples — I’ve just included the relevant changes here:
<style>
#makeMeDraggable { width: 300px; height: 300px; background: red; }
#draggableHelper { width: 300px; height: 300px; background: yellow; }
</style>

...

<script type="text/javascript">

$( init );

function init() {
  $('#makeMeDraggable').draggable( {
    cursor: 'move',
    containment: 'document',
    helper: myHelper
  } );
}

function myHelper( event ) {
  return '<div id="draggableHelper">I am a helper - drag me!</div>';
}

</script>
Events: Responding to drags
Often when the user drags an element, you want to know when the dragging has started and stopped, as well as the new position of the element. You can do this by binding event handlers to various events that are triggered by the drag operation, like this:
$('#makeMeDraggable').draggable( {
    eventName: eventHandler,
    ...
  } );
Here’s a list of available events:
create
- Fired when the draggable element is first created by calling
draggable().
start
- Fired when the user first starts dragging the element.
drag
- Fired whenever the mouse is moved during the drag operation.
stop
- Fired when the user lets go of the mouse button after dragging the element.
Your event handler function should accept 2 arguments:
- The event object (
event). - A jQuery UI object representing the draggable element (
ui).
You can use the following 3 properties of the ui object to retrieve information about the dragged element:
helper- The jQuery object representing the helper that’s being dragged. If you haven’t set a custom helper using the
helperoption then this object is the element itself. position- An object that contains the position of the dragged element or helper, relative to the element’s original position. The object has 2 properties:
left(the x-position of the left edge of the element), andtop(the y-position of the top edge of the element). offset- An object that contains the position of the dragged element or helper, relative to the document. As with
position, the object hasleftandtopproperties.
Let’s modify our example so that it displays the final position of the dragged element, relative to the document, when the user releases the mouse button. Here’s the relevant code:
<script type="text/javascript">

$( init );

function init() {
  $('#makeMeDraggable').draggable( {
    cursor: 'move',
    containment: 'document',
    stop: handleDragStop
  } );
}

function handleDragStop( event, ui ) {
  var offsetXPos = parseInt( ui.offset.left );
  var offsetYPos = parseInt( ui.offset.top );
  alert( "Drag stopped!nnOffset: (" + offsetXPos + ", " + offsetYPos + ")n");
}

</script>
Styling draggable elements
Sometimes it’s nice to give elements a different look while they’re being dragged. For example, you might want to highlight the dragged element, or add a drop shadow to it so it looks like it’s being lifted off the page.
While an element is actually being dragged, jQuery UI gives the element a CSS class of ui-draggable-dragging. You can then add a CSS rule for this class in order to style the element while the user is dragging it.
Let’s modify our simple draggable square example so that it changes from red to green while it’s being dragged:
<style>
#makeMeDraggable { width: 300px; height: 300px; background: red; }
#makeMeDraggable.ui-draggable-dragging { background: green; }
</style>
Droppables: Accepting draggable elements
So far we’ve learned how to make an element draggable, so that the user can drag it around the page. We’ve also looked at using events to respond to drags and drops.
However, there’s an easier way to deal with drops, and that is to create droppable elements. A droppable element is an element that can accept a draggable element that has been dragged and dropped onto it.
When a draggable is dropped on a droppable, the droppable fires a drop event. By writing an event handler function for the drop event, you can determine which draggable was dropped onto the droppable.
To make an element droppable, you call — you guessed it — droppable().
Let’s modify our draggable square example to include a droppable element that the square can be dropped onto:
<!doctype html>
<html lang="en">
<head>

<style>
#makeMeDraggable { float: left; width: 300px; height: 300px; background: red; }
#makeMeDroppable { float: right; width: 300px; height: 300px; border: 1px solid #999; }
</style>

<script type="text/javascript" src="https://ajax.googleapis.com/ajax/libs/jquery/1.5.0/jquery.min.js"></script>
<script type="text/javascript" src="https://ajax.googleapis.com/ajax/libs/jqueryui/1.8.9/jquery-ui.min.js"></script>

<script type="text/javascript">

$( init );

function init() {
  $('#makeMeDraggable').draggable();
  $('#makeMeDroppable').droppable( {
    drop: handleDropEvent
  } );
}

function handleDropEvent( event, ui ) {
  var draggable = ui.draggable;
  alert( 'The square with ID "' + draggable.attr('id') + '" was dropped onto me!' );
}

</script>

</head>
<body>

<div id="content" style="height: 400px;">

  <div id="makeMeDraggable"> </div>
  <div id="makeMeDroppable"> </div>

</div>

</body>
</html>
As you can see, we’ve created an event handler function called handleDropEvent() to respond to the droppable’s drop event. As with draggable events, the handler needs to accept an event and a ui object.
The ui object has a draggable property, which is the draggable element that was dragged onto the droppable. Our function uses this object, along with the jQuery attr() method, to retrieve the ID of the dropped element ("makeMeDraggable") and display it using alert().
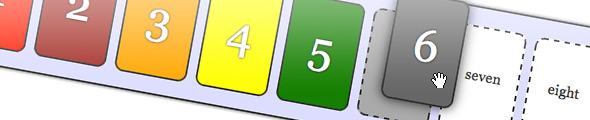
Complete example: A drag-and-drop number cards game
A lot of the above concepts are easier to grasp when you see them working in a real example. So let’s make one!
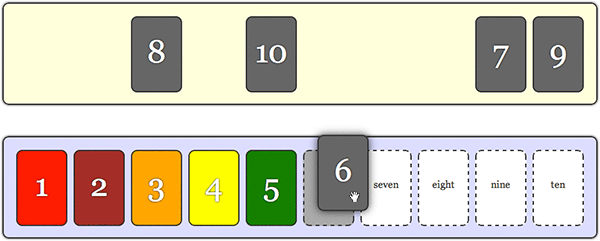
We’re going to build a simple number cards game for young kids. The user is presented with 10 number cards in random order, and 10 slots to drop the cards onto. The object of the game is to drop all 10 cards onto the correct slots. Try out the finished game by clicking the button below:
Step 1: The markup
The HTML for our game is straightforward:
<!doctype html>
<html lang="en">
<head>

<title>A jQuery Drag-and-Drop Number Cards Game</title>
<meta http-equiv="Content-Type" content="text/html;charset=utf-8">
<link rel="stylesheet" type="text/css" href="style.css">

<script type="text/javascript" src="https://ajax.googleapis.com/ajax/libs/jquery/1.5.0/jquery.min.js"></script>
<script type="text/javascript" src="https://ajax.googleapis.com/ajax/libs/jqueryui/1.8.9/jquery-ui.min.js"></script>

<script type="text/javascript">

// JavaScript will go here

</script>

</head>
<body>

<div id="content">

  <div id="cardPile"> </div>
  <div id="cardSlots"> </div>

  <div id="successMessage">
    <h2>You did it!</h2>
    <button onclick="init()">Play Again</button>
  </div>

</div>

</body>
</html>
In the head area we’ve included the jQuery and jQuery UI libraries, and linked to a style.css file which we’ll build in Step 4. We’ve also added a script element for our JavaScript code (which we’ll write in a moment). In the body we have:
- A
"#content"divto contain the game - A
"#cardPile"divthat will contain the set of 10 unsorted cards - A
"#cardSlots"divthat will contain the 10 slots to drop the cards into - A
"#successMessage"divto display a “You did it!” message, along with a button to play again. (We’ll hide this initially using JavaScript when the page loads.)
Step 2: The init() function
Our first chunk of JavaScript code sets up the game:
var correctCards = 0;
$( init );

function init() {

  // Hide the success message
  $('#successMessage').hide();
  $('#successMessage').css( {
    left: '580px',
    top: '250px',
    width: 0,
    height: 0
  } );

  // Reset the game
  correctCards = 0;
  $('#cardPile').html( '' );
  $('#cardSlots').html( '' );

  // Create the pile of shuffled cards
  var numbers = [ 1, 2, 3, 4, 5, 6, 7, 8, 9, 10 ];
  numbers.sort( function() { return Math.random() - .5 } );

  for ( var i=0; i<10; i++ ) {
    $('<div>' + numbers[i] + '</div>').data( 'number', numbers[i] ).attr( 'id', 'card'+numbers[i] ).appendTo( '#cardPile' ).draggable( {
      containment: '#content',
      stack: '#cardPile div',
      cursor: 'move',
      revert: true
    } );
  }

  // Create the card slots
  var words = [ 'one', 'two', 'three', 'four', 'five', 'six', 'seven', 'eight', 'nine', 'ten' ];
  for ( var i=1; i<=10; i++ ) {
    $('<div>' + words[i-1] + '</div>').data( 'number', i ).appendTo( '#cardSlots' ).droppable( {
      accept: '#cardPile div',
      hoverClass: 'hovered',
      drop: handleCardDrop
    } );
  }

}
Let’s break the above code down:
- Initialize the
correctCardsvariable
We first set up a variable calledcorrectCardsto track the number of correctly-dropped cards. When this reaches 10 then the user has won the game. - Call
init()when the document is ready
We use$( init )to call ourinit()function once the DOM has loaded. - Hide the success message
Within theinit()function itself, we first hide the#successMessagediv, and reduce its width and height to zero so that we can make it “pop out” when the game is won. - Reset the game
Sinceinit()can be called after a game has already been played, we setcorrectCardsto zero so that the game can begin again, and also clear out the#cardPileand#cardSlotsdivs so that we can populate them afresh. - Create the pile of shuffled cards
To create the pile of cards, we first make an array,numbers, containing the numbers 1 to 10, then sort the array with a randomizing sort function to shuffle the numbers.Then we loop through each element in the
numbersarray, creating adivcard element for each number. Inside thedivwe place the number, so that it appears on the card in the page. Once we’ve created thedivobject, we store the card’s number in a'number'key inside the object by using jQuery’sdata()method.We also give the card
divanidof'cardn', wherenis the card number. This lets us give each card a different colour in the CSS. We then append the card to the#cardPilediv.The interesting bit in the loop is, of course, the call to the
draggable()method. This:- Makes the card draggable
- Uses
containmentto constrain it to the#contentdiv - Uses
stackto ensure that the dragged card always sits on top of the other cards - Uses
cursorto turn the mouse cursor into a move cursor during the drag, and - Sets the
revertoption totrue. This makes the card slide back to its initial position when dropped, so that the user can try again. We’ll turn this option off when the user has dragged the card to the correct slot, as we’ll see in a moment.
- Create the card slots
The last part of theinit()function creates the 10 slots to drag the cards onto. We create an array calledwordsthat contains the words “one” to “ten”, then loop through the elements of thewordsarray, creating a slotdivfor each number. As before, we usedata()to record the number of the slot, so we can test if the user has dragged the correct card to the correct slot, and we append the slot to the#cardSlotsdiv.This time, we call the
droppable()method so that the slot can receive a draggable card. We use theacceptoption with the selector"#cardPile div"to ensure that the slot will only accept our number cards, and not any other draggable element. ThehoverClassoption adds a CSS class to a droppable when a draggable is hovered over it — we use this option to add a class of'hovered'to the element, which we’ll highlight using CSS. Finally, we set up adropevent handler calledhandleCardDrop(), which is triggered when the user drops a card on the droppable. We’ll write this handler next.
Step 3: The handleCardDrop() event handler function
The last piece of JavaScript we’ll write is the event handler for our droppables’ drop events, handleCardDrop():
function handleCardDrop( event, ui ) {
  var slotNumber = $(this).data( 'number' );
  var cardNumber = ui.draggable.data( 'number' );

  // If the card was dropped to the correct slot,
  // change the card colour, position it directly
  // on top of the slot, and prevent it being dragged
  // again

  if ( slotNumber == cardNumber ) {
    ui.draggable.addClass( 'correct' );
    ui.draggable.draggable( 'disable' );
    $(this).droppable( 'disable' );
    ui.draggable.position( { of: $(this), my: 'left top', at: 'left top' } );
    ui.draggable.draggable( 'option', 'revert', false );
    correctCards++;
  }

  // If all the cards have been placed correctly then display a message
  // and reset the cards for another go

  if ( correctCards == 10 ) {
    $('#successMessage').show();
    $('#successMessage').animate( {
      left: '380px',
      top: '200px',
      width: '400px',
      height: '100px',
      opacity: 1
    } );
  }

}
Let’s work through this function:
- Grab the slot number and card number
The first thing we do is grab the number of the slot that the card was dropped on, as well as the number of the dropped card, so that we can see if they match.As our function is an event handler for the droppable element, we can retrieve the element via the
thisvariable. We then wrap the element inside the$()function to turn it into a jQuery object, then use thedata()method to retrieve the value of the'number'key, and store the value inslotNumber.Similarly, the
draggableproperty of theuiobject contains the jQuery object representing the dragged card. By reading its'number'key usingdata(), we get the card number, which we store incardNumber. - If the card and slot match, drop the card onto the slot
If the 2 numbers match then the correct card was dropped onto the slot. First we add a'correct'CSS class to the card so that we can change its colour via CSS. We then disable both the draggable and droppable by calling theirdisablemethods. This prevents the user from being able to drag this card, or drag another card onto this slot, again.After disabling the card and slot, we position the card directly on top of the slot by calling the
position()method. This handy method lets you position any element relative to practically anything else, and also plays nicely with draggable and droppable elements. In this case, we’re positioning the card (ui.draggable)’s top left corner (my: 'left top') on top of the slot ($this)’s top left corner (at: 'left top').Finally we set the card’s
revertoption tofalse. This prevents the card from being pulled back to its initial position once it has been dropped. We also increment thecorrectCardsvariable to keep track of the number of correctly-dropped cards. - Check for a win
IfcorrectCardsequals 10, we have a winner! We show the success message, then animate it from zero width and height up to its full width and height, creating a zooming effect. The success message includes a Play Again button in the markup that triggers theinit()function when clicked, thereby starting a new game.
Step 4: The CSS
The last stage of creating our card game is to style the page, cards and slots using CSS. Here’s the complete style.css file:
/* Add some margin to the page and set a default font and colour */

body {
  margin: 30px;
  font-family: "Georgia", serif;
  line-height: 1.8em;
  color: #333;
}

/* Give headings their own font */

h1, h2, h3, h4 {
  font-family: "Lucida Sans Unicode", "Lucida Grande", sans-serif;
}

/* Main content area */

#content {
  margin: 80px 70px;
  text-align: center;
  -moz-user-select: none;
  -webkit-user-select: none;
  user-select: none;
}

/* Header/footer boxes */

.wideBox {
  clear: both;
  text-align: center;
  margin: 70px;
  padding: 10px;
  background: #ebedf2;
  border: 1px solid #333;
}

.wideBox h1 {
  font-weight: bold;
  margin: 20px;
  color: #666;
  font-size: 1.5em;
}

/* Slots for final card positions */

#cardSlots {
  margin: 50px auto 0 auto;
  background: #ddf;
}

/* The initial pile of unsorted cards */

#cardPile {
  margin: 0 auto;
  background: #ffd;
}

#cardSlots, #cardPile {
  width: 910px;
  height: 120px;
  padding: 20px;
  border: 2px solid #333;
  -moz-border-radius: 10px;
  -webkit-border-radius: 10px;
  border-radius: 10px;
  -moz-box-shadow: 0 0 .3em rgba(0, 0, 0, .8);
  -webkit-box-shadow: 0 0 .3em rgba(0, 0, 0, .8);
  box-shadow: 0 0 .3em rgba(0, 0, 0, .8);
}

/* Individual cards and slots */

#cardSlots div, #cardPile div {
  float: left;
  width: 58px;
  height: 78px;
  padding: 10px;
  padding-top: 40px;
  padding-bottom: 0;
  border: 2px solid #333;
  -moz-border-radius: 10px;
  -webkit-border-radius: 10px;
  border-radius: 10px;
  margin: 0 0 0 10px;
  background: #fff;
}

#cardSlots div:first-child, #cardPile div:first-child {
  margin-left: 0;
}

#cardSlots div.hovered {
  background: #aaa;
}

#cardSlots div {
  border-style: dashed;
}

#cardPile div {
  background: #666;
  color: #fff;
  font-size: 50px;
  text-shadow: 0 0 3px #000;
}

#cardPile div.ui-draggable-dragging {
  -moz-box-shadow: 0 0 .5em rgba(0, 0, 0, .8);
  -webkit-box-shadow: 0 0 .5em rgba(0, 0, 0, .8);
  box-shadow: 0 0 .5em rgba(0, 0, 0, .8);
}

/* Individually coloured cards */

#card1.correct { background: red; }
#card2.correct { background: brown; }
#card3.correct { background: orange; }
#card4.correct { background: yellow; }
#card5.correct { background: green; }
#card6.correct { background: cyan; }
#card7.correct { background: blue; }
#card8.correct { background: indigo; }
#card9.correct { background: purple; }
#card10.correct { background: violet; }


/* "You did it!" message */
#successMessage {
  position: absolute;
  left: 580px;
  top: 250px;
  width: 0;
  height: 0;
  z-index: 100;
  background: #dfd;
  border: 2px solid #333;
  -moz-border-radius: 10px;
  -webkit-border-radius: 10px;
  border-radius: 10px;
  -moz-box-shadow: .3em .3em .5em rgba(0, 0, 0, .8);
  -webkit-box-shadow: .3em .3em .5em rgba(0, 0, 0, .8);
  box-shadow: .3em .3em .5em rgba(0, 0, 0, .8);
  padding: 20px;
}
I won’t go into detail with this file, since most of it is either self-explanatory or not relevant to the tutorial. Some rules of interest though:
#cardSlotsand#cardPile— the rectangles containing the slots and unsorted cards respectively — are given a 2-pixel dark grey border with rounded corners and a drop shadow.#cardSlots divand#cardPile divselect the slots and cards themselves. They’re floated left so they all line up in a horizontal row, and given some padding and the same style border as the#cardSlotsand#cardPilerectangles. Additionally, the card slots are given a dashed border, and the cards are given a nice big font for the numbers. Thetext-shadowproperty is used to put an outline around the numbers.#cardSlots div.hoveredis triggered when a card hovers over a slot, thanks to thehoverclass: 'hovered'option we added in Step 2 above. We give this selector a darker grey background, so that the slot is highlighted when a card is hovered over it. This helps the user identify which slot they’re dropping the card onto.#cardPile div.ui-draggable-draggingis triggered when a card is being dragged (see Styling draggable elements). We give this selector a drop shadow so the card appears to be floating above the page.#card1.correctthrough#card10.correctselect the individual cards once they’ve been correctly placed, due to the call toaddClass()that we made insidehandleCardDrop()(see Step 3 above). We give each correct card a different colour to create a nice rainbow effect. We can do this because we gave each card a uniqueidin Step 2.- Finally,
#successMessagestyles the “You did it!” box, positioning it centrally in the page and giving it a green background, curvy border and box shadow. We set its width and height to zero initially, so we can zoom it in when the user wins the game.
All done!
We’ve now built our drag-and drop card game. Try it out again if you like:
In this tutorial you learned how to use the jQuery and jQuery UI libraries to add drag-and-drop functionality to your web pages. You looked at:
- The Draggable plugin, which makes it easy to turn any element into a draggable widget in the page
- How to specify options for draggable elements
- Using a helper element, which is dragged instead of the draggable element
- Working with draggable events to get information about dragged elements
- Styling elements while they’re being dragged, and
- The Droppable plugin, which lets you easily identify and handle dropped elements.
Finally, we brought all this knowledge together to build a simple drag-and-drop card game for kids.
I hope you found this article helpful. There’s a lot more to draggables and droppables — and jQuery UI, for that matter — than we’ve covered here. For more information, see the jQuery UI website.
Happy coding!
Hi, thanks for the effort, but… whats new and relevant in this post, that is not here: http://jqueryui.com/?
@Paul11: The jQuery UI site is great for reference, but it doesn’t have an introductory tutorial for drag-and-drop AFAIK. Hopefully my tutorial fills this gap to some extent. 🙂
Great tutorial! Will be a base for a bar custom plugin. Nice!!
@Decret: Thanks – glad you enjoyed it. 🙂
Thanks for the tutorial.
It helps me trying to implement a calendar system where people can drag events type to fill a day.
I have a few questions though:
1. I have set helper:”clone” but when dragging the original is moved.
In my case a user can select the same event multiple time during the date so I need the draggable item to remain in place. I did this using the following code:
var clone = $(ui.draggable).clone();
            $(this).append(clone);
			 clone.position( { of: $(this), my: 'left top', at: 'left top' } );
            clone.removeClass('draggable')
            clone.draggable({
                snap: '.ui-droppable',

            });
not sure if it’s the best way but it seems it’s working. Any better solution?
2. I would like if an item is dragged out of the droppable container (cardSlots in the example) the item being dragged to fade out (disappear).
3. Is it possible to have the same container draggable and droppable? I need to be able to move items around after they have been dropped with some rules enforced like after one item was dropped no other item can be dropped in the same location, but if it’s moved the location is available again.
Thanks again for the great tutorial
Mike
Hi MikeQ,
Glad you found the tutorial helpful!
1. Not sure why the original would move if you used helper: ‘clone’. That’s certainly not the expected behaviour. Maybe you could post the URL of the full page and we can take a look at the problem?
2. Check out the ‘out’ event for Droppable: http://jqueryui.com/demos/droppable/ – you could create an event handler for this that calls fadeOut() on the draggable then removes it from the DOM.
3. I’ve no idea. 🙂 Have you tried it? Also by default you can move a draggable again after it’s been dragged on a droppable – it’s only disabled in my card game demo because that’s the way the game works.
Hi Matt,
This is what I have:
<!doctype html> <html lang="en"> <head> <title>A jQuery Drag-and-Drop Number Cards Game</title> <meta http-equiv="Content-Type" content="text/html;charset=utf-8"> <link rel="stylesheet" type="text/css" href="style.css"> <script type="text/javascript" src="//ajax.googleapis.com/ajax/libs/jquery/1.5.2/jquery.min.js"></script> <script type="text/javascript" src="//ajax.googleapis.com/ajax/libs/jqueryui/1.8.11/jquery-ui.min.js"></script> <script type="text/javascript"> var correctCards = 0; $( init ); function init() { // Hide the success message $('#successMessage').hide(); $('#successMessage').css( { left: '580px', top: '250px', width: 0, height: 0 } ); // Reset the game correctCards = 0; $('#cardPile').html( '' ); $('#cardSlots').html( '' ); // Create the pile of shuffled cards var numbers = [ 1, 2, 3, 4, 5, 6, 7, 8, 9, 10 ]; numbers.sort( function() { return Math.random() - .5 } ); for ( var i=0; i<10; i++ ) { $('<div>' + numbers + '</div>').data( 'number', numbers ).attr( 'id', 'card'+numbers ).attr( 'sNumber', '' ).appendTo( '#cardPile' ).draggable( { containment: '#content', stack: '#cardPile div', cursor: 'move', revert: true, helper: 'clone', zIndex: '2700' , opacity: 0.5 } ); } // Create the card slots var words = [ 'one', 'two', 'three', 'four', 'five', 'six', 'seven', 'eight', 'nine', 'ten' ]; for ( var i=1; i<=10; i++ ) { $('<div>' + words[i-1] + '</div>').data( 'number', i ).attr( 'sid', 'slot'+i ).appendTo( '#cardSlots' ).droppable( { accept: '#cardPile div, #cardSlots div', hoverClass: 'hovered', drop: handleCardDrop } ); } } function handleCardDrop( event, ui ) { var slotNumber = $(this).data( 'number' ); var cardNumber = ui.draggable.data( 'number' ); var oldSlotNumber = ui.draggable.attr( 'sNumber' ); ui.draggable.attr( 'sNumber', slotNumber ); // If the card was dropped to the correct slot, // change the card colour, position it directly // on top of the slot, and prevent it being dragged // again //if ( slotNumber == cardNumber ) { ui.draggable.addClass( 'correct' ); // ui.draggable.draggable( 'disable' ); if (oldSlotNumber == '') $(this).droppable('disable'); else { $("[sid=slot" + oldSlotNumber + "]").droppable({ disabled: false }); ui.helper.remove(); } var clone = $(ui.draggable).clone(); $(this).append(clone); clone.position( { of: $(this), my: 'left top', at: 'left top' } ); clone.removeClass('draggable') clone.draggable({ snap: '.ui-droppable' }); ui.draggable.draggable( 'option', 'revert', false ); correctCards++; //} // If all the cards have been placed correctly then display a message // and reset the cards for another go if ( correctCards == 10 ) { $('#successMessage').show(); $('#successMessage').animate( { left: '380px', top: '200px', width: '400px', height: '100px', opacity: 1 } ); } } </script> </head> <body> <div class="wideBox"> <h1>Drag-and-Drop with jQuery: Your Essential Guide</h1> <h2>A Number Cards Game</h2> </div> <div id="content"> <div id="cardPile"> </div> <div id="cardSlots"> </div> <div id="successMessage"> <h2>You did it!</h2> <button onclick="init()">Play Again</button> </div> </div> <div class="wideBox"> <p>© Elated.com | <a href="http://www.elated.com/articles/drag-and-drop-with-jquery-your-essential-guide/">Back to Tutorial</a></p> <p style="font-size: .8em; line-height: 1.5em;"><a rel="license" href="http://creativecommons.org/licenses/by/3.0/"><img alt="Creative Commons License" style="border-width:0" src="http://i.creativecommons.org/l/by/3.0/88x31.png" /></a><br />This <span xmlns:dc="http://purl.org/dc/elements/1.1/" href="http://purl.org/dc/dcmitype/Text" rel="dc:type">work</span> by <a xmlns:cc="http://creativecommons.org/ns#" href="http://www.elated.com/" property="cc:attributionName" rel="cc:attributionURL">http://www.elated.com/</a> is licensed under a <a rel="license" href="http://creativecommons.org/licenses/by/3.0/">Creative Commons Attribution 3.0 Unported License</a>.</p> </div> </body> </html>It’s working, well almost, I still can’t delete cards by dragging them out of the cardSlots div and I get an error on IE (all versions except 9).
This is the error:
SCRIPT5007: Unable to get value of the property ‘options’: object is null or undefined
jquery-ui.min.js, line 54 character 158
Thanks
Mike
@MikeQ:
I think you might want to record when a draggable is successfully dropped on a droppable – you could do this in handleCardDrop(), and store the “dropped” status in the draggable using data(). Then create a handleCardOut event handler that binds to the droppable’s ‘out’ event. If the card in question’s “dropped” status is true then fade the card out by calling fadeOut().
Quick thought – wouldn’t it make more sense to create the clone when the user starts dragging the card (the draggable’s ‘start’ event), rather than when the card is dropped (the droppable’s ‘drop’ event)?
Not sure about the IE error – might be a jQuery UI issue?
Hi Matt, thanks for the tutorial, very interesting. I’m working on a page which includes drag and drop items with jquerys. Call me thick here but I’ve been trying to see the bit of code that relates to the controlling of the parameters of the drag and drop zone. I see in the demo that the parameters are nicely set and the cards cannot be dragged out of the zone. However, my drag and drop items can be dragged off the page to the right and bottom and I need to stop this.
Can you give me an indication of what coding I have to insert?
Many thanks
@Ely: The ‘containment’ option controls limits the draggable elements to a specific element or rectangle. See the “Adding draggable options” section of the tutorial.
Many thanks Matt, I went through this “Adding draggable options” tutorial, changed the code using containment: ‘#content’, snap: ‘#content’ and ………. my problem is solved!!
I’ve got another issue now. My Javascript is working perfectly in Firefox, Crome, Safari, IE 8 but not in IE 7. I haven’t tried it in IE 6 but I imagine its not working either. I’m not able to select and drag my images. Any ideas?
Thanks again
Ely
@Ely: Any JavaScript errors in IE7?
Hi Matt, yes at the bottom left the warning ‘error on page’ appears when I place the mouse on top of any of the images. I haven’t got this live yet, but here’s the code (quite a lot I’m afraid):
//<!--Main.js Site--> //Everything inside will load as soon as the DOM is loaded and before the page contents are loaded. $(document).ready(function() { //Let´s give our “ulâ€s a Carousel effect by adding the following line of code: $('.productsNav').jcarousel(); $('.productsNav').jcarousel(); $('.desc').css({'opacity':'0.8'}) //Let’s apply a hover effect on the product images so that we can see some info regarding the respective product //This code will apply a nice hover “slideDown†and “slideUp†effect. $('.productsNav li').hover( function(){ $('.desc', this).slideDown() }, function(){ $('.desc', this).slideUp() } )//End of hover //Apply reflection to all images of class $('.reflected').draggable({ revert: 'invalid', helper:'clone', opacity: 0.4, appendTo: 'body',zIndex:9999, containment: '#content', snap: '#content'}).reflect({opacity:0.3, height:0.2}); //calculates total price var cartTotal = function(){ var total = 0; $('.products').each( function() { var price = parseFloat($('span.price', this).text()); var quantity = parseInt($('span.quantity', this).text()); total += price * quantity; } ); $('#showTotal').text(total); } //Now let´s bring the “draggable†and “droppable†of jquery UI in action //Adds products to cart var addProductToCart = function(event, dragged){ /*var $div = $('#container'); $('.jcarousel-item') .jcarousel-item("start",function(event, dragged){ dragged.limit = $div.offset(); dragged.limit.bottom = dragged.limit.top + $div.outerHeight() - $( this ).outerHeight(); dragged.limit.right = dragged.limit.left + $div.outerWidth() - $( this ).outerWidth(); }) .jcarousel-item(function(event, dragged){ $( this ).css({ top: Math.min( dragged.limit.bottom, Math.max( dragged.limit.top, dragged.offsetY ) ), left: Math.min( dragged.limit.right, Math.max( dragged.limit.left, dragged.offsetX ) ) }); });*/ //storing the dragged element in a variable var pObj = $(dragged.draggable) //storing the main parent i.e "li" in our case var mainParent = pObj.parent().parent(); var productImage = pObj.attr('src'); var productId = pObj.attr('id').split('_'); var productTitle = mainParent.children('.desc').find('.details').text(); var productPrice = mainParent.children('.desc').find('.num').text(); //checking if that product already exist in cart, if so we will increase the quantity by 1 //else a product will get append to the dropOnMe div var chkCart = $('#'+productId[1]+'_cart'); //================================================================= //Conditions //================================================================= var chkCart2 = $('#'+'prod5'+'_cart'); var chkCart3 = $('#'+'prod6'+'_cart'); if((productId[1] == 'prod6') && (chkCart2.size()==1) || (productId[1] == 'prod5') && (chkCart3.size()==1)){ alert ( "Pack2-Lite2 cannot be bought with Pack2-EXPRESS2." ); } else{ chkCart2 = $('#'+'prod'+'_cart'); chkCart3 = $('#'+'prod'+'_cart'); if((productId[1] == 'prod') && (chkCart2.size()==1) || (productId[1] == 'prod') && (chkCart3.size()==1)){ alert ( "Pack2-ENTERPRISE2 cannot be bought with Pack3-Lite3." ); } //=============================================================== var chkCart4 = $('#'+'prod1'+'_cart'); var chkCart5 = $('#'+'prod2'+'_cart'); if((productId[1] == 'prod2') && (chkCart4.size()==1) || (productId[1] == 'prod1') && (chkCart5.size()==1)){ alert ( "Pack2-Lite2 cannot be bought with Pack2-EXPRESS2." ); } else{ chkCart4 = $('#'+'prod'+'_cart'); chkCart5 = $('#'+'prod'+'_cart'); if((productId[1] == 'prod') && (chkCart4.size()==1) || (productId[1] == 'prod') && (chkCart5.size()==1)){ alert ( "Pack2-ENTERPRISE2 cannot be bought with Pack3-Lite3." ); } //================================================================= var chkCart6 = $('#'+'prod1'+'_cart'); var chkCart7 = $('#'+'prod4'+'_cart'); if((productId[1] == 'prod4') && (chkCart6.size()==1) || (productId[1] == 'prod1') && (chkCart7.size()==1)){ alert ( "Pack2-Lite2 cannot be bought with Pack2-EXPRESS2." ); } else{ chkCart6 = $('#'+'prod'+'_cart'); chkCart7 = $('#'+'prod'+'_cart'); if((productId[1] == 'prod') && (chkCart6.size()==1) || (productId[1] == 'prod') && (chkCart7.size()==1)){ alert ( "Pack2-ENTERPRISE2 cannot be bought with Pack3-Lite3." ); } //================================================================== //================================================================= var chkCart8 = $('#'+'prod2'+'_cart'); var chkCart9 = $('#'+'prod4'+'_cart'); if((productId[1] == 'prod4') && (chkCart8.size()==1) || (productId[1] == 'prod2') && (chkCart9.size()==1)){ alert ( "Pack2-Lite2 cannot be bought with Pack2-EXPRESS2." ); } else{ chkCart8 = $('#'+'prod'+'_cart'); chkCart9 = $('#'+'prod'+'_cart'); if((productId[1] == 'prod') && (chkCart8.size()==1) || (productId[1] == 'prod') && (chkCart9.size()==1)){ alert ( "Pack2-ENTERPRISE2 cannot be bought with Pack3-Lite3." ); } //================================================================== //================================================================= var chkCart10 = $('#'+'prod1'+'_cart'); var chkCart11 = $('#'+'prod3'+'_cart'); if((productId[1] == 'prod3') && (chkCart10.size()==1) || (productId[1] == 'prod1') && (chkCart11.size()==1)){ alert ( "Pack2-Lite2 cannot be bought with Pack2-EXPRESS2." ); } else{ chkCart10 = $('#'+'prod'+'_cart'); chkCart11 = $('#'+'prod'+'_cart'); if((productId[1] == 'prod') && (chkCart10.size()==1) || (productId[1] == 'prod') && (chkCart11.size()==1)){ alert ( "Pack2-ENTERPRISE2 cannot be bought with Pack3-Lite3." ); } //================================================================== //================================================================= var chkCart12 = $('#'+'prod3'+'_cart'); var chkCart13 = $('#'+'prod4'+'_cart'); if((productId[1] == 'prod4') && (chkCart12.size()==1) || (productId[1] == 'prod3') && (chkCart13.size()==1)){ alert ( "Pack2-Lite2 cannot be bought with Pack2-EXPRESS2." ); } else{ chkCart12 = $('#'+'prod'+'_cart'); chkCart13 = $('#'+'prod'+'_cart'); if((productId[1] == 'prod') && (chkCart12.size()==1) || (productId[1] == 'prod') && (chkCart13.size()==1)){ alert ( "Pack2-ENTERPRISE2 cannot be bought with Pack3-Lite3." ); } //================================================================== //================================================================= var chkCart14 = $('#'+'prod5'+'_cart'); var chkCart15 = $('#'+'prod7'+'_cart'); if((productId[1] == 'prod7') && (chkCart14.size()==1) || (productId[1] == 'prod5') && (chkCart15.size()==1)){ alert ( "Pack2-Lite2 cannot be bought with Pack2-EXPRESS2." ); } else{ chkCart14 = $('#'+'prod'+'_cart'); chkCart15 = $('#'+'prod'+'_cart'); if((productId[1] == 'prod') && (chkCart14.size()==1) || (productId[1] == 'prod') && (chkCart15.size()==1)){ alert ( "Pack2-ENTERPRISE2 cannot be bought with Pack3-Lite3." ); } //================================================================== //================================================================= var chkCart16 = $('#'+'prod6'+'_cart'); var chkCart17 = $('#'+'prod7'+'_cart'); if((productId[1] == 'prod7') && (chkCart16.size()==1) || (productId[1] == 'prod6') && (chkCart17.size()==1)){ alert ( "Pack2-Lite2 cannot be bought with Pack2-EXPRESS2." ); } else{ chkCart16 = $('#'+'prod'+'_cart'); chkCart17 = $('#'+'prod'+'_cart'); if((productId[1] == 'prod') && (chkCart16.size()==1) || (productId[1] == 'prod') && (chkCart17.size()==1)){ alert ( "Pack2-ENTERPRISE2 cannot be bought with Pack3-Lite3." ); } //================================================================== //================================================================= var chkCart18 = $('#'+'prod7'+'_cart'); var chkCart19 = $('#'+'prod8'+'_cart'); if((productId[1] == 'prod8') && (chkCart18.size()==1) || (productId[1] == 'prod7') && (chkCart19.size()==1)){ alert ( "Pack2-Lite2 cannot be bought with Pack2-EXPRESS2." ); } else{ chkCart18 = $('#'+'prod'+'_cart'); chkCart19 = $('#'+'prod'+'_cart'); if((productId[1] == 'prod') && (chkCart18.size()==1) || (productId[1] == 'prod') && (chkCart19.size()==1)){ alert ( "Pack2-ENTERPRISE2 cannot be bought with Pack3-Lite3." ); } //================================================================== //================================================================= var chkCart20 = $('#'+'prod6'+'_cart'); var chkCart21 = $('#'+'prod8'+'_cart'); if((productId[1] == 'prod8') && (chkCart20.size()==1) || (productId[1] == 'prod6') && (chkCart21.size()==1)){ alert ( "Pack2-Lite2 cannot be bought with Pack2-EXPRESS2." ); } else{ chkCart20 = $('#'+'prod'+'_cart'); chkCart21 = $('#'+'prod'+'_cart'); if((productId[1] == 'prod') && (chkCart20.size()==1) || (productId[1] == 'prod') && (chkCart21.size()==1)){ alert ( "Pack2-ENTERPRISE2 cannot be bought with Pack3-Lite3." ); } //================================================================== //================================================================= var chkCart24 = $('#'+'prod9'+'_cart'); var chkCart25 = $('#'+'prod11'+'_cart'); if((productId[1] == 'prod11') && (chkCart24.size()==1) || (productId[1] == 'prod9') && (chkCart25.size()==1)){ alert ( "Pack2-Lite2 cannot be bought with Pack2-EXPRESS2." ); } else{ chkCart24 = $('#'+'prod'+'_cart'); chkCart25 = $('#'+'prod'+'_cart'); if((productId[1] == 'prod') && (chkCart24.size()==1) || (productId[1] == 'prod') && (chkCart25.size()==1)){ alert ( "Pack2-ENTERPRISE2 cannot be bought with Pack3-Lite3." ); } //================================================================== //================================================================= var chkCart22 = $('#'+'prod9'+'_cart'); var chkCart23 = $('#'+'prod10'+'_cart'); if((productId[1] == 'prod10') && (chkCart22.size()==1) || (productId[1] == 'prod9') && (chkCart23.size()==1)){ alert ( "Pack2-Lite2 cannot be bought with Pack2-EXPRESS2." ); } else{ chkCart22 = $('#'+'prod'+'_cart'); chkCart23 = $('#'+'prod'+'_cart'); if((productId[1] == 'prod') && (chkCart22.size()==1) || (productId[1] == 'prod') && (chkCart23.size()==1)){ alert ( "Pack2-ENTERPRISE2 cannot be bought with Pack3-Lite3." ); } //================================================================== //================================================================= var chkCart24 = $('#'+'prod9'+'_cart'); var chkCart25 = $('#'+'prod12'+'_cart'); if((productId[1] == 'prod12') && (chkCart24.size()==1) || (productId[1] == 'prod9') && (chkCart25.size()==1)){ alert ( "Pack2-Lite2 cannot be bought with Pack2-EXPRESS2." ); } else{ chkCart24 = $('#'+'prod'+'_cart'); chkCart25 = $('#'+'prod'+'_cart'); if((productId[1] == 'prod') && (chkCart24.size()==1) || (productId[1] == 'prod') && (chkCart25.size()==1)){ alert ( "Pack2-ENTERPRISE2 cannot be bought with Pack3-Lite3." ); } //================================================================== //================================================================= var chkCart26 = $('#'+'prod11'+'_cart'); var chkCart27 = $('#'+'prod12'+'_cart'); if((productId[1] == 'prod12') && (chkCart26.size()==1) || (productId[1] == 'prod11') && (chkCart27.size()==1)){ alert ( "Pack2-Lite2 cannot be bought with Pack2-EXPRESS2." ); } else{ chkCart26 = $('#'+'prod'+'_cart'); chkCart27 = $('#'+'prod'+'_cart'); if((productId[1] == 'prod') && (chkCart26.size()==1) || (productId[1] == 'prod') && (chkCart27.size()==1)){ alert ( "Pack2-ENTERPRISE2 cannot be bought with Pack3-Lite3." ); } //================================================================== //================================================================= var chkCart28 = $('#'+'prod11'+'_cart'); var chkCart29 = $('#'+'prod10'+'_cart'); if((productId[1] == 'prod10') && (chkCart28.size()==1) || (productId[1] == 'prod11') && (chkCart29.size()==1)){ alert ( "Pack2-Lite2 cannot be bought with Pack2-EXPRESS2." ); } else{ chkCart28 = $('#'+'prod'+'_cart'); chkCart29 = $('#'+'prod'+'_cart'); if((productId[1] == 'prod') && (chkCart28.size()==1) || (productId[1] == 'prod') && (chkCart29.size()==1)){ alert ( "Pack2-ENTERPRISE2 cannot be bought with Pack3-Lite3." ); } //================================================================== //================================================================= var chkCart30 = $('#'+'prod13'+'_cart'); var chkCart31 = $('#'+'prod14'+'_cart'); if((productId[1] == 'prod14') && (chkCart30.size()==1) || (productId[1] == 'prod13') && (chkCart31.size()==1)){ alert ( "Pack2-Lite2 cannot be bought with Pack2-EXPRESS2." ); } else{ chkCart30 = $('#'+'prod14'+'_cart'); chkCart31 = $('#'+'prod13'+'_cart'); if((productId[1] == 'prod13') && (chkCart30.size()==1) || (productId[1] == 'prod14') && (chkCart31.size()==1)){ alert ( "Pack2-ENTERPRISE2 cannot be bought with Pack3-Lite3." ); } //================================================================== //================================================================= var chkCart30 = $('#'+'prod14'+'_cart'); var chkCart31 = $('#'+'prod15'+'_cart'); if((productId[1] == 'prod15') && (chkCart30.size()==1) || (productId[1] == 'prod14') && (chkCart31.size()==1)){ alert ( "Pack2-Lite2 cannot be bought with Pack2-EXPRESS2." ); } else{ chkCart30 = $('#'+'prod'+'_cart'); chkCart31 = $('#'+'prod'+'_cart'); if((productId[1] == 'prod') && (chkCart30.size()==1) || (productId[1] == 'prod') && (chkCart31.size()==1)){ alert ( "Pack2-ENTERPRISE2 cannot be bought with Pack3-Lite3." ); } //================================================================== //================================================================= var chkCart32 = $('#'+'prod13'+'_cart'); var chkCart33 = $('#'+'prod15'+'_cart'); if((productId[1] == 'prod15') && (chkCart32.size()==1) || (productId[1] == 'prod13') && (chkCart33.size()==1)){ alert ( "Pack2-Lite2 cannot be bought with Pack2-EXPRESS2." ); } else{ chkCart32 = $('#'+'prod'+'_cart'); chkCart33 = $('#'+'prod'+'_cart'); if((productId[1] == 'prod') && (chkCart32.size()==1) || (productId[1] == 'prod') && (chkCart33.size()==1)){ alert ( "Pack2-ENTERPRISE2 cannot be bought with Pack3-Lite3." ); } //================================================================== //================================================================= var chkCart34 = $('#'+'prod14'+'_cart'); var chkCart35 = $('#'+'prod16'+'_cart'); if((productId[1] == 'prod16') && (chkCart34.size()==1) || (productId[1] == 'prod14') && (chkCart35.size()==1)){ alert ( "Pack2-Lite2 cannot be bought with Pack2-EXPRESS2." ); } else{ chkCart34 = $('#'+'prod'+'_cart'); chkCart35 = $('#'+'prod'+'_cart'); if((productId[1] == 'prod') && (chkCart34.size()==1) || (productId[1] == 'prod') && (chkCart35.size()==1)){ alert ( "Pack2-ENTERPRISE2 cannot be bought with Pack3-Lite3." ); } //================================================================== //================================================================= var chkCart36 = $('#'+'prod13'+'_cart'); var chkCart37 = $('#'+'prod16'+'_cart'); if((productId[1] == 'prod16') && (chkCart36.size()==1) || (productId[1] == 'prod13') && (chkCart37.size()==1)){ alert ( "Pack2-Lite2 cannot be bought with Pack2-EXPRESS2." ); } else{ chkCart36 = $('#'+'prod15'+'_cart'); chkCart37 = $('#'+'prod16'+'_cart'); if((productId[1] == 'prod16') && (chkCart36.size()==1) || (productId[1] == 'prod15') && (chkCart37.size()==1)){ alert ( "Pack2-ENTERPRISE2 cannot be bought with Pack3-Lite3." ); } //================================================================== //================================================================= var chkCart38 = $('#'+'prod2'+'_cart'); var chkCart39 = $('#'+'prod3'+'_cart'); if((productId[1] == 'prod3') && (chkCart38.size()==1) || (productId[1] == 'prod2') && (chkCart39.size()==1)){ alert ( "Pack2-Lite2 cannot be bought with Pack2-EXPRESS2." ); } else{ chkCart38 = $('#'+'prod5'+'_cart'); chkCart39 = $('#'+'prod8'+'_cart'); if((productId[1] == 'prod8') && (chkCart38.size()==1) || (productId[1] == 'prod5') && (chkCart39.size()==1)){ alert ( "Pack2-ENTERPRISE2 cannot be bought with Pack3-Lite3." ); } //================================================================== //================================================================= var chkCart40 = $('#'+'prod10'+'_cart'); var chkCart41 = $('#'+'prod12'+'_cart'); if((productId[1] == 'prod12') && (chkCart40.size()==1) || (productId[1] == 'prod10') && (chkCart41.size()==1)){ alert ( "Pack2-Lite2 cannot be bought with Pack2-EXPRESS2." ); } else{ chkCart40 = $('#'+'prod'+'_cart'); chkCart41 = $('#'+'prod'+'_cart'); if((productId[1] == 'prod') && (chkCart40.size()==1) || (productId[1] == 'prod') && (chkCart41.size()==1)){ alert ( "Pack2-ENTERPRISE2 cannot be bought with Pack3-Lite3." ); } //================================================================== //==================================================================================================== else{ if(chkCart.size()==1) { var quantity = parseInt(chkCart.find('.quantity').text())+1; chkCart.find('.quantity').text(quantity) } else { $('#dropOnMe').append('<div class="products" id="'+productId[1]+'_cart"><div class="productImage"><img src="'+productImage+'" title="'+productTitle+'"/></div><div class="productInfo"><span class="name">'+productTitle+'</span> <span class="price">'+productPrice+'</span> (x<span class="quantity">1</span>)</div><div class="productRemove"><img src="images/remove.png" /></div></div><div class="clear"></div>') .find('div.products:last') .fadeIn(1000) .find('.productRemove') .click(function() { $(this).parent().fadeOut(1000, function() { var node = $(this) node.remove(); //after removing of the product we will re-calulate the total price cartTotal(); }) }); } } } } } } } } } } } } } } } } } } } } } } } }// Always remember to put a closed bracket after adding a condition //calculates total price cartTotal(); }; $('#dropOnMe').droppable({ accept:'.reflected', activeClass:'activeClassCart', hoverClass:'hoverClassCart', drop:addProductToCart }); }) //======================================================== var cartTotal2 = function(){ var total =""; var totalPrice = 0; $('.products').each( function() { var price = parseFloat($('span.price', this).text()); var quantity = parseInt($('span.quantity', this).text()); total += $('span.name', this).text() + "n" + " Price: "+ price + " Quantity: "+ quantity +"n" ; totalPrice += price * quantity; } ); total = total+ "Total Price = " + totalPrice; $('#showTotal1').text(total); return total ; } function sendRequest() { var cart = cartTotal2(); // alert(cart); var eml = "[email protected]"; var bod ="&body=" + cart; var subj ="?subject=Order"; location.href="mailto:"+eml+subj+bod; } //======================================================== //The Accordeon var ContentHeight = 1570; var TimeToSlide = 250.0; var openAccordion = ''; function runAccordion(index) { var nID = "Accordion" + index + "Content"; if(openAccordion == nID) nID = ''; setTimeout("animate(" + new Date().getTime() + "," + TimeToSlide + ",'" + openAccordion + "','" + nID + "')", 33); openAccordion = nID; } function animate(lastTick, timeLeft, closingId, openingId) { var curTick = new Date().getTime(); var elapsedTicks = curTick - lastTick; var opening = (openingId == '') ? null : document.getElementById(openingId); var closing = (closingId == '') ? null : document.getElementById(closingId); if(timeLeft <= elapsedTicks) { if(opening != null) opening.style.height = ContentHeight + 'px'; if(closing != null) { closing.style.display = 'none'; closing.style.height = '0px'; } return; } timeLeft -= elapsedTicks; var newClosedHeight = Math.round((timeLeft/TimeToSlide) * ContentHeight); if(opening != null) { if(opening.style.display != 'block') opening.style.display = 'block'; opening.style.height = (ContentHeight - newClosedHeight) + 'px'; } if(closing != null) closing.style.height = newClosedHeight + 'px'; setTimeout("animate(" + curTick + "," + timeLeft + ",'" + closingId + "','" + openingId + "')", 33); }//End of Accordeon ================================ /*reflection.js for jQuery v1.02*/ (function($) { $.fn.extend({ reflect: function(options) { options = $.extend({ height: 0.33, opacity: 0.5 }, options); return this.unreflect().each(function() { var img = this; if (/^img$/i.test(img.tagName)) { function doReflect() { var reflection, reflectionHeight = Math.floor(img.height * options.height), wrapper, context, gradient; if ($.browser.msie) { reflection = $("<img />").attr("src", img.src).css({ width: img.width, height: img.height, marginBottom: -img.height + reflectionHeight, filter: "flipv progid:DXImageTransform.Microsoft.Alpha(opacity=" + (options.opacity * 100) + ", style=1, finishOpacity=0, startx=0, starty=0, finishx=0, finishy=" + (options.height * 100) + ")" })[0]; } else { reflection = $("<canvas />")[0]; if (!reflection.getContext) return; context = reflection.getContext("2d"); try { $(reflection).attr({width: img.width, height: reflectionHeight}); context.save(); context.translate(0, img.height-1); context.scale(1, -1); context.drawImage(img, 0, 0, img.width, img.height); context.restore(); context.globalCompositeOperation = "destination-out"; gradient = context.createLinearGradient(0, 0, 0, reflectionHeight); gradient.addColorStop(0, "rgba(255, 255, 255, " + (1 - options.opacity) + ")"); gradient.addColorStop(1, "rgba(255, 255, 255, 1.0)"); context.fillStyle = gradient; context.rect(0, 0, img.width, reflectionHeight); context.fill(); } catch(e) { return; } } $(reflection).css({display: "block", border: 0}); wrapper = $(/^a$/i.test(img.parentNode.tagName) ? "<span />" : "<div />").insertAfter(img).append([img, reflection])[0]; wrapper.className = img.className; $.data(img, "reflected", wrapper.style.cssText = img.style.cssText); $(wrapper).css({width: img.width, height: img.height + reflectionHeight, overflow: "hidden"}); img.style.cssText = "display: block; border: 0px"; img.className = "reflected"; } if (img.complete) doReflect(); else $(img).load(doReflect); } }); }, unreflect: function() { return this.unbind("load").each(function() { var img = this, reflected = $.data(this, "reflected"), wrapper; if (reflected !== undefined) { wrapper = img.parentNode; img.className = wrapper.className; img.style.cssText = reflected; $.removeData(img, "reflected"); wrapper.parentNode.replaceChild(img, wrapper); } }); } }); })(jQuery);I would like to think that it is something easy Matt? I’m about to throw the lap top out of the window at the moment!!
Many thanks
Matt, when I add the Add On DIVX Plus web player, and I place my mouse over an image, the error pop up appears with the details ‘error: tagName is not an object;
When I disable this Add On I can drag the image but not drop it into the shopping cart. I’ve been trying for days now and this project has to be completed. Got any ideas?
Many thanks
@Ely: I would disable all add-ons to start with, in case any of them are causing the problem.
When you see the “error on page” warning triangle, double-click it to get the full message (including the line number where the error occurred).
can you tell me how to save the numbers who have moved, you can do with php and mysql, please I need a solution
@ggmac23: Best way would probably be to make an Ajax request within handleDropEvent(). You’d send the ID of the card in the request to your PHP script, which would then store the ID in your database table.
You can easily make Ajax requests using jQuery:
http://api.jquery.com/jQuery.ajax/
HTH,
Matt
Hello Matt,
Nice tutorial, but I am having one problem. I’m an eLearning developer and plan to use this for a “matching” interaction. My client has a population of 150K employees on IE6, IE8 or FF3, majority (90%+) on IE6. This interaction works fine in IE8 and FF3, and initially in IE6. In IE6 when I try to move a draggable that’s already been dropped on one of the five targets, it won’t let me. I’ve commented out everything in the handle Drop Event function except the ui.draggable.position statement in order to write my own validation routine. I tried to explicitly set ui.draggable.draggable to enabled, but still a no go. I’m also not reverting when dropped on an incorrect target. Validation will be handled via a Submit button that will grade the interaction all at once with a second attempt allowed if three or more are incorrect.
Any ideas?
Thanks,
Ray
[Edited by RSugelSr on 15-Jun-11 17:03]
Not sure what’s going on with IE6, yesterday it didn’t work, today it does.
@RSugelSr: That sounds like the IE6 we all know and love 😉 Glad it’s working now anyway!
Hey Matt,
Really great tutorial. I’m just having an issue. In my handleImageDrop function, the ui.draggable.data() values are not coming through. Can you tell me what I could be doing wrong?
Thanks!
40 for ( var i=0; i<={{ num_products }}; i++ ) { 41 elixirQuery("#img_productImage" + i).draggable( { 42 //containment: '#content', 43 cursor: 'move', 44 revert: true, 45 helper: 'clone', 46 } ); 47 } 48 elixirQuery("#div_wishlist").droppable( { 49 //accept: '#div_productList div', 50 hoverClass: 'hovered', 51 drop: handleImageDrop, 52 }); 53 function handleImageDrop( event, ui ){ 54 var product_id = ui.draggable.data( 'title' ); 55 var product_img_src = ui.draggable.data( 'src' ); 56 alert("The product_img_src is: " + product_img_src); 57 alert("The product_id is: " + product_id); 58 59 60 jQuery.ajax({ 61 type: "POST", 62 url: '/wishlist/add/' + product_id + '/', 63 data: "", 64 success: function(){ 65 jQuery("#table_wishlist").append('<tr><td><img src="' + product_img_src + '" width=80 height=80</td></tr>'); 66 }, 67 }); 68 }@mittelman: Where and how are you creating the ‘title’ and ‘src’ data keys on your draggable elements?
Matt – Forgive my noob-ness at javascript! I was expecting those to be the src and title of my <img> tag that is being dragged. Is there a way to get that info? The biggest problem is that I’m using a template to render my html and there could be 2 or 30 draggable objects, so it’s hard to give them all a unique id and know how to select them using jquery selectors. Thanks for your hlep!
Matt – I got it…i needed to call the .attr() function instead of .data(). Thanks its working great now!
@mittelman: Ah I see what you were trying to do now. Yes, data() is for associating extra data with an element via jQuery, and has nothing to do with the element’s attributes.
Glad you got it working!
How would I position the current clicked droppable item to land on top position? For example, while viewing photos with the basic demo the photo keeps its current position in the stack.
@eyveneen – I’m no expert, but I’d say you can do something like this:
var oldHtml = $(“div_target”).html();
var newHtml = newStuff + oldHtml;
$(“div_target”).html(newHtml);
So you’re basically putting the “newStuff” at the beginning and adding the existing stuff to the end of it.
Make sense? Hope that helps!
Hello and sorry for my noobishness..but maybe you where born as a noob too! 😉
I really like this tutorial!
But my problem is as followed:
I like too have some moveable icons which I like to dorp on a Droppable Element. After dropping the icon each icon can open a different Page.
In your tutorial it opens the alert window…how can I change it to a new window for each icon?
THX
@gromo: No problem, we were all noobs once 🙂
You can open a new window on a drop event – something like this:
function handleDropEvent( event, ui ) { var draggable = ui.draggable; var iconId = draggable.attr('id'); window.open( 'newPage.php?id='+iconId, 'newWindow' ); }Many thanks for taking the time to put up this tutorial. It’s just what I needed to get my started on a drag and drop task I have.
I’m using Grails for my project – do you have any views on the best ways to integrate Grails and jQuery? I know about the jQuery plugin(s) but wondered if I can get away without them for features such as in your tutorial. I just need the Javascript right? I’d like to keep the technology salad as simple as possible.
Thanks again.
Chris
@Chris: I don’t know anything about Grails I’m afraid. It sounds like it’s a server-side web app framework though? In which case it shouldn’t interfere with jQuery at all.
Thank you for posting this JQuery Drag and Drop tutorial! It’s very well written.
I’m sorry but the cards weren’t visible in the card game in ie9. They work fine in Safari 5.1 though.
Thanks again for posting this tutorial.
@markw707: Upgrade to a newer version of jQuery to fix the IE9 issue:
http://bugs.jquery.com/ticket/8052
Great tutorial. Thanks so much for this!
I’m somewhat new to jQuery and JavaScript, and I’ve been struggling through a drag-drop problem with no luck.
Is it possible to prevent one draggable from being dropped upon another draggable?
For example, if I created a tic-tac-toe board where each square is a droppable, and each X and O is a draggable, I would want the draggable to revert if I attempted to drop it on a square that already contained an X or O. I’d also want the droppable to become active again if a draggable is removed from it.
Any advice? Thanks in advance.
Hi brianeoneill,
I do something similar to this in my app. The key thing for me was to maintain a “model” (in your case you could have a 3×3 array representing the drop cells) – i.e. don’t just try to get the info from the visual components.
If the model for the cell is “empty” you can allow the drop and update the model for that cell. If it’s already filled (with an “O” or an “X”) you could maybe use the revert setting to send the draggable back to where it came from.
You’ll need to determine the row/col coordinates from the drop position in order to reference your model, but you can do then by inspecting the position attributes of the draggable relative to the droppable (or you may have a droppable for each separate cell in your game grid).
Hope this helps.
Chris
@Chris Ward
Thanks for the reply. I’ll explore that avenue. Forgive my noob-ness, but can you (or anyone else) recommend a good resource for learning more about creatingin/maintaining a model?
Best,
B
Hi,
I wanted to get back sooner rather than later but (since time is in short supply) please forgive any glaring errors in “indicative” code below. What I did was take my own Model “class” in JavaScript at attempt to b@stardise it to match your example.
What I am trying to show it holding the state of your game in an abstraction – in this case the “class” Model. Then you can add the handy methods/functions to that to simplify the interactions. For example see the use of
if(model.isUndefinedRowCol(row, col)) {Which is the main thing you’re after I think.
Hope it helps – it’s bit rushed but should give some idea of what I meant…
var Model_UNDEFINED = "_"

function Model() {
	this.rows
	this.rowCount
	this.colCount

	this.init = function(rowCount, colCount) {
		this.rowCount = rowCount
		this.colCount = colCount
		this.rows = new Array(rowCount);

		for ( var i = 0; i < rowCount; i++) {
			this.rows = new Array(colCount);
		}
		this.reset();
	}

	this.toString = function() {
		var retString = "";

		for ( var i = 0; i < this.rows.length; i++) {
			for ( var j = 0; j < this.rows.length; j++) {
				retString += this.rows[j];
			}
			retString += "n";
		}
		return retString;
	}

	this.reset = function() {
		for ( var i = 0; i < this.rows.length; i++) {
			for ( var j = 0; j < this.rows.length; j++) {
				this.rows[j] = Model_UNDEFINED;
			}
		}
	}

	this.setRowCol = function(row, col, value) {
		if((row == null) || (col == null)) {
			return;
		}

		this.rows[row][col] = value;
	}

	this.resetRowCol = function(row, col) {
		if((row == null) || (col == null)) {
			return;
		}

		this.rows[row][col] = Model_UNDEFINED;
	}

	this.getRowCol = function(row, col) {
		if((row == null) || (col == null)) {
			return;
		}

		return this.rows[row][col];
	}

	this.isUndefined = function(item) {
		if(item == null) {
			return false;
		}

		return item == Model_UNDEFINED;
	}

	this.isUndefinedRowCol = function(row, col) {
		if((row == null) || (col == null)) {
			return;
		}
		var item = this.getRowCol(row, col)
		return this.isUndefined(item)
	}

}
Use the above in your HTML (script) code with this sort of thing …
var model; function init() { model = new Model(); model.init(3, 3); ... .droppable({ ... drop : handleDrop, ... }); } function handleDrop(event, ui) { // work out the row and col you've dropped it on if(model.isUndefinedRowCol(row, col)) { // allow the drop ... ui.draggable.draggable( 'option', 'revert', false ); // update the model model.setRowCol(row, col) = ui.draggable.data('playerSymbol'); } else { ui.draggable.draggable( 'option', 'revert', true ); } }hi Matt, I liked your tutorial on drag and drop features in jQuery.
I am now looking for a drag and drop feature either between two windows (same browsers) or two frames in a window. I saw the jQuery UI documentation and did not find any useful object or method to work on this feature.
Can you please help me or direct me towards some documentation or any article showcasing this feature.
@Chris Ward,
Wow, thank you SO much for taking the time for such a detailed response. I’m going to give that a try. I’ll be sure to share the results.
Best,
Brian
@Chris Ward: Great answer 🙂
@mclipwala: Not sure if this would be possible using jQuery UI. You might be able to get it to work using HTML5 drag-and-drop (obviously only in newer browsers that support it):
http://stackoverflow.com/questions/3694631/html5-drag-and-drop-between-windows
http://www.html5rocks.com/en/tutorials/dnd/basics/
Matt,
Great demo… really breaks it down quite well for a true beginner such as myself.
I’ve modified the demo a bit so that the destination pile is vertically stacked, not horizontal. Then I increased the width of the destination pile so it is about 80% the width of the page.
I’ve left the source pile alone so it is the same size. When I drag the card onto the proper destination, I want the card to snap to the same width as the destination div. I tried setting the CSS as follows:
#card3.correct { background: orange; width:500px;}
But doing so in this manner causes problems for the source pile.
Is there a way to make the small draggable card snap to the full width of the destination div?
Any help is appreciated.
Thanks,
–Rick
@rpdwyer: Please post the URL of your page so we can see the problem.
@rpdwyer
I think I’ve encountered the same sort of thing. I put it down to the fact that the <div> item actually exists in the source pile so when you change the width via the style then it will “stretch” the containing source pile.
As I recall I found that there were cases were I ended up creating a *new* <div> item (a sort of clone) and then placed that in the destination and could style it without impacting the source.
I am quite new to jQuery and I’ve played around with lots of things in drag and drop so I can’t be very specific.
Hi all,
Want to combine this example with a gallery-like feature where cardpile and cardslots have prev/next links at left and right such that a user can scroll horizontally through a number greater than 10. How best to do it?
Thanks..
Robin
@rgsamways: Off the top of my head…
Try adding the prev/next links, then add click handlers to the links that increase/decrease the margin-left CSS property of the cardPile/cardSlots divs appropriately. Use CSS transitions if you’d like a smooth slide between each position.
Also wrap each div in an outer div with the same dimensions, and apply overflow: hidden to the outer divs. That way the cardPile and cardSlots divs will scroll horizontally within the “window” of the outer div.
Really nice demo. Works fine in Firefox and Chrome, but the drag and drop didn’t work in IE8.0.
I try on my Android Tablet to test the demo and I found out that the drag and drop doesn’t work well. When I try to drag a card, it’s the all page that is dragged instead.
Do you have a version for tablet or a ideas of what I should adapt to make it work ?
@survivant
I’ve felt that pain.
This took it away for me within minutes of discovering it :
http://furf.com/exp/touch-punch/draggable.html
Hope it works for you too.
Regard,
Chris
I would like to ask if there is a way to use the objects as a part of form submission. For example, the user will only know the correct placement of the draggable object after clicking the SUBMIT button instead of real time results.
k_ace,
I used Elated’s D & D as the basis for an eLearning activity. Not a form submission but the same concept. Had to write additional methods, but the basic premise is to compare a drag’s final position to the correct position. After clicking the “Submit” button, it validates visually indicating which items were placed correctly/incorrectly and then displays a “Solution” button which moves all drags to their correct positions.
Hi,
Firstly I love the plugin, it works great for what I want it to do!
I have used the card-draggable code as I have created a system to approve designs based on the user dragging Object A to Object B then firing a SQL statement.
My problem is when adding the divs, namely:
I can only see 1 of the drag container, but my project pulls the main container – *with the ‘cardpile’ inside* based on the amount of entries in the database. i.e there are 8 designs, it pulls 8 containers, but this plugin only pulls into the first one. I assume it’s because of the ID?
Can you please help with how to have multiple entities of these divs on one page?
Appreciate any assistance!
@ChrisWard, your information about the Model ‘class’ for handling a grid-based game layout is something I’ve been trying to figure out myself for the past week or so… I just didn’t realize what exactly I was looking for!
That was a great example, but I was wondering if you know of any other resources that go into the concept a bit deeper; I haven’t come across any tutorials or training that really lays it out.
@matt, this article has been invaluable as well!
@minttoothpick – thank you very much, I am pleased if it helped in any way.
I don’t really know of any other resources. I didn’t find anything on the web to get me going down this route.
There were three influences that drove me to use a “model” –
a) I am using Grails and it’s clear distinction between Model, View and Controller were at the front of my mind at the time. I’ve done a lot of GUI application work over the years to tend to use this approach as default
b) Complexity of what I wanted to store – my application needs to maintain pretty darn complex state and I needed to have it in an actual data structure rather than rely on the DOM states.
c) Load/Save – My application requires me to be able to persist my visual representation and be able to reload it. Once you have your stuff represented in a data structure (the “model” in JavaScript with the member fields and the getters and setters and convenience functions) it’s not too difficult to puke that out in something like JSON. Once you’ve done it in that direction (saving) you can do the other direction (loading). I tend to have a function called
in my models and it just takes the JSON string input and calls a library function to reestablish the proper model instance from it.
I don’t know if this helps at all. My general advice would be to think about a model/data structure that would hold all the state(s) your thing needs. Maybe even write some tests to use the model until you’re happy with it. At that point you can move to doing the visual stuff on top.
One of the first things the appealed to me with jQuery was the ability to attach data to visual objects using
Once you do that it makes it nice and clean to access this data inside a drop method (if you’re using drag and drop) and use that as the param for your calls to your model functions.
Not sure if this makes it clearer or most confusing!
Chris
@ChrisWard – Thanks again for your comments. I have only been working with JavaScript for several months, and it was in the past two weeks that I started using jQuery. Discovering the .data() method has been very helpful.
Currently I am putting together a checkers board game. I started by implementing the <canvas> element and tried a couple related JS libraries for working with it, but it proved too complicated. Now I’m working with jQuery and <div> elements to create the game board, but I am still figuring out how to best reference the individual cells for the game logic.
I haven’t delved into JSON yet but I’ve been hearing about it a lot.
Anyways, I appreciate that you have taken the time to provide such valuable information!
Hi, your guide is wonderful and very helpful.
However, I am having a problem. I am using a function to create a helper (instead of clone), but I am trying to pass a variable to this helper. More specifically, I am trying to pass the inner html of the original draggable element to the helper element.
Here is my very lame attempt:
function catHelper(event, ui){ var name=ui.draggable.html(); return '<div class="cat_helper">'+name+'</div>'; }@minttoothpick
One way to do what you need is to have <div>s for the black and white pieces and 8×8 <div>s for the playing board.
If you want to identify the colour of a piece (or counter or whatever you want to call it) you could apply a .data(“black”) or .data(“white”). However – you might want to use the css class attribute since you’ll probably be needed to style these <div>s to have a black or white image.
Then on the board each of the squares could have data in the range .data(“1,1”) … .data(“8,8”).
If you make the board squares droppable, and the playing piece draggable then when you drop a piece onto a square you should be able to work out the piece colour and the grid reference in the handleDrop function (which gives you a reference to both the draggable and the droppable)
Once you have these you could call your model method like
model.setCell( x, y, pieceColour )
Something along those lines should work I’d have thought.
@minttoothpick: If you want to learn JSON then you might enjoy my tutorial:
http://www.elated.com/articles/json-basics/
@nicolasmoise: Off the top of my head, you probably want to create a closure, passing in the draggable element so that your function can access it.
thanks for the great dnd tutorial, Matt!
In the tutorial, the numbers get located randomly in the Card Pile, and the Card Slots are located 1-10, left to right — Card “1” will always drop on the first Slot.
I want to build a game where you don’t know which ‘Correct’ slot the number should drop into – in other words, so slot “1” (array position 0) locates randomly in the row of 10 Card Slot locations, instead of always in the first (left-most) location, but i’ve had no luck ‘sorting’ the Slots to any other position.
any ideas?
tia
First of all, this is a great introduction to jQuery UI and drag and drop! I found it immensely helpful when getting up to speed and implementing it in to my project.
One issue I came across was reassigning the parent div of the draggable object when a drop occurred. You can get some positioning weirdness.
If anyone runs across the same problem, you can see my solution here: http://eightbitswitch.com/2012/06/jquery-ui-drag-and-drop-to-change-parent-div/
@xkater: Can you not just call the sort() method on the words array, in the same way as the numbers array?
@danahartweg: Thanks for posting that solution 🙂
Excellent article, very helpful.
I have a project in mind, so will try to get to grips with this
Taking the card example as a starting point, I would like to add multiple instances of the same card(s) and stack them on top of each other, (or nearly on top, so you can tell its a stack).
Grateful for an approach
Great article.
I would like to set this up for my students where they can practice vocabulary, but I am still relatively new to jquery.
How would I go about replacing the numerals with images so that an image could be dragged onto the correct word?
Thanks in advance!
Superb article, everything is crystal clear, thanks a lot for finding time to compose this
cheers
sameera
That’s cool
Hi, Matt. I’ve found your code great, but I’ve run into a problem with Chrome: when the user zooms in or out ,the cards refuse to drop in their intended positions. Have you developed a solution yet? Thanks a lot for the code and for your answer!
@piapoco: Looks like a general problem with any jQuery UI draggable. Try zooming in then dragging “I only snap to the big box” – it no longer snaps to the big box edges: http://jqueryui.com/draggable/#snap-to
Thanks so much for the guide. This was my first try at using drag and drop (and pretty much jQuery in general) and you walked me through it easily. Great article and helpful links to the documentation.
@goldilaks You’re welcome – thanks for your feedback. 🙂
Many thanks for this great tutorial!! I would like to create the slot divs arranged in a circle, perhaps using the following:
<script type="text/javascript">
$(document).ready(function(){
var radius = 200; // radius of the circle
var fields = $('.field'),
    container = $('#container'),
    width = container.width(),
    height = container.height(),
    angle = 0,
    step = (2*Math.PI) / fields.length;
fields.each(function() {
    var x = Math.round(width/2 + radius * Math.cos(angle) - $(this).width()/2),
        y = Math.round(height/2 + radius * Math.sin(angle) - $(this).height()/2);
    $(this).css({
        left: x + 'px',
        top: y + 'px'
    });
    angle += step;
});
});
</script>

</head>

<body>
<div id="container">
<!--    <div id="center"></div>
    <div id="crosshair-x"></div>
    <div id="crosshair-y"></div>-->
    <div class="field">1</div>
    <div class="field">2</div>
    <div class="field">3</div>
    <div class="field">4</div>
    <div class="field">5</div>
    <div class="field">6</div>
    <div class="field">7</div>
    <div class="field">8</div>
    <div class="field">9</div>
</div>
Any ideas on how I can incorporate this into the drag and drop code so that it works with 9 slots and cards arranged in a circle?
[Edited by peterbrowne on 20-Dec-12 02:11]
some of users of my website cannot see draggable box in IE9.
what can i do ?
Use conditional comments to show an alternative.
Apologies for the possibly n00b question, but how to change the first numerical array in the card game example to a string array so it still matches the cards correctly. ie change this array:
to a string array of words (for example):
I presume the randomizing ‘.sort’ function is preventing correct matching if the numerical array is changed to a string array? Anyone done a non-numerical matching game?
But anyway thank you @Matt for the excellent tutorial, I like learning from real-world examples like this and you’ve explained it all so clearly!
[Edited by DIFowler on 18-Feb-13 20:12]
can the numbers[] variable filled with image instead of number?
I am using ubuntu and firefox. The demo works online but if you copy the html and style code from this web page and run on your computer it doesn’t. You can not drag the cards past slot number 8. You can not drag cards to slot nine or ten. I added a width of 100% to the #containment div. It worked o.k. Why would it work online and not on the local computer?
[Edited by cantrecall on 01-Mar-13 08:59]
I am very happy about your information!! It is genial and helpful!!
But it does not run on my android phone. I cannot drag anything. The cards do not move.
I am a teacher in Austria and I want to develop questions with drag & drop for my students.
Most of them using their smartphones.
What should I do to make it run on smartphones and tablets???
Thank you very much and greetings from Salzburg!
Uwe
Hi Uwe,
I use drag and drop a lot based originally on this article. I also use TouchPunch to extend to drag and drop for iPad but I recently noticed that the only tablet that failed to work was one using the Android browser.
I appreciate is is not much help to you but I would also be interested in the answer.
Chris Ward
Hi Chris,
thank you very much for your mail! I found a solution with your help and it worked on my android phone also.
I made some modifications of your example: http://www.ats.eu.com/drop and I will combine it with my database to develop more examples….
Best wishes
Uwe
Hi Matt,
I’m not sure if you are still following this post or not, but any how, I wanted to check with you about some tweak that I made to your code.
My goal is to use this drag and drop for sorting type of exercises for our users.
And I will include the code that i have changed here. My question is how to get the order in which the user has placed his choices in cardSlots. That is, I want to save the user’s answer.
Is there any way to do this?
Thanks in advance.
<%@ Page Language="vb" AutoEventWireup="false" CodeBehind="Test.aspx.vb" Inherits="Project.Test"
    EnableEventValidation="false" ValidateRequest="false" %>

<%@ Register Assembly="AjaxControlToolkit" Namespace="AjaxControlToolkit" TagPrefix="asp" %>
<%@ Register Assembly="AjaxControlToolkit" Namespace="AjaxControlToolkit.HTMLEditor"
    TagPrefix="cc1" %>
<!DOCTYPE html" "http://www.w3.org/TR/xhtml1/DTD/xhtml1-transitional.dtd">
<html>
<head runat="server">
    <title>Sorting Exercise</title>
    <style type="text/css">
        /* Add some margin to the page and set a default font and colour */

        body
        {
            margin: 30px;
            font-family: "Georgia" , serif;
            line-height: 1.8em;
            color: #333;
        }

        /* Give headings their own font */

        h1, h2, h3, h4
        {
            font-family: "Lucida Sans Unicode" , "Lucida Grande" , sans-serif;
        }

        /* Main content area */

        #content
        {
            margin: 80px 70px;
            text-align: center;
            -moz-user-select: none;
            -webkit-user-select: none;
            user-select: none;
        }

        /* Header/footer boxes */

        .wideBox
        {
            clear: both;
            text-align: center;
            margin: 70px;
            padding: 10px;
            background: #ebedf2;
            border: 1px solid #333;
        }

        .wideBox h1
        {
            font-weight: bold;
            margin: 20px;
            color: #666;
            font-size: 1.5em;
        }

        /* Slots for final card positions */

        #cardSlots
        {
            margin: 50px auto 0 auto;
            background: #ddf;
        }

        /* The initial pile of unsorted cards */

        #cardPile
        {
            margin: 0 auto;
            background: #ffd;
        }

        #cardSlots, #cardPile
        {
            width: 200px;
            height: 400px;
            padding: 0px;
            border: 2px solid #333;
            -moz-border-radius: 10px;
            -webkit-border-radius: 10px;
            border-radius: 10px;
            -moz-box-shadow: 0 0 .3em rgba(0, 0, 0, .8);
            -webkit-box-shadow: 0 0 .3em rgba(0, 0, 0, .8);
            box-shadow: 0 0 .3em rgba(0, 0, 0, .8);
        }

        /* Individual cards and slots */

        #cardSlots div, #cardPile div
        {
            float: left;
            width: 80%;
            height: 20px;
            padding: 5px;
            padding-top: 5px;
            padding-bottom: 5px;
            border: 2px solid #333;
            -moz-border-radius: 10px;
            -webkit-border-radius: 10px;
            border-radius: 10px;
            margin: 0 0 0 10px;
            background: #fff;
        }

        #cardSlots div:first-child, #cardPile div:first-child
        {
            /*margin-left: 0;*/
        }

        #cardSlots div.hovered
        {
            background: #aaa;
        }

        #cardSlots div
        {
            border-style: dashed;
        }

        #cardPile div
        {
            background: #666;
            color: #fff;
            font-size: 12px;
            text-shadow: 0 0 3px #000;
        }

        #cardPile div.ui-draggable-dragging
        {
            -moz-box-shadow: 0 0 .5em rgba(0, 0, 0, .8);
            -webkit-box-shadow: 0 0 .5em rgba(0, 0, 0, .8);
            box-shadow: 0 0 .5em rgba(0, 0, 0, .8);
        }

        /* Individually coloured cards */
        #card0.correct
        {
            background: silver;
        }
        #card1.correct
        {
            background: red;
        }
        #card2.correct
        {
            background: brown;
        }
        #card3.correct
        {
            background: orange;
        }
        #card4.correct
        {
            background: yellow;
        }
        #card5.correct
        {
            background: green;
        }
        #card6.correct
        {
            background: cyan;
        }
        #card7.correct
        {
            background: blue;
        }
        #card8.correct
        {
            background: indigo;
        }
        #card9.correct
        {
            background: purple;
        }
        #card10.correct
        {
            background: violet;
        }
        #card11.correct
        {
            background: lime;
        }
        #card12.correct
        {
            background: Teal;
        }
        #card13.correct
        {
            background: Olive;
        }
        #card14.correct
        {
            background: White;
        }
        #card15.correct
        {
            background: Navy;
        }
        #card16.correct
        {
            background: gray;
        }

        /* "You did it!" message */
        #successMessage
        {
            position: absolute;
            left: 580px;
            top: 250px;
            width: 0;
            height: 0;
            z-index: 100;
            background: #dfd;
            border: 2px solid #333;
            -moz-border-radius: 10px;
            -webkit-border-radius: 10px;
            border-radius: 10px;
            -moz-box-shadow: .3em .3em .5em rgba(0, 0, 0, .8);
            -webkit-box-shadow: .3em .3em .5em rgba(0, 0, 0, .8);
            box-shadow: .3em .3em .5em rgba(0, 0, 0, .8);
            padding: 20px;
        }
    </style>
    <script type="text/javascript" src="https://ajax.googleapis.com/ajax/libs/jquery/1.5.0/jquery.min.js"></script>
    <script type="text/javascript" src="https://ajax.googleapis.com/ajax/libs/jqueryui/1.8.9/jquery-ui.min.js"></script>
    <script type="text/javascript">
        var correctCards = 0;
        $(init);
        //When|we|got|to|the|concert,|the |orchestra| had|already| begun|to|play.
        var numbers = [[0, 'When'], [1, 'we'], [2, 'got'], [3, 'to'], [4, 'the'], [5, 'concert'], [6, 'the'], [7, 'orchestra'], [8, 'had'], [9, 'already'], [10, 'begun'], [11, 'to'], [12, 'play']];
        var numbersunsorted = [[0, 'When'], [1, 'we'], [2, 'got'], [3, 'to'], [4, 'the'], [5, 'concert'], [6, 'the'], [7, 'orchestra'], [8, 'had'], [9, 'already'], [10, 'begun'], [11, 'to'], [12, 'play']];
        function init() {

            // Hide the success message
            $('#successMessage').hide();
            $('#successMessage').css({
                left: '580px',
                top: '250px',
                width: 0,
                height: 0
            });

            // Reset the game
            correctCards = 0;
            $('#cardPile').html('');
            $('#cardSlots').html('');
            $('#cardPile').height(35 * numbers.length);
            $('#cardSlots').height(35 * numbers.length);


            // Create the pile of shuffled cards
            numbers.sort(function () { return Math.random() - .5 });
            for (var i = 0; i < numbers.length; i++) {
                $('<div>' + numbers[1] + '</div>').data('number', numbers[1]).attr('id', 'card' + numbers[0]).appendTo('#cardPile').draggable({
                    containment: '#content',
                    stack: '#cardPile div',
                    cursor: 'move',
                    revert: true
                });
            }

            // Create the card slots
            var words = ['', '', '', '', '', '', '', '', '', '', '', '', '', '', '', '', ''];
            for (var i = 1; i <= numbers.length; i++) {
                $('<div>' + numbersunsorted[i - 1][1] + '</div>').data('number', numbersunsorted[i - 1][1]).appendTo('#cardSlots').droppable({
                    accept: '#cardPile div',
                    hoverClass: 'hovered',
                    drop: handleCardDrop
                });
            }

        }

        function handleCardDrop(event, ui) {
            var slotNumber = $(this).data('number');
            var cardNumber = ui.draggable.data('number');

            // If the card was dropped to the correct slot,
            // change the card colour, position it directly
            // on top of the slot, and prevent it being dragged
            // again
            if (slotNumber == cardNumber) {
                ui.draggable.addClass('correct');
                ui.draggable.draggable('disable');
                $(this).droppable('disable');
                ui.draggable.position({ of: $(this), my: 'left top', at: 'left top' });
                ui.draggable.draggable('option', 'revert', false);
                correctCards++;
            }


            if (slotNumber != cardNumber) {
                ui.draggable.addClass('incorrect');
                //ui.draggable.draggable('enable');
                $(this).droppable('disable');
                ui.draggable.position({ of: $(this), my: 'left top', at: 'left top' });
                ui.draggable.draggable('option', 'revert', false);

            }
            // If all the cards have been placed correctly then display a message
            // and reset the cards for another go

            if (correctCards == numbers.length) {
                $('<div>' + 'Your Score is: ' + correctCards + ' out of ' + numbers.length + '</div>').appendTo('#successMessage')
                $('#successMessage').show();
                $('#successMessage').animate({
                    left: '380px',
                    top: '200px',
                    width: '400px',
                    height: '100px',
                    opacity: 1
                });
            }
        }

        function showResult() {

            $('<div>' + 'Your Score is: ' + correctCards + ' out of ' + numbers.length + '</div>').appendTo('#Div1');
            $('#Div1').show();
            $('#Div1').animate({
                left: '380px',
                top: '200px',
                width: '400px',
                height: '100px',
                opacity: 1
            });
        }
    </script>
</head>
<body>
    <form id="form1" runat="server">
    <div id="content" style="width: 40%">
        <div id="cardPile" style="float: left;">
            <div id="card4" class="ui-draggable" style="position: relative;">
                4</div>
            <div id="card1" class="ui-draggable" style="position: relative;">
                1</div>
            <div id="card2" class="ui-draggable" style="position: relative;">
                2</div>
            <div id="card5" class="ui-draggable" style="position: relative;">
                5</div>
            <div id="card3" class="ui-draggable" style="position: relative;">
                3</div>
            <div id="card6" class="ui-draggable" style="position: relative;">
                6</div>
            <div id="card7" class="ui-draggable" style="position: relative;">
                7</div>
            <div id="card8" class="ui-draggable" style="position: relative;">
                8</div>
            <div id="card9" class="ui-draggable" style="position: relative;">
                9</div>
            <div id="card10" class="ui-draggable" style="position: relative;">
                10</div>
            <div id="card11" class="ui-draggable" style="position: relative;">
                11</div>
            <div id="card12" class="ui-draggable" style="position: relative;">
                12</div>
            <div id="card13" class="ui-draggable" style="position: relative;">
                13</div>
            <div id="card14" class="ui-draggable" style="position: relative;">
                14</div>
        </div>
        <div id="cardSlots">
            <div class="ui-droppable">
                one</div>
            <div class="ui-droppable">
                two</div>
            <div class="ui-droppable">
                three</div>
            <div class="ui-droppable">
                four</div>
            <div class="ui-droppable">
                five</div>
            <div class="ui-droppable">
                six</div>
            <div class="ui-droppable">
                seven</div>
            <div class="ui-droppable">
                eight</div>
            <div class="ui-droppable">
                nine</div>
            <div class="ui-droppable">
                ten</div>
            <div class="ui-droppable">
                Eleven</div>
            <div class="ui-droppable">
                Twelve</div>
            <div class="ui-droppable">
                Thirteen</div>
            <div class="ui-droppable">
                Fourteen</div>
        </div>
        <div id="successMessage" style="display: none; left: 580px; top: 250px; width: 0px;
            height: 0px;">
            <button onclick="init()">
                Play Again</button>
        </div>
        <button   onmouseover="showResult()" onmouseout="$('#Div1').hide(); $('#Div1').html('');">
            Show Result</button>
        <div id="Div1" style="display: none; left: 580px; top: 250px; width: 0px;
            height: 0px;">
        </div>

    </div>
    </form>
</body>
</html>
[Edited by hitech on 30-May-13 10:53]
Never mind. After reading a bit about JQuery ui, I came to know that we can store multiple values as data with each cell, and it can be the cell location.
$('<div>' + numbers['value'] + '</div>').data('number', { x: numbers['value'], y: numbers['index'] }).attr('id', 'card' + numbers['index']).appendTo('#cardPile').draggable({
                        containment: '#content',
                        stack: '#cardPile div',
                        cursor: 'move',
                        revert: true
                    });
$('<div>' + userAnswer[i - 1]['value'] + '</div>').data('number', { x: numbersunsorted[i - 1]['value'], y: numbersunsorted[i - 1]['index'] }).appendTo('#cardSlots').droppable({ accept: '#cardPile div', hoverClass: 'hovered', drop: handleCardDropThen we can read it after dropping the card into the slot
var slotNumber = $(this).data('number').x;
var slotindex = $(this).data('number').y;
var cardNumber = ui.draggable.data('number').x;
var cardindex = ui.draggable.data('number').y;
Thanks
[Edited by hitech on 03-Jun-13 07:56]
Hi,
Your Tutorial is great but i really need help to create a game using this tutorial.
I need help to show out some random cards after the user has pulled and dropped to the correct slots.
Can anybody help me?
[Edited by noobie on 11-Jun-13 01:28]
@matt
I need help to show out some random card numbers after the user has pulled and dropped the first card number to the correct slots.
Hi experts,
I am a teacher in Austria and I developed some quizzes with 200 questions in a database for my students taking the great ideas of this example.
But some students using a surface RT can not use my quizzes because drag & drop does not work there and it is not possible to install an other browser like Mozilla or Chrome on a RT system!!!!
Do anybody know a solution of this problem?
Thanks from Salzburg
Uwe
It’s not often I comment these days, but the specificity and the comprehensiveness of this article qualifies such a response — you’ve given me precisely what I need.
Nice tutorial. Im trying to modify this drag and drop so that it is possible to drag and drop each number to multiple slots. Is this possible? Can anyone give me a hint?
Hi robinh,
I’ve not posted on this thread for a while so forgive me if I am repeating anything said by others.
Anyway … I’ve done something similar to your requirements in a music notation application I wrote. In that I need to be able to drag from a palette of musical symbols onto the lines of a music stave. Most of the symbols can be placed multiple times, which seems to be what you want to do (kind of).
My first solution was to create a stack of each symbol and thus have many instances of each to drag.
However, I quickly realised that all I needed to do was REPLACE the symbol in the palette once I’d used (dragged) the previous instance.
There’s a setting to say “clone” the dragged object.
A quick search for an example yielded …
$( “.selector” ).draggable( “option”, “helper”, ‘clone’ );
See this for details :
http://stackoverflow.com/questions/7878980/jquery-ui-drag-shape-but-keep-a-copy-of-the-original-shape
Hope this helps.
Chris
Hi Chris,
Thank you for your answer.
I have a modified version of this drag and drop where i also save data to mysql.
Tried to add helper “clone” but after it is dragged to a slot it is gone. Im not sure why this happens but maybe because I declare the div’s in the html file and not by js.
Will need to do some more testing on this.
Best regards
Robin
Hi again,
Im actually using this example:
http://stackoverflow.com/questions/19826075/jquery-drag-drop-form-hidden-value-inserting-into-php-mysql
Have not got it to work as i want yet.
Does anyone have a tips?
Code is here:
http://jsfiddle.net/qLhke/29/
Hello, first I want to congratulate you for your tutorial which was undoubtedly very well done! Secondly, I would like to do with my students a similar to this application, but it was recorded all in mysql example a student does something in the application and this is ready, while another home can continue. Hugs and success for all! I used the translator for not writing in English, I apologize if something went wrong. Jean Brazil.
Hi, i need my droppable fires multiple drop events, how can i do that? until now it just fires one. Please im desperate!!! 🙁
How would you drag a card that’s been locked in place back out again
and
either drag it to another drop target (draggable)
or
revert back to its previous position if unsuccessful (revert)
The tutorial is so nice and easy to understand step by step.
In number cards game, its uses numbers and functionality is place to correct place.
But i need the code for letters (a,b,c,d…) given some letters,
we need to frame a correct name.
for example
n t h l i s e
Using the above letters, i drag or move (left and right only) one by one letter and to form the correct name as following.
“senthil” is the correct name.
Please give a reply.
Any help will be appreciated.
Letters are also numbers … ASCII code numbers.
Array elements can hold letters as well and are referenced by a number, so just as long as the letters are in the array in their correct final order it will work just the same.
[Edited by chrishirst on 15-Mar-14 20:24]
Thanks for this awesome tutorial. I’m not a programmer but found it really helpful.
I’ve got what I hope is a simple question. It’s about the array for numbers.
“Then we loop through each element in the numbers array, creating a div card element for each number. Inside the div we place the number, so that it appears on the card in the page. Once we’ve created the div object, we store the card’s number in a ‘number’ key inside the object by using jQuery’s data() method.”
Instead of the card number appearing on the draggable card, I would like some custom text. Is there a simple way to do that?
“Instead of the card number appearing on the draggable card, I would like some custom text. Is there a simple way to do that?”
I’ve been bashing my head against this all morning. If someone could tell me the answer, I’d be so grateful.
While I’ve been failing to make this happen, I’ve noticed that if you repeatedly refresh the game, about 10% of the time it will not randomise the cards. This is both on my local development version and also on the live preview (http://www.elated.com/res/File/articles/development/javascript/jquery/drag-and-drop-with-jquery-your-essential-guide/card-game.html). Just keep hitting refresh and you’ll see that fairly often it gives you all the dragable cards in non-randomised order (1-10).
If it helps, this is where I’ve got to so far.
If I change the numbers variable to be like this (there are only seven cards in my game):
then everything displays correctly, however, the cards won’t match. You cannot drop them in place.
If I make a new variable to store the text values, like this:
and change the code that creates the cards from this:
$('<div>' + numbers + '</div>')to be this:
$('<div>' + test + '</div>')then the cards do not sort and they are also not droppable.
OK, I’ve finally found the answer. When you create the numbers array, you need to give it multiple properties. Like this:
var numbers = [];
	numbers [ 0 ] = {x:1, y:'red'};
	numbers [ 1 ] = {x:2, y:'orange'};
	numbers [ 2 ] = {x:3, y:'yellow'};
	numbers [ 3 ] = {x:4, y:'green'};
	numbers [ 4 ] = {x:5, y:'sky blue'};
	numbers [ 5 ] = {x:6, y:'indigo'};
  	numbers [ 6 ] = {x:7, y:'violet'};
All you need to do then is define which property you want when you’re making the card stack:
for ( var i=0; i<7; i++ ) { $('<div>' + numbers.y + '</div>').data( 'number', numbers.x ).attr( 'id', 'card1' ).appendTo( '#cardPile' ).draggable( { containment: '#content', stack: '#cardPile div', cursor: 'move', revert: true } ); }It looks like no-one is following this, but all the same, the following css will fix the cursor (which changes to ‘text select’ when hovering over cards/slots):
#cardSlots { cursor: default; } #cardPile { cursor: move; }An updated, improved version of the above:
/* Cursors */ #cardPile div { cursor: move; } #cardSlots { cursor: default; } .correct { cursor: default; }Hello,
http://davidmaillard.fr/projets/dragdrop/
I’m trying to run a test. The idea is to allow the card (draggable) to be able to position it on any cartridge (droppable).
But my problem is at the ‘revert’ option. Indeed, as the first movement is not enabled, the option ‘revert’ is enabled. Then after moving, the option is disabled.
Thereafter, if I want to move the card again and I do not put me on a cartridge, the cart does not return to its original location because the option ‘revert’ was previously off.
function handleCardDrop( event, ui ) {
		ui.draggable.position( { of: $(this), my: 'left top', at: 'left top' } );
		ui.draggable.draggable( 'option', 'revert', false );
	}
Have you an idea to reactivate the option ‘revert’ on the cart in order to allow more travel?
Thank you in advance 🙂
The solution was finally change this line:
hello,
first of all, i’am a newbie.
i am looking for this kind of tutorial but find this things only in flash.
this tutorial was almost the perfect example for me because i want to make a sort of quiz for my soccer team (the kids are 10 years old)
my idea was to drag de numbers to te correct places on te soccerfield
the “cardslots” must be placed on the page (soccerfield) in a 433 system
this is where its going wrong i cant place them in other places
can somebody help me or give me the right directions
thanks
ps sorry for my pour english
harold
Hi, I have a situation where the object to be dragged and dropped is beneath a covering image. I don’t know how to move the focus of the drag from the top image to the draggable object below it, any ideas?
Any help much appreciated, thanks
Mike
PS: thanks for the plain english explanation of the jQuery, very helpful. I am using Edge Animate to try and get the interactivity working.
This is such a fantastic tutorial thank you so much.
I am trying to create something very similar but instead of numbers/words I want to drag and drop an image.
I have played around with the code but have not have any luck, is anyone able to assist me.
Thanks
I really like this tutorial, but I am trying to modify slightly and can’t figure out how. I would like to have the bottom row come up in a random order as well. How would I do this?
Hey,
Could you please provide me the github link for the cards problem. I couldn’t find it.
-Daisy
Hi All,
I am using below code. Everything working fine except reset button. Code for reset button is:-
$(“#dvSource”).html( ” );
$(“#dvDrop”).html( ” );
When i am using this code – .html( ” ) which is working in provided cards game example, but in my case page doesn’t load and not show error in console. If we use this code –
.html( ), page is loading but reset button does not reset the page.
Please suggest how to reset the page.
Thanks In Advance.
Mayank
HTML CODE
———–
<!DOCTYPE html>
<html lang="en">
<head>
    <title></title>
</head>
<body>
<style>

        #content
		{
			margin: 80px 70px;
			text-align: center;
			-moz-user-select: none;
			-webkit-user-select: none;
			user-select: none;
		}

        #dvSource, #dvDrop
		{
			width: 910px;
			height: 120px;
			padding: 20px;
			border: 2px solid #333;
			-moz-border-radius: 10px;
			-webkit-border-radius: 10px;
			border-radius: 10px;
			-moz-box-shadow: 0 0 .3em rgba(0, 0, 0, .8);
			-webkit-box-shadow: 0 0 .3em rgba(0, 0, 0, .8);
			box-shadow: 0 0 .3em rgba(0, 0, 0, .8);
		}
		#dvSource img, #dvDrop div
		{
			 float: left;
			 width: 58px;
			 height: 78px;
			 padding: 0px;
			 padding-top: 0px;
			 padding-bottom: 0;
			 border: 2px solid #333;
			 -moz-border-radius: 10px;
			 -webkit-border-radius: 10px;
			 border-radius: 10px;
			 margin: 0 0 0 10px;

		}
		#successMessage
		{
			position: absolute;
			left: 580px;
			top: 250px;
			width: 0;
			height: 0;
			z-index: 100;
			background: #dfd;
			border: 2px solid #333;
			-moz-border-radius: 10px;
			-webkit-border-radius: 10px;
			border-radius: 10px;
			-moz-box-shadow: .3em .3em .5em rgba(0, 0, 0, .8);
			-webkit-box-shadow: .3em .3em .5em rgba(0, 0, 0, .8);
			box-shadow: .3em .3em .5em rgba(0, 0, 0, .8);
			padding: 20px;
		}


    </style>
	<script type="text/javascript" src="http://ajax.googleapis.com/ajax/libs/jquery/1.8.3/jquery.min.js"></script>
    <script src="http://code.jquery.com/ui/1.8.24/jquery-ui.min.js" type="text/javascript"></script>
    <link href="http://code.jquery.com/ui/1.8.24/themes/blitzer/jquery-ui.css" rel="stylesheet" type="text/css" />
	<script>
	$(init);
	var correctCards = 0;
	function init()
	{

	  // Hide the success message
		  $('#successMessage').hide();
		  $('#successMessage').css
			(
				{
					left: '580px',
					top: '250px',
					width: 0,
					height: 0
				}
			);

	     // Reset the game
			correctCards = 0;
			$("#dvSource").html();
			$("#dvDrop").html();


		$("#dvSource img").draggable
		(
			{
				containment: '#content',
				stack: '#dvSource img',
				cursor: 'move',
				revert: true
			}
		)

		$("#dvDrop div").droppable
		(
			{
				accept: '#dvSource img', //We use the accept option with the selector "#cardPile div" to ensure that the slot will only accept our number cards, and not any other draggable element.
				hoverClass: 'hovered', //The hoverClass option adds a CSS class to a droppable when a draggable is hovered over it — we use this option to add a class of 'hovered' to the element, which we'll highlight using CSS.
				drop: handleCardDrop
			}
		)

	}
		function handleCardDrop( event, ui )
		{

			var DropId = $(this).attr( 'id' ); // output - Drop_1
			var DragId = ui.draggable.attr( 'id' );// output - Drag_1
			var aDrop = parseInt(DropId.slice(5)); // output - 1
			var bDrag = DragId.slice(5);// output - 1
			//alert(bDrag)
			if ( aDrop == bDrag )
			{

				//ui.draggable.addClass( 'correct' );
				ui.draggable.draggable( 'disable' );// this line decrease opacity and disable.
				$(this).droppable( 'disable' );
				ui.draggable.position( { of: $(this), my: 'left top', at: 'left top' } );
				ui.draggable.draggable( 'option', 'revert', false ); // this line drop the element.
				correctCards++;
			}

			// If all the cards have been placed correctly then display a message
			// and reset the cards for another go

			if ( correctCards == 8 )
			{
				$('#successMessage').show();
				$('#successMessage').animate
				(
					{
					  left: '380px',
					  top: '200px',
					  width: '400px',
					  height: '100px',
					  opacity: 1
					}
				);
			}
		}
	</script>
	<div id="content">
		<div id="dvSource">
			<img alt="" id="Drag_1" src="images/Chrysanthemum.jpg" />
			<img alt="" id="Drag_2" src="images/Desert.jpg" />
			<img alt="" id="Drag_3" src="images/Hydrangeas.jpg" />
			<img alt="" id="Drag_4" src="images/Jellyfish.jpg" />
			<img alt="" id="Drag_5" src="images/Koala.jpg" />
			<img alt="" id="Drag_6" src="images/Lighthouse.jpg" />
			<img alt="" id="Drag_7" src="images/Penguins.jpg" />
			<img alt="" id="Drag_8" src="images/Tulips.jpg" />
		</div>
		<hr/>
		 <div id="dvDrop">
		   <div id="Drop_1">One</div>
		   <div id="Drop_2">Two</div>
		   <div id="Drop_3">Three</div>
		   <div id="Drop_4">Four</div>
		   <div id="Drop_5">Five</div>
		   <div id="Drop_6">Six</div>
		   <div id="Drop_7">Seven</div>
		   <div id="Drop_8">Eight</div>
		</div>
		<div id="successMessage">
			<h2>You did it!</h2>
			<button onclick="init()">Play Again</button>
		</div>
	</div>
</body>
</html>
[Edited by chrishirst on 05-Jul-15 09:53]
By “Reset the page” you are meaning what exactly?
Actually i want, when i click on playAgain button, everything should be reset. I did as per cards game example. I called the init() mehod but it’s not happing. You can also test the code which is above provided. I think below code is not supporting for reset the page.
$(“#dvSource”).html( ” );
$(“#dvDrop”).html( ” );
Please Provide solution.
Thanks In Advance.
Mayank
Skypeid – kanhaiya97
[Edited by mayanksudden on 05-Jul-15 10:24]
“Please Provide solution.”
That is NOT going to happen, the tutorials are here for YOU to learn from by fixing problems that you find along the process of developing them.
You might get a clue from me as to the possible problem, so you can find the solution for yourself.
Hi Chris,
could you explain that why used single Quotation mark after .html like below in cards game example.
$(‘#cardPile’).html( ” );
$(‘#cardSlots’).html( ” );
Thanks In Advance.
Mayank
It sets the content of the element to an empty string.
it is the jquery equivalent of;
document.getElementById(“ID”).innerHTML = “”;
Hi there,
I keep finding myself revisiting this excellent tutorial, but can’t quite get the code to do what I want, which is slightly different from how you’ve done things.
What I would like to do is to not reveal whether the dragged answer is correct until all draggables have been placed. I would then like to have a ‘check answers’ button which reveals their score. Needless to say I’d rather not hint in anyway whether they have dropped the draggable on to the right droppable until the button is pressed.
If you could either respond to me directly or extend this article to show how to do what I’m after, I’d be ecstatic.
Keep up the good work!
anyone can help me? about creating a sql database designer tool? using a drag and drop method in Jquery?
Thanks in advance. 🙂
You can’t. javascript cannot ‘talk’ to SQL servers.
I created an user account just to leave a message here:
Your article is amazing! It’s so complete and well written. Congratulations!!!
Great piece of work. I want to use a version on a tablet. Can the drag and drop be made touch sensitive?
That is for the tablet to support, javascript (therefore jquery) has no direct hardware interaction at all.
This has been really helpful to me and I’m just starting to play around in html and jquery. I am tying to fiddle around to see if I can replace the card numbers into pictures so that I can match the pictures to its corresponding name…
but i’m stuck… i’m guessing its some syntax problem that i’m getting… maybe the code i only made for number variables and not jpg objects..
I’m wondering how would I go about doing this:
// Create the pile of shuffled cards
var minpic = [ “Gypsum.jpg”, “RoseQuartz.jpg”, “Plagioclase.jpg”, “Muscovite.jpg”, “Flurorite.jpg”, “Talc.jpg”, “Halite.jpg”, “Quartz.jpg”, “Calcite.jpg”];
//minpic.sort( function() { return Math.random() – .5 } );
for ( var i=0; i<9; i++ ) {
$(‘<div>’ + minpic.src + ‘</div>’).data( ‘number’, minpic.src ).attr( ‘id’, ‘card’+minpic.src ).appendTo( ‘#cardPile’ ).draggable( {
containment: ‘#content’,
stack: ‘#cardPile div’,
cursor: ‘move’,
revert: true
} );
}
// Create the card slots
var minerals = [ ‘GYPSUM’, ‘ROSE QUARTZ’, ‘PLAGIOCLASE’, ‘MUSCOVITE’, ‘FLUORITE’, ‘TALC’, ‘HALITE’, ‘ROCK CRYSTAL QUARTZ’, ‘CALCITE’];
for ( var i=1; i<=9; i++ ) {
$(‘<div>’ + minerals[i-1] + ‘</div>’).data( ‘number’, i ).appendTo( ‘#cardSlots’ ).droppable( {
accept: ‘#cardPile div’,
hoverClass: ‘hovered’,
drop: handleCardDrop
} );
}
Hi, firefox dont work
Should be OK now – can you try again please?
I know this is an old tutorial but your demos are broken. You have http references to CDN’s that now require https so some of your scripts are not loading.
Should be fixed now.
Sir,
I have checked on my android phone, as it is a mouse-driven it’s not working. Being an absolute beginner and student, I need help from an experienced renowned professional like you sir. I sincerely request you to publish the same code for touch devices like mobile devices. I would love to see more posts, codes and guidance from you sir.
See https://stackoverflow.com/questions/5186441/javascript-drag-and-drop-for-touch-devices
Hi, I love the drag and drop cards number game… it worked on my PC Chrome, but unfortunately, not on my iPad… I would like to be able to use your code to make an educational game for iPads, is it possible to have a code that is friendly for both PC and iPads?
See https://stackoverflow.com/questions/5186441/javascript-drag-and-drop-for-touch-devices
For the top card numbers, can I put in images instead?
For example, this script:
// Create the pile of shuffled cards
var numbers = [ 1, 2, 3, 4, 5, 6, 7, 8, 9, 10 ];
numbers.sort( function() { return Math.random() – .5 } );
Is it possible to replace 1 with 1.png, 2 with 2.png, etc?
for example,
var numbers=[1.png, 2.png, 3.png] and so on?
I’m trying to figure it out, your assistance will be greatly appreciated
thanks 🙂
Thank you, sir. I checked the link and got the code ..now it’s working on my android phone. Really appreciate your help.
If I want to maintain unique id assignments for my cards, and I want them all to appear green when dropped correctly, is there a simplified way to include this in my .css file?
#card1.correct, #card2.correct, #card3.correct, #card4.correct, #card5.correct, #card6.correct, #card7.correct, #card81.correct, #card9.correct, #card10.correct {
background-color: #0F9;
}