WinSCP is a popular free FTP program for Windows. An FTP program lets you transfer files between your computer and your Web server.
In this introductory tutorial, you’ll learn how to use WinSCP to upload your website’s files to your server.
This tutorial assumes you’ve already downloaded and installed WinSCP. It also assumes you’re using WinSCP with the “Commander” interface, rather than the “Explorer” interface. (To change interfaces in WinSCP, choose Options > Preferences, then click the Interface option and select either Commander or Explorer.)
Connecting to your Web server
When you start WinSCP, You’ll see the WinSCP Login dialog box (shown below). This is where you enter information about the Web server you want to connect to.
If you’re not sure of your Web server’s FTP details, ask your hosting company.
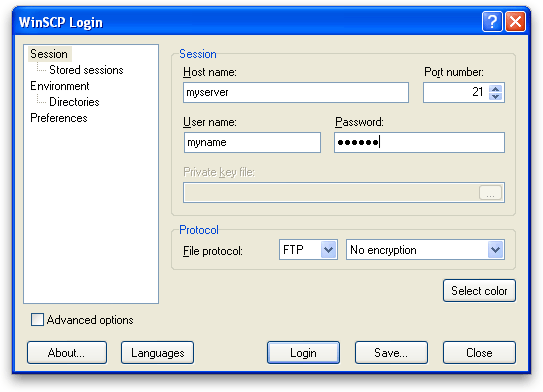
Enter the following information in the dialog:
- Your Web server’s name in the Host name box
- Your login name in the User name box
- Your login password in the Password box
- Your protocol information in the Protocol boxes. For the sake of this tutorial, we’ll assume you’re using plain, simple FTP, so choose FTP and No encryption.
Once you’ve entered your Web server details, click Login to connect to your server.
You may be behind a proxy server, especially if you’re using WinSCP from work. If so, you will need to get your proxy server details from your IT support people. Then, in the WinSCP Login dialog, select the Advanced options checkbox, then click the Proxy option and enter your proxy server information.
Your home directory
Once logged in, you will be taken to your home directory on your Web server, which you’ll see in the right hand pane in WinSCP. This directory contains (amongst other things) your website directory, which is where you need to upload all your files:
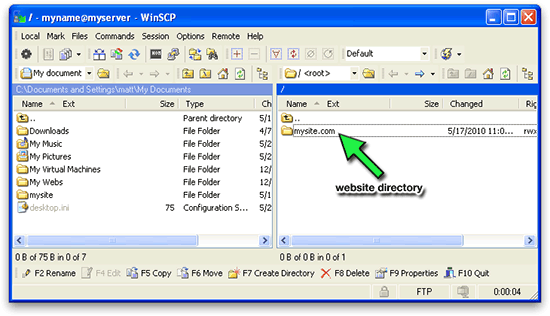
Double-click your website directory — mysite.com in the above screenshot — to browse its contents.
Your document root
The top level folder of your website is often called the document root. This is where you will place your first website files. The document root is often named htdocs or public_html, and is usually inside your website directory.
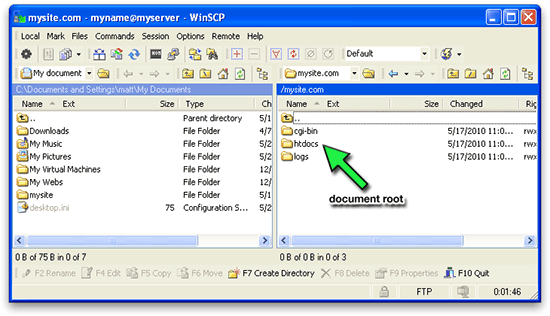
htdocs, your document root directory — the top level of your website.If you like, you can double-click your document root folder — htdocs in the above screenshot — to browse its contents.
Uploading a Web page
Once you’ve found your document root, you’re now ready to upload your website. Here, you’re going to upload your first page, index.html, which should be the name of the main page of your website.
Use the left-hand pane in WinSCP to browse to your website folder on your hard disk. You can then upload your index.html file to the server by dragging it from the left-hand pane to the htdocs folder in the right-hand pane:
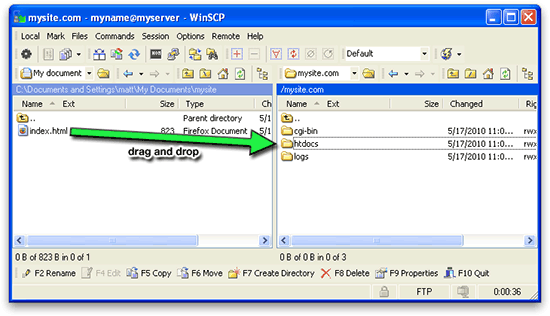
htdocs folder in the right-hand pane.Once you’ve dragged your file, you may see a Copy dialog appear. Just click the Copy button in the dialog to continue. You can also check the Do not show this dialog again checkbox in the dialog, if it annoys you.
Once WinSCP has finished uploading the file, double-click your document root folder (e.g. htdocs) in the right-hand pane to view its contents. You should see a copy of your file. Congratulations — you’ve just uploaded your Web page!
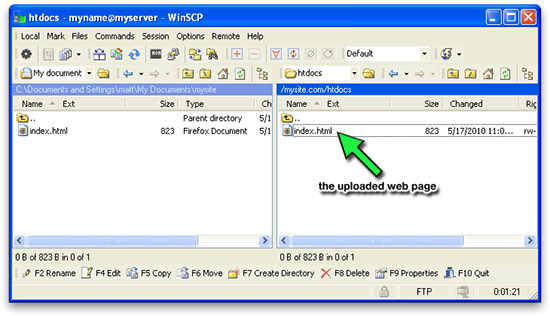
If you now open up a Web browser and go to your website’s URL, you should see your Web page on the Internet. Well done! 🙂
You can also upload files and folders by dragging them straight from Windows Explorer into the right-hand pane in WinSCP.
Other stuff
Downloading
If you need to download a Web page from your site again (for example, you lost the original on your PC), simply drag and drop your page the other way, from the right-hand pane to the left-hand pane (or to Windows Explorer).
Disconnecting
After you’ve finished uploading stuff, choose Session > Disconnect to disconnect from your Web server. Or simply close down WinSCP.
Deleting files
To delete a file that you have uploaded to your server, click on the file in the right-hand pane to select it, and press the Delete key on your keyboard.
Doing other stuff to files
Right-click on a file in the right-hand pane and you will see all sorts of things you can do to it, such as renaming it and editing it.
If you need to change permissions on a file then right-click it and choose Properties from the pop-up menu.
This basic WinSCP tutorial has shown you how to upload your website files with WinSCP. To learn more about about using WinSCP, take a look at the WinSCP Guides. Have fun!
Leave a Reply