In this tutorial we’ll introduce you to SSH – a tool that allows you to send remote commands to your Web server – and show you some simple UNIX commands to help you manage your website.
What is SSH?
SSH is a protocol that allows you to connect to a remote computer – for example, your Web server – and type commands to be carried out on that computer, such as moving and copying files, creating directories (folders), and running scripts. To talk to your Web server via SSH, you need an SSH client on your computer – see below – and you also need three pieces of information:
- Your Web server’s IP address or hostname
- Often – but not always – the hostname is the same as your website’s domain name.
- A username
- This is the username that you’ll use to login via SSH. Often it’s the same as your Web control panel or FTP username.
- A password
- This is the password that’s associated with the above username.
If you’re not sure what to use for your hostname, username or password, check with your Web hosting company.
Connecting using an SSH client on Windows
There are many free and commercial SSH client programs available for Windows. A good, popular free client is PuTTY. To use it, simply download the putty.exe file, then double-click putty.exe on your computer to run it. You’ll see PuTTY’s configuration dialog appear:
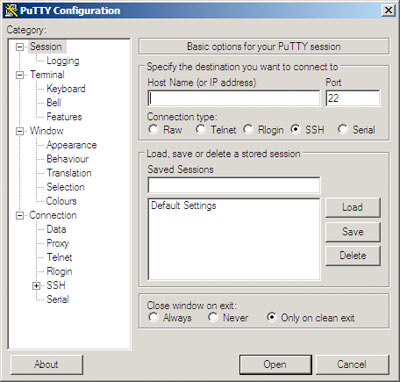
Enter your Web server’s IP address or hostname in the Host Name (or IP address) box, and click Open. The first time you connect to your Web server, you’ll probably see a security alert dialog appear, warning you that PuTTY doesn’t know anything about the machine (“host”) that you’re connecting to. Click Yes to add your server to PuTTY’s cache and proceed with the connection.
You’ll now see a black terminal window appear, containing a “login as:” prompt:
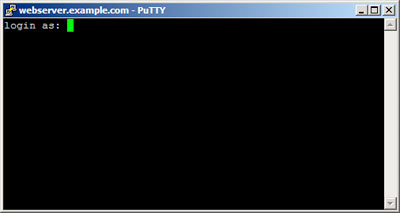
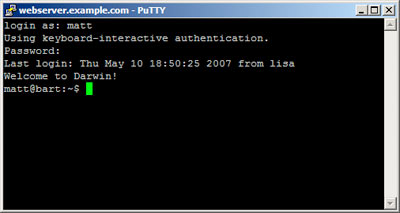
Enter your username, and press Enter. A “Password:” prompt appears; enter your password and, again, press Enter. If all goes well, you’ll now be logged into your Web server. You’ll probably see some sort of welcome message from your server, followed by a shell prompt:
Connecting using an SSH client on Mac OS X or Linux
If you use a Mac or run Linux, you’re in luck, as Mac OS X and Linux both come with a built-in SSH client. To use it, you first need to open a terminal window. On Mac OS X, you can do this by double-clicking the Terminal application inside Applications/Utilities in the Finder. To open a terminal on Linux, consult your distribution’s documentation; usually it’s available via the applications menu.
Once you have a terminal window open, type:
ssh username@hostname
where username is your SSH username, and hostname is the host name or IP address of your Web server. Then press Enter. If this is the first time you’ve tried to connect to this computer, you’ll see a warning to the effect that the host couldn’t be authenticated. Type yes and press Enter to confirm that you’d like to continue with the connection.
After a few seconds you should see a “Password:” prompt appear; enter your password and press Enter once again. You should now see a welcome message and a shell prompt, indicating that you’re logged into your Web server:

Some basic commands
Congratulations! You’ve logged in to your Web server using SSH. You can now issue commands to the server by typing them in at the shell prompt:
username@webserver:~$
and pressing Enter. Let’s look at some simple Unix commands.
The ls command
ls is short for “list”; it lists all the files and directories in your current directory (called the working directory in Unix parlance). Type ls and press Enter, and you should see a listing appear in the terminal window:
username@webserver:~$ ls
myfile.txt   myfile2.txt   mysite.com
The cd command
cd stands for “change directory”, and it allows you to move into and out of directories, much like double-clicking folders on your PC. For example, if mysite.com listed above is the directory containing your website, you can move into the directory as follows:
username@webserver:~$ cd mysite.com
You can then do another ls to list the contents of the mysite.com directory:
username@webserver:~/mysite.com$ ls
cgi-bin   htdocs   logs
To move back up a directory, use cd .. (".." means “the parent directory”). You’ll then be back in your original directory:
username@webserver:~/mysite.com$ cd ..
username@webserver:~$ ls
myfile.txt   myfile2.txt   mysite.com
The pwd command
Often it’s useful to know your exact current directory. To find this out, type the command pwd (short for “print working directory”) and press Enter. The computer displays the full path to the current directory you’re working in:
username@webserver:~$ pwd
/home/users/username/
The more command
The more command is a quick way to view the contents of a text file on your server. Just type more followed by the name of your file, and press Enter:
username@webserver:~$ more myfile.txt
Project Gutenberg's The Complete Works of Artemus Ward, Part 1
#1 of this seven part series by Charles Farrar Browne

Copyright laws are changing all over the world, be sure to check
the laws for your country before redistributing these files!!!

Please take a look at the important information in this header.
We encourage you to keep this file on your own disk, keeping an
electronic path open for the next readers.

Please do not remove this.

This should be the first thing seen when anyone opens the book.
Do not change or edit it without written permission.  The words
are carefully chosen to provide users with the information they
--More--(16%)
If your text file is more than one page long, you’ll see a line such as:
--More--(16%)
at the bottom of the page, showing you how much of the text file you’ve seen. Press Enter to scroll through one line at a time, or Space to scroll one page at a time. To cancel the more command, press q.
That should be enough to keep you going for a while! Once you’re confident with using SSH and issuing commands, you can start to learn other useful commands for copying and moving files, testing CGI scripts, and working with directories. Take a look at our Useful UNIX commands reference for more info.
Hi Team,
I am having some log files with different timestamps. What is the command for scp to get the files between two timestamps? Thanks in advance