
With the advent of CSS3 transforms, we can do some nice tricks with elements in a web page, including rotation, scaling, and skewing. Once we start throwing jQuery into the mix too, we can start doing some really nice tricks!
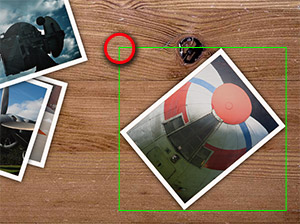
In this tutorial I’ll show how you can use CSS3 transforms, along with some jQuery, to add smoothly rotatable photos to a web page. You can try it out right now by clicking the “View Demo” button above. Hold down Shift, then click and drag on a photo to rotate it.
I’ve based the code on this photo light table tutorial that I wrote a couple of months ago. In that tutorial, you could drag photos around the table, and click a photo to view it in a lightbox. Now, with this latest addition, you can also Shift-drag a photo to rotate it smoothly about its centre. Nice!
I should point out that this tutorial won’t work in IE at all, since IE (as of version 8) doesn’t support CSS transforms. I suspect it might work in IE9, although I don’t have it to test with. It also won’t work in touchscreen mobile browsers (yet) due to the lack of a Shift key!
Here’s how to code this baby up. Bear in mind that we’re starting with the script from the last tutorial, so if you want to follow along then you can download that code and work from it.
Step 1. Add variables to track the rotation
The first thing to do is add 3 more global variables towards the top of the script. These will hold the currently rotated photo object, as well as a couple of useful angles (new code shown in bold):
var newImageZIndex = 1;         // To make sure newly-loaded images land on top of images on the table
var loaded = false;             // Used to prevent initPhotos() running twice
var imageBeingRotated = false;  // The DOM image currently being rotated (if any)
var mouseStartAngle = false;    // The angle of the mouse relative to the image centre at the start of the rotation
var imageStartAngle = false;    // The rotation angle of the image at the start of the rotation
mouseStartAngle will hold the angle of the mouse at the point where the user starts Shift-dragging, while imageStartAngle will hold the rotation angle of the image at that point. We’ll use this information to calculate the new rotation angle of the image during the rotation process.
Step 2. Add a mouseup event handler to stop the rotation
One thing we’ll definitely need is a way to detect when the user has finished Shift-dragging. To do this, we’ll attach an event handler function called stopRotate() to the mouseup event. (We’ll write this function in a moment.)
Since the user may well drag the mouse outside a photo as they rotate it, we should attach this handler to the document, rather than to the image. We’ll do this in the initPhotos() function:
  // The table image has loaded, so bring in the table
  $('#lighttable').fadeIn('fast');

  // Add an event handler to stop the rotation when the mouse button is released
  $(document).mouseup( stopRotate );

  // Process each photo in turn...
  $('#lighttable img').each( function(index) {
Step 3. Track the current rotation angle of each image as it’s created
In the previous tutorial, we randomly rotate each photo as it’s added to the table to create a pleasing “scattered” effect. Now, if we’re going to allow the user to rotate the photos with the mouse, we’ll need to know the initial rotation angle of each photo.
So, when each photo is randomly rotated at the start, we’ll add a line of code to store its rotation angle inside the jQuery object representing the photo. This is easy to do, thanks to jQuery’s handy data() method:
    // Set a random position and angle for this photo
    var left = Math.floor( Math.random() * 450 + 100 );
    var top = Math.floor( Math.random() * 100 + 100 );
    var angle = Math.floor( Math.random() * 60 - 30 );
    $(this).css( 'left', left+'px' );
    $(this).css( 'top', top+'px' );
    $(this).css( 'transform', 'rotate(' + angle + 'deg)' );
    $(this).css( '-moz-transform', 'rotate(' + angle + 'deg)' );
    $(this).css( '-webkit-transform', 'rotate(' + angle + 'deg)' );
    $(this).css( '-o-transform', 'rotate(' + angle + 'deg)' );
    $(this).data('currentRotation', angle * Math.PI / 180 );
We produced the original random angle in degrees, but radians are actually easier to work with when it comes to calculating rotation angles. So we convert the angle to radians when we store it, using the formula: radians = degrees * π / 180.

Step 4. Prevent the Draggable plugin interfering with the rotation
The original light table uses the jQuery UI Draggable plugin to make the photos draggable. This is great, but it will also get in the way of our new rotation code. This is because, when the user Shift-drags a photo to rotate it, the Draggable plugin will intercept the dragging action and move the photo instead.
Therefore we need to tell Draggable to ignore the drag action if the user is Shift-dragging to rotate an image. First we’ll need to attach a callback function to Draggable’s start event by changing the call to Draggable, as follows:
    // Make the photo draggable
    $(this).draggable( { containment: 'parent', stack: '#lighttable img', cursor: 'pointer', start: dragStart } );
Now we’ll add the dragStart() function, after the initPhotos() function:
// Prevent the image being dragged if it's already being rotated

function dragStart( e, ui ) {
  if ( imageBeingRotated ) return false;
}
This function checks if the user is currently rotating an image by looking at the value of imageBeingRotated; if it’s not false then an image is being rotated, so we return false from dragStart(). This tells Draggable to cancel its drag operation.
Step 5. Add a mousedown event handler to start the rotation
As we loop through the photos in initPhotos(), we’ll add a mousedown event handler function called startRotate() to each photo. This event handler function will check if the user held down Shift while starting to drag and, if they did, start the dragging process:
    // Make the photo draggable
    $(this).draggable( { containment: 'parent', stack: '#lighttable img', cursor: 'pointer', start: dragStart } );

    // Make the photo rotatable
    $(this).mousedown( startRotate );
We’ll write the startRotate() function in a moment.
Step 6. Prevent the lightbox interfering with the rotation
Our light table uses the excellent ColorBox plugin to pop up a lightbox when the photo is clicked. However, as with Draggable, this will interfere with our “Shift-drag-to-rotate” action, and pop up the lightbox whenever the user finishes a rotation. It took me a while to work out exactly why, but here’s what seems to happen:
- The user Shift-clicks to start rotating. This fires the
mousedownevent, which triggers ourstartRotate()function. No problems there. - The user drags to rotate the image. Again, no problems here.
- The user releases the mouse button to stop rotating. This fires the
mouseupevent, which triggers ourstopRotate()function. However, when JavaScript sees amousedownfollowed by amouseup, it also triggers aclickevent. Since Colorbox is set up to respond toclickevents, this results in the lightbox popping up when the user releases the mouse button. Pesky!
The way around this is to explicitly assign each photo’s click event to a custom event handler function, which only opens the lightbox if the user isn’t in the process of rotating an image.
So first we change the line:
    // Make the lightbox pop up when the photo is clicked
    addLightbox(this);
to:
    // Make the lightbox pop up when the photo is clicked
    $(this).bind( 'click', function() { openLightbox( this ) } );
Now we’ll add the openLightbox() event handler function (after the initPhotos() function). This explicitly opens the Colorbox lightbox for the clicked image, but only if an image isn’t currently being rotated. Much of this code is taken from the old addLightbox() function:
// Open the lightbox only if an image isn't currently being rotated

function openLightbox( image ) {
  if ( !imageBeingRotated ) {
    var imageFile = $(image).attr('src');
    imageFile = imageFile.replace ( /^slides//, "" )
    var imageCaption = $(image).attr('alt');
    $.colorbox( {
                href:'slides-big/'+imageFile,
                maxWidth: "900px",
                maxHeight: "600px",
                title: imageCaption
                } );
   return false;
  }
}
We can also delete our now-redundant addLightbox() function from the code.
There’s a little bit more to this workaround, as you’ll see when we come to write the stopRotate() function!
Step 7. Write the event handler to start the rotation

Now that we’ve set everything up, and stopped the 2 jQuery plugins getting in the way of things, we’re ready to start writing our rotation code!
The startRotate() function — triggered when the user first presses their mouse button down while hovering over a photo — sets up the rotation, records a couple of important angles, and binds an event handler to track mouse movements during the rotation. Here’s the function:
// Start rotating an image

function startRotate( e ) {

  // Exit if the shift key wasn't held down when the mouse button was pressed
  if ( !e.shiftKey ) return;

  // Track the image that we're going to rotate
  imageBeingRotated = this;

  // Store the angle of the mouse at the start of the rotation, relative to the image centre
  var imageCentre = getImageCentre( imageBeingRotated );
  var mouseStartXFromCentre = e.pageX - imageCentre[0];
  var mouseStartYFromCentre = e.pageY - imageCentre[1];
  mouseStartAngle = Math.atan2( mouseStartYFromCentre, mouseStartXFromCentre );

  // Store the current rotation angle of the image at the start of the rotation
  imageStartAngle = $(imageBeingRotated).data('currentRotation');

  // Set up an event handler to rotate the image as the mouse is moved
  $(document).mousemove( rotateImage );

  return false;
}
Let’s look at each step of this function:
-
- Exit if the Shift key wasn’t held down
startRotate()is triggered whenever the user presses their mouse button while over an image. However the user might not be rotating — they might be starting to drag the photo around, or just clicking it to open the lightbox. We only want to start rotating the photo if they’ve held down Shift as well, so we use the handyshiftKeyproperty of theEventobject to determine if Shift was held down. If it wasn’t, we exit the function straight away. - Track the image that we’re going to rotate
We need to store the clicked image in the globalimageBeingRotatedvariable, to let other event handlers know that we’re currently rotating the image. It’s easy to get the clicked image, since jQuery passes it to our event handler via thethiskeyword. - Store the angle of the mouse at the start of the rotation
We need to record the angle of the mouse relative to the centre of the image at the start of the rotation. Then, when the mouse is later moved, we can compare the new angle to the start angle to work out how much rotation to apply. We get the centre point of the image by calling agetImageCentre()function (we’ll write this in a moment), then compute the X and Y components of the distance between the mouse and the centre. Then we useMath.atan2()to find the angle between these 2 points (relative to the x axis), which we then store in the globalmouseStartAnglevariable. - Store the current rotation angle of the image
We also need to store the rotation angle of the image at the point where the user starts to rotate it. We can then use this figure to calculate the new rotation angle for the image once the user has moved the mouse. Since we always store an image’s current rotation angle in its jQuery object ascurrentRotation(see Step 3), it’s easy to pull this value out and store it in the globalimageStartAnglevariable. - Set up an event handler to rotate the image as the mouse is moved
Next we attach amousemoveevent handler function,rotateImage(), to the document. This will be triggered whenever the mouse moves from now on, and we’ll use this function to rotate the image according to the new mouse position. (We’ll write this function in a moment.)We attach the
mousemovehandler to the document, rather than the image, because the user might drag the mouse outside of the image as they rotate it.
- Exit if the Shift key wasn’t held down
- Stop event propagation and bubbling
The last thing our event handler does is returnfalse. This tells jQuery that we’ve now handled themousedownevent, so it shouldn’t trigger any other event handlers that might respond to this event.
Step 8. Write the event handler to stop the rotation

In Step 2, we bound an event handler function, stopRotate(), to the document’s mouseup event. Let’s write that function now:
// Stop rotating an image

function stopRotate( e ) {

  // Exit if we're not rotating an image
  if ( !imageBeingRotated ) return;

  // Remove the event handler that tracked mouse movements during the rotation
  $(document).unbind( 'mousemove' );

  // Cancel the image rotation by setting imageBeingRotated back to false.
  // Do this in a short while - after the click event has fired -
  // to prevent the lightbox appearing once the Shift key is released.
  setTimeout( function() { imageBeingRotated = false; }, 10 );
  return false;
}
The first thing the function does is check that we’re actually in the process of rotating an image. If not then it exits.
If we are rotating an image then the function first unbinds the rotateImage() function from the mousemove event, so that future mouse movements no longer trigger rotateImage().
The function also needs to set the global imageBeingRotated variable to false, to tell other event handlers that we’re no longer rotating an image. Rather than doing this directly, the function uses setTimeout() to set the variable to false after 10 milliseconds. Why on Earth does it do this?!
Well, remember from Step 6 that a mousedown followed by a mouseup also fires a click event. What’s more, the click is only fired after the mouseup event handler has finished. So if we were to set imageBeingRotated to false within stopRotate() then it would be false by the time the openLightbox() click handler was called. This would then cause the lightbox to pop up every time the user released the mouse button after rotating an image!
By setting imageBeingRotated to false after 10 milliseconds, we give stopRotate() time to finish and fire the click event, calling openLightbox(). Since imageBeingRotated will still be true at this point, the lightbox doesn’t pop up. Then a fraction of a second later, imageBeingRotated is set to false.
It’s a tad long-winded, but it works like a charm. 😉
Step 9. Write the event handler to rotate the image
Now we come to the meat of the rotation code. rotateImage() is triggered whenever the user moves the mouse in the document. Its job is to check that we’re in the process of rotating an image and, if we are, to rotate the image based on the new mouse position:
// Rotate image based on the current mouse position

function rotateImage( e ) {

  // Exit if we're not rotating an image
  if ( !e.shiftKey ) return;
  if ( !imageBeingRotated ) return;

  // Calculate the new mouse angle relative to the image centre
  var imageCentre = getImageCentre( imageBeingRotated );
  var mouseXFromCentre = e.pageX - imageCentre[0];
  var mouseYFromCentre = e.pageY - imageCentre[1];
  var mouseAngle = Math.atan2( mouseYFromCentre, mouseXFromCentre );

  // Calculate the new rotation angle for the image
  var rotateAngle = mouseAngle - mouseStartAngle + imageStartAngle;

  // Rotate the image to the new angle, and store the new angle
  $(imageBeingRotated).css('transform','rotate(' + rotateAngle + 'rad)');
  $(imageBeingRotated).css('-moz-transform','rotate(' + rotateAngle + 'rad)');
  $(imageBeingRotated).css('-webkit-transform','rotate(' + rotateAngle + 'rad)');
  $(imageBeingRotated).css('-o-transform','rotate(' + rotateAngle + 'rad)');
  $(imageBeingRotated).data('currentRotation', rotateAngle );
  return false;
}
Here’s how the function works:
- Exit if we’re not rotating an image
If the Shift key isn’t being held down when the mouse is moved, orimageBeingRotatedequalsfalse, then the function simply exits without doing anything. - Calculate the new mouse angle relative to the image centre
This code is much the same as the code instartRotate(). - Calculate the new rotation angle for the image
Now that we have the new mouse angle (mouseAngle), we can subtract the mouse angle at the start of the rotation (stored inmouseStartAngle) to get the angle that the mouse has moved since the start. By adding this to the angle of the image at the start (imageStartAngle), we get the new rotation angle for the image. - Rotate the image to the new angle, and store the new angle
Now it’s simply a case of setting the CSS3transformproperty (along with the vendor-specific versions) to the new rotation angle, thereby rotating the image. The function also stores the new rotation angle of the image within the jQuery object ascurrentRotation, and returnsfalseto stop themousemoveevent being propagated further.
Step 10. Write a function to calculate an image’s centre point
This function, getImageCentre(), is called by startRotate() and rotateImage(). It’s used to calculate the centre point of an image that is being rotated.
This was actually the hardest part of the code to write. Getting the centre point of an image that has been rotated via CSS3 transforms is not easy!
To get the centre point, we first need to call the jQuery offset() method to get the image’s offset — that is, the coordinates of the top left corner of the image. We can then add half the image width and height to these coordinates to calculate the centre.
The problem is that, when you ask for the offset of an image that’s been rotated in CSS, most browsers don’t give you the top left corner of the actual image. Instead, they give you the top left corner of the larger bounding box surrounding the image — that is, the non-rotated rectangle that completely encloses the rotated image. This corner point moves around as the image rotates and the bounding box changes size, making it very hard to use it as a basis for calculating the image centre.
Just to complicate matters, Firefox (as of 4.0 beta 3, at least) does actually give you the top left corner of the image itself, as if it wasn’t rotated at all, which is exactly what we want. It’s the only browser that does, though. I’m not sure which browser is correct, or if getting offsets of rotated images is even mentioned in the CSS3 spec (I don’t think so).
Anyway, after experimenting with some hideous trigonometry to try and calculate the original, non-rotated offset, I gave up and decided to think outside the box instead (pun intended!).
Here’s what we do instead:
- Temporarily rotate the image back to zero radians (so it’s straight).
- Get the offset and use it to calculate the image centre.
- Rotate the image back to its previous angle.
This avoids the whole problem of getting the offset of a rotated image, since the image isn’t rotated at the time we read the offset coordinates.
This all happens so fast that you don’t even notice it — in fact I suspect most browsers don’t even get around to drawing the image when it’s at zero radians. Clever, huh? 🙂
So, here’s our entire function for calculating the centre point of a rotated image:
// Calculate the centre point of a given image

function getImageCentre( image ) {

  // Rotate the image to 0 radians
  $(image).css('transform','rotate(0rad)');
  $(image).css('-moz-transform','rotate(0rad)');
  $(image).css('-webkit-transform','rotate(0rad)');
  $(image).css('-o-transform','rotate(0rad)');

  // Measure the image centre
  var imageOffset = $(image).offset();
  var imageCentreX = imageOffset.left + $(image).width() / 2;
  var imageCentreY = imageOffset.top + $(image).height() / 2;

  // Rotate the image back to its previous angle
  var currentRotation = $(image).data('currentRotation');
  $(imageBeingRotated).css('transform','rotate(' + currentRotation + 'rad)');
  $(imageBeingRotated).css('-moz-transform','rotate(' + currentRotation + 'rad)');
  $(imageBeingRotated).css('-webkit-transform','rotate(' + currentRotation + 'rad)');
  $(imageBeingRotated).css('-o-transform','rotate(' + currentRotation + 'rad)');

  // Return the calculated centre coordinates
  return Array( imageCentreX, imageCentreY );
}
The end result
Here’s the demo again. It works pretty smoothly, even on my old rusty Core Duo iMac.
Firefox 4 is the smoothest of the browsers I tested, followed by WebKit browsers (Safari and Chrome), followed by Opera.
As I said at the start, it won’t work in IE8 or earlier due to lack of CSS transform support (although it doesn’t give any errors). It won’t do much in iOS 4 either, since there’s no such thing as holding down a Shift key on an iPhone. I suspect the code could be rewritten to allow rotation using a 2-finger rotation gesture — maybe a project to try once jQuery Mobile hits the streets!
I hope you enjoyed reading this tutorial (and the other “Kitchen Table” tutorials that went before it), and feel free to use the rotation code in your own projects if you like.
Have fun — and as always, if you have any thoughts or suggestions on this tutorial, please let me know in the comments below! 🙂
[Photo credit: Torley]
wow great!! only 1 thing i’d like to ask: is there a way to add a resize function to this? i have a basic basic understanding of jquery and tried some things up to now, but didn’t get it.
@wursti: Yes it should be possible. You could modify startRotate() and rotateImage() to check if another modifier key (such as alt/option) was held down. If so, then resize the image in rotateImage() by setting new values for the width and height:
$(imageBeingRotated).css('width', newWidth);
$(imageBeingRotated).css('height', newHeight);
(You can calculate those values by looking at how far the mouse has moved since the drag started, and in what direction, and multiplying the old width and height appropriately.)
Hope that helps!
cool, thank you matt!!
so now i added these two guys:
$(this).data('currentWidth', thisWidth );
$(this).data('currentHeight', thisHeight );
and i have this for startrotate():
function startRotate( e ) {

	if ( e.shiftKey ) {

		imageBeingRotated = this;

		// Store the angle of the mouse at the start of the rotation, relative to the image centre
		var imageCentre = getImageCentre( imageBeingRotated );
		var mouseStartXFromCentre = e.pageX - imageCentre[0];
		var mouseStartYFromCentre = e.pageY - imageCentre[1];
		mouseStartAngle = Math.atan2( mouseStartYFromCentre, mouseStartXFromCentre );

		// Store the current rotation angle of the image at the start of the rotation
		imageStartAngle = $(imageBeingRotated).data('currentRotation');

		// Set up an event handler to rotate the image as the mouse is moved
		$(document).mousemove( rotateImage );

		return false;
	} else {

		if ( e.altKey ) {

			imageBeingRotated = this;

			// Store the position of the mouse at the start of the scaling, relative to the image centre
			var imageCentre = getImageCentre( imageBeingRotated );
			var mouseStartXFromCentreScale = e.pageX - imageCentre[0];
			var mouseStartYFromCentreScale = e.pageY - imageCentre[1];

			// Store the current size of the image at the start of the scaling
			imageStartWidth = $(imageBeingRotated).data('currentWidth', thisWidth[1]);
			imageStartHeight = $(imageBeingRotated).data('currentHeight', thisHeight[1]);

			// Set up an event handler to scale the image as the mouse is moved
			$(document).mousemove( rotateImage );

			return false;
		} else {

			return;
		}
	}
}
and after all this for rotateimage():
function rotateImage( e ) {

	if ( e.shiftKey ) {

		if ( !imageBeingRotated ) return;

		// Calculate the new mouse angle relative to the image centre
		var imageCentre = getImageCentre( imageBeingRotated );
		var mouseXFromCentre = e.pageX - imageCentre[0];
		var mouseYFromCentre = e.pageY - imageCentre[1];
		var mouseAngle = Math.atan2( mouseYFromCentre, mouseXFromCentre );

		// Calculate the new rotation angle for the image
		var rotateAngle = mouseAngle - mouseStartAngle + imageStartAngle;

		// Rotate the image to the new angle, and store the new angle
		$(imageBeingRotated).css('transform','rotate(' + rotateAngle + 'rad)');
		$(imageBeingRotated).css('-moz-transform','rotate(' + rotateAngle + 'rad)');
		$(imageBeingRotated).css('-webkit-transform','rotate(' + rotateAngle + 'rad)');
		$(imageBeingRotated).css('-o-transform','rotate(' + rotateAngle + 'rad)');
		$(imageBeingRotated).data('currentRotation', rotateAngle );
		return false;

	} else {

		if (e.altKey) {

			if ( !imageBeingRotated ) return;

			// Calculate the new mouse position relative to the image centre
			var imageCentre = getImageCentre( imageBeingRotated );
			var mouseXFromCentre = e.pageX - imageCentre[0];
			var mouseYFromCentre = e.pageY - imageCentre[1];

			// Calculate the new size for the image
			var newWidth = mouseXFromCentre - mouseStartXFromCentre + imageStartWidth;
			var newHeight = mouseYFromCentre - mouseStartYFromCentre + imageStartheight;

			// Scale the image to the new size, and store the new size
			$(imageBeingRotated).css('width',newWidth + 'px');
			$(imageBeingRotated).css('height',newHeight + 'px');
			$(imageBeingRotated).data('currentWidth', newWidth);
			$(imageBeingRotated).data('currentHeight', newHeight);
			return false;

		} else {

			return;
		}
	}
}
and … it still works 🙂 but without resizing 🙁 would be great if you could once look over it if i have overseen smth or if i did it completely wrong?
@wursti: Wow, good work! I’m impressed. 🙂
When you wrote:
$(this).data('currentWidth', thisWidth );
$(this).data('currentHeight', thisHeight );
…don’t you want this instead?
$(this).data('currentWidth', $(this).width() );
$(this).data('currentHeight', $(this).height() );
Does the code branch for the alt key in rotateimage() actually run when you alt-drag? You could use console.log() to write a message to the console if that code branch is being run. Then you know that the alt-drag is at least being detected.
Also if you can post your complete modified page’s URL here then it will be easier for me to see/debug.
Cheers!
Matt
true, but i just forgot to mention that i have the following before:
actually i never used the console for debugging 🙂 which is a great tool! it now tells me that my “thiswidth” variable in the startrotate() function is not defined.
i sent you the url via pm.
@wursti: It looks like you’re creating thisWidth/thisHeight inside initPhotos(). These are local variables, so you won’t be able to access them inside startRotate(). You’ll need to make thisWidth/thisHeight global.
Also why are you using thisWidth[1] and thisHeight[1] inside startRotate() I don’t think they are arrays, are they?
BTW I know you emailed me the URL but could you also post it here please, so others can help & benefit?
Thanks,
Matt
alright, check it out here: http://bit.ly/l3slZA
anyways, i got it now 🙂 it has been several mistypings in variable transfer and, as you said, 1 or 2 global local variable problems.
but the thing with thisWidth[1] and thisHeight[1]: well, i don’t understand why, but it does not work without the square brackets (then i just get back “[object object]”). and it can be as well thisHeight[0] instead of thisHeight[1] – for whatever reason.
next step will be to preserve aspect ratio while resizing. hope i’ll get along with that better 🙂
& thx a lot for your great help !!!
@wursti: That rocks! Awesome work. 🙂
thisWidth[1] and thisHeight[1]: thisWidth & thisHeight are probably objects, and you’re accessing the first property of each object (objects & arrays are interchangeable in JavaScript). Not totally sure though! 😉
@wrusti .. can you please share the link to your updated code at [email protected] .. i needed both resize and rotate feature …
i have used this gallery here http://www.ibrahimhanif.com/demo/courture.php, but the problem is that the client wants a next and previous image on the thumbnail image, as anyone who opens an image has to go back and open a new image, i m very tensed about it and tried a lot but dint able to show next pre image, plz help me in this case as i have just 2 days to submit this project, thanks
@amy_designer: “the client wants a next and previous image on the thumbnail image”
Do you mean the lightbox image?
You might be able to use Colorbox’s grouping feature to do it:
http://colorpowered.com/colorbox/
Or alternatively, add “previous” and “next” links to the lightbox (maybe using Colorbox’s “html” setting), and add click handlers to the links to move between the photos.
ya the client want the next and previous button on the lightbox, its css is present in colorbox.css file which is
#cboxPrevious{position:absolute; bottom:0; left:0px; background:url(images/controls.png) -75px 0px no-repeat; width:25px; height:25px; text-indent:-9999px; }
#cboxPrevious.hover{background-position:-75px -25px; }
#cboxNext{ position:absolute; bottom:0; left:27px; background:url(images/controls.png) -50px 0px no-repeat; width:25px; height:25px; text-indent:-9999px;}
#cboxNext.hover{background-position:-50px -25px; }
and also the next previous image with the name of control.png is present in the image folder, but still the colorbox is not showing the next previous image, as you give me tha link of colorbox website, i say there the atribute of arrowkey which should be true in case we need a next previous image, but i havent found it on colorbox html, if you can send me your email, i will send you the files, will be thankful to you if you fixed it and send me by tommorow, plz plz plz, its a humble request
damn, sorry @abhishek198 – i mistakenly reordered my files!
check out the recent version on http://thxalot.org/stuff/jq-rot-res/
this location should be safe 🙂
Hi,
you have explained very nicely.
I tried to implement same to using jquery-mobile.
since i was new to jquery-mobile i was not able to achieve it. can you please provide solution or some suggestion to develop using jquery-mobile.
Thanks:)
Hi,
the plugin is awsome..
Is any option to store the collage, that the user created in the front end. I could able to change the position/ rotation etc. Can I store the data for later use.
Regards,
Javascript is not allowed to save files to the local filing system or to the server.
The nearest you could get would be to store the parameters and settings in a persistent cookie.
Matt , Great Gallery plugin.
Can we add rotate corner on each image for rotate pic instead of shift key rotate option.
If yes then how can we add, can you please suggest how can we implement?
Man, it was written FIVE years ago, the world [and Matt] have moved on, and it is a tutorial intended to get you in to the coding of it and therefore allow you extend and improve it as you see fit.
Try it, test it and if it works, come back and tell us, and how you integrated the ‘feature’. Or you can publish your own code [always accrediting Elated with the original idea please].
Interesting, but unfortunately less than satisfactory on mobile 🙁