
Your email list is absolutely critical to your online business.
The bigger your list, the easier it is for you to sell your products and services. So it’s a great idea to grow your list quickly! One of the best ways to build your list is with an opt-in freebie.
When I say “opt-in freebie”, I’m talking about a free downloadable file — such as a useful PDF report, guide, eBook, or video — that acts as an incentive to get people to sign up to your list. Once someone becomes a subscriber, they automatically receive a link to download your freebie.
Hopefully you’ve thought of — or even made — a gorgeous freebie or two already! (If you haven’t, here are some great ideas.)
Once you have your freebie, the next step is to put it somewhere on the web so that your subscribers can download it. But this process can seem a little daunting. How exactly do you put your freebie up for download? And how do you link it up with your subscription process?
If you’re using MailChimp then I have some good news for you: You can do the whole thing in MailChimp. You don’t even need a website!
In this article I’ll show you exactly how to do it, in four simple steps. By the time you’ve worked through to the end, you’ll have uploaded your freebie to MailChimp; linked to it from your thank-you page and welcome email; and tested the whole thing to make sure it all works beautifully.
Ready to rock your opt-in? Let’s get started!
Step 1: Upload your freebie to MailChimp
The first step is to upload your freebie file to the MailChimp server. This makes it available for your subscribers to download. Follow these steps to upload your freebie:
- Log into MailChimp.
Visit the MailChimp site and click the Log In link at the top of the page. Enter your username and password, then click the Log In button. Your MailChimp Dashboard appears. - Access the File Manager.
The File Manager is where you can upload and manage all of your files on the MailChimp server. To reach it, first click the Templates option in the top menu on your Dashboard page, then click the File Manager button in the top-right corner of the page: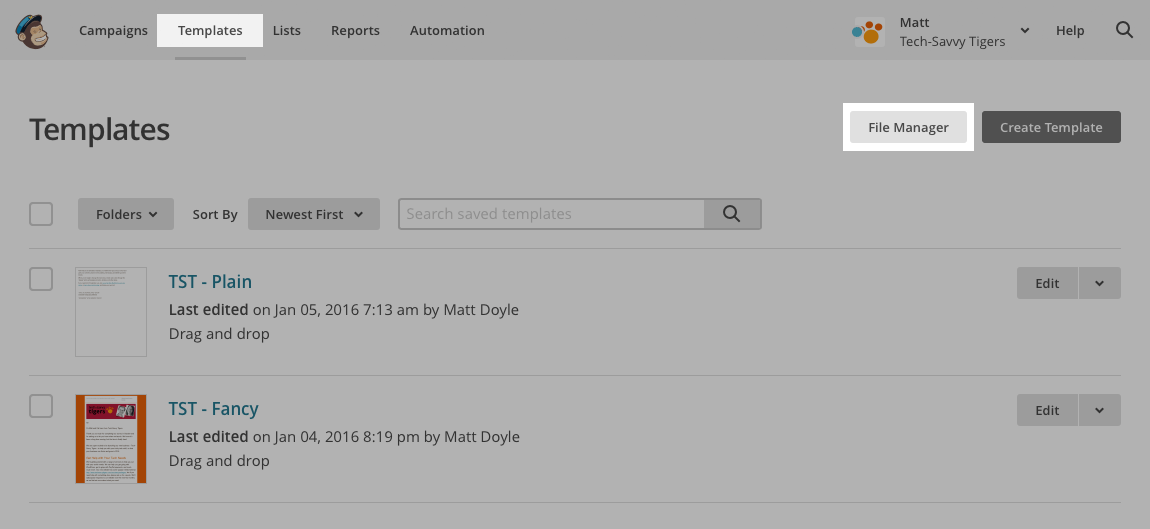

To get to the MailChimp File Manager, first click the Templates menu option, the click the File Manager button. - Upload your freebie.
Find your freebie file on your computer, and drag it onto the File Manager page in your browser. MailChimp automatically uploads your file: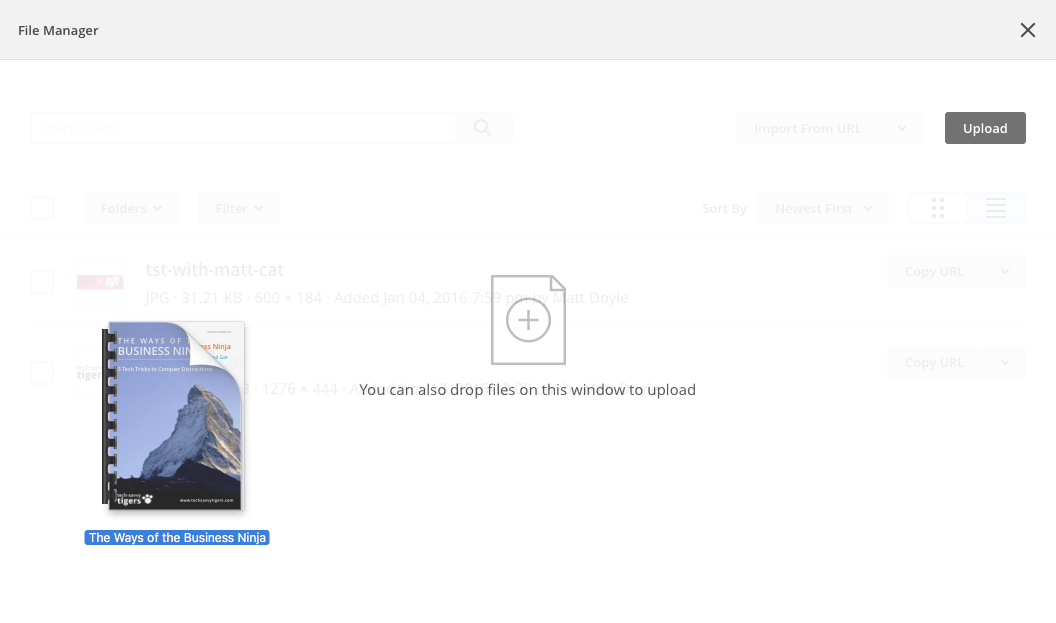

Just drag your freebie file into the File Manager window to upload it to the MailChimp server. - Copy the freebie’s URL.
Once it’s uploaded, your freebie appears in the list of files in the File Manager. Click the Copy URL button to the right of the freebie to copy the download link to your clipboard. Paste it into a text file or word processor document for now: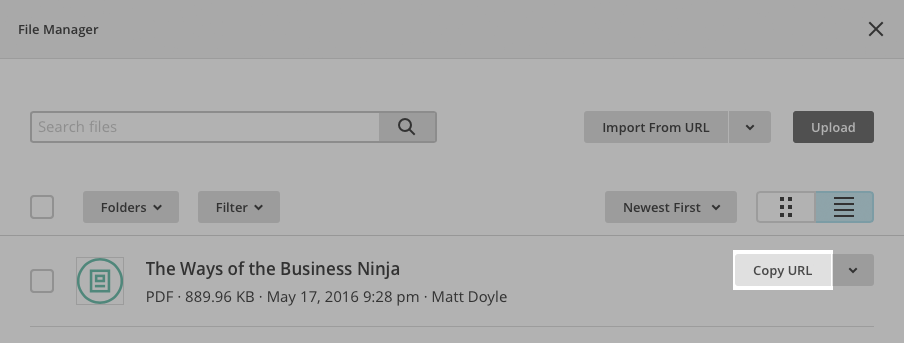

To copy your freebie’s URL to your clipboard, click the Copy URL button next to your freebie file. Then paste the URL into a text file for safe keeping.
When you’ve copied and pasted the URL, click the X in the top-right corner of the page to close the File Manager.
Step 2: Link to the freebie from the thank-you page
Now that you’ve uploaded your freebie to MailChimp, you want to link to it from your signup thank-you page. This lets your subscribers click the link to download the freebie once they’ve signed up.
Follow these steps to link up your freebie:
- Access the signup forms for your list.
Click the Lists option in the top menu on your Dashboard page. Click the little down arrow to the right of the list that you want to work with and, in the menu that appears, click Signup forms: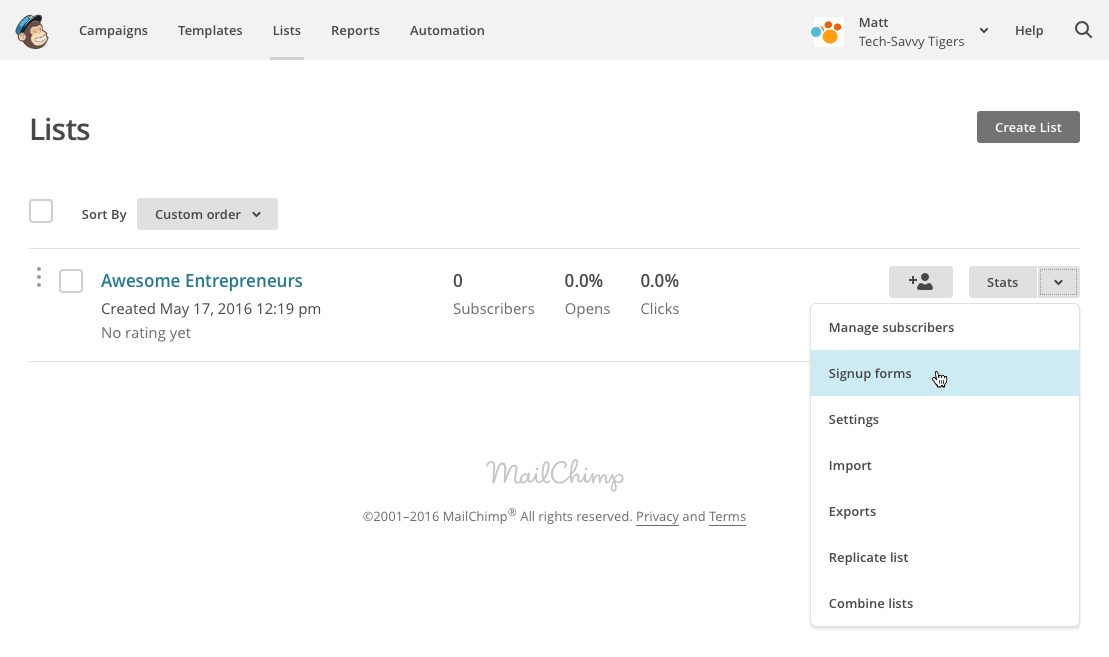

To access your MailChimp signup forms, choose Signup forms on the Lists page. - Edit the General signup forms.
When you reach the Signup Forms page, click General forms at the top of the list: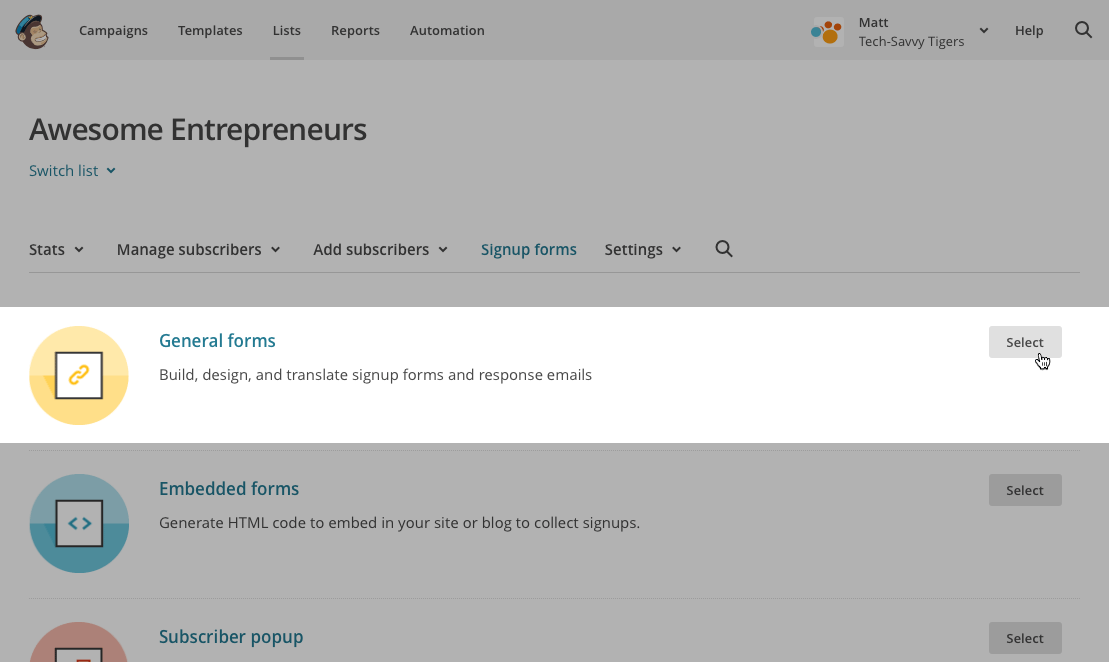

On the “Signup forms” page, click General forms to edit your general signup forms. - Edit the thank-you page.
You’ll now see a “Create forms” page appear. Click the big grey button toward the top of the page (directly below Forms and response emails), and choose Confirmation “thank you” page in the menu that appears: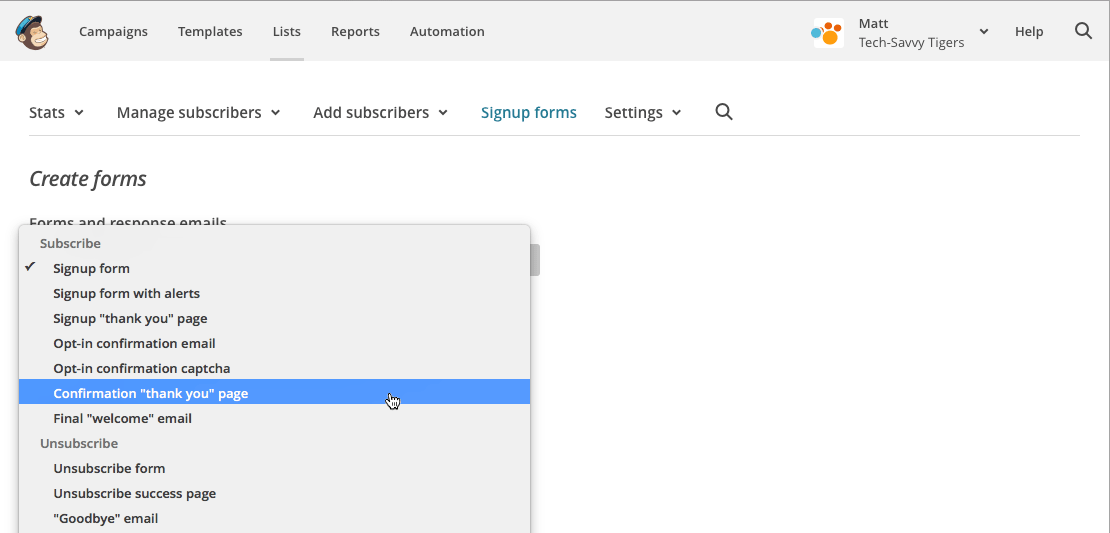

To edit your thank-you page, choose Confirmation “thank you” page from the “Create forms” menu. - Edit the page content.
You’re now editing your thank-you page. This is the page that appears when a subscriber clicks the link in their confirmation email. Click the main content area in the thank-you page to begin editing it: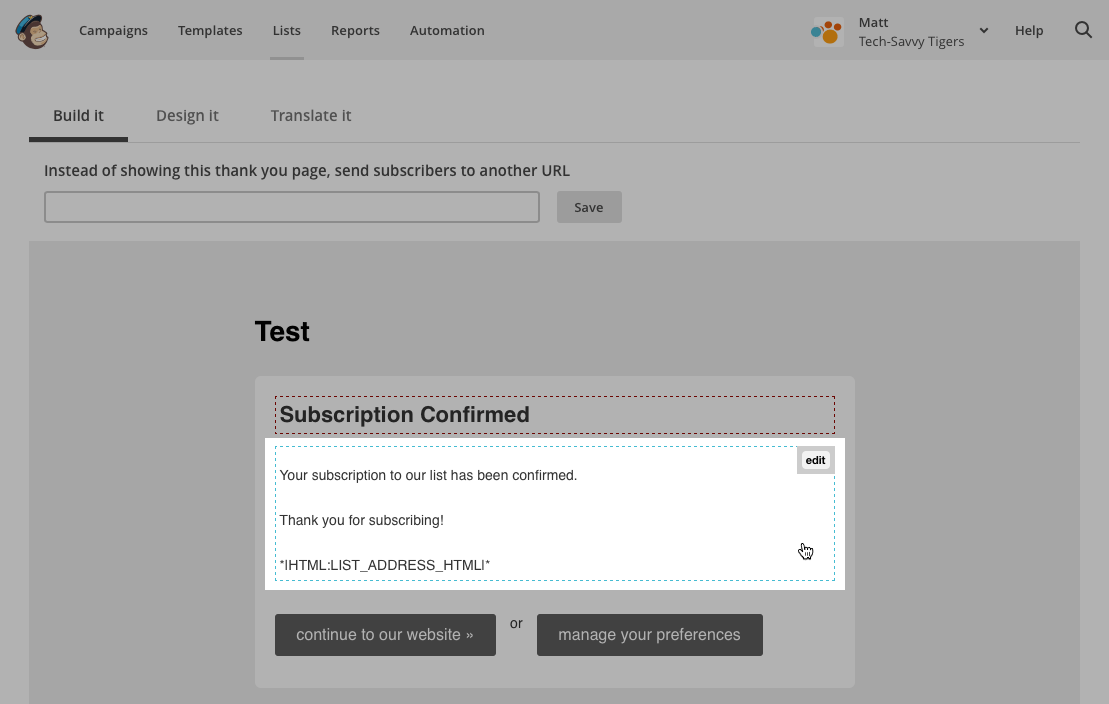

To edit your “thank you” page content, click the main content area. - Add the text for your link to your thank-you page.
Now it’s time to add your freebie’s download link to the page. First, type the text that you’d like to use for your download link (for example, “Click here to download your freebie.”). Click and drag over the text you just typed to select it: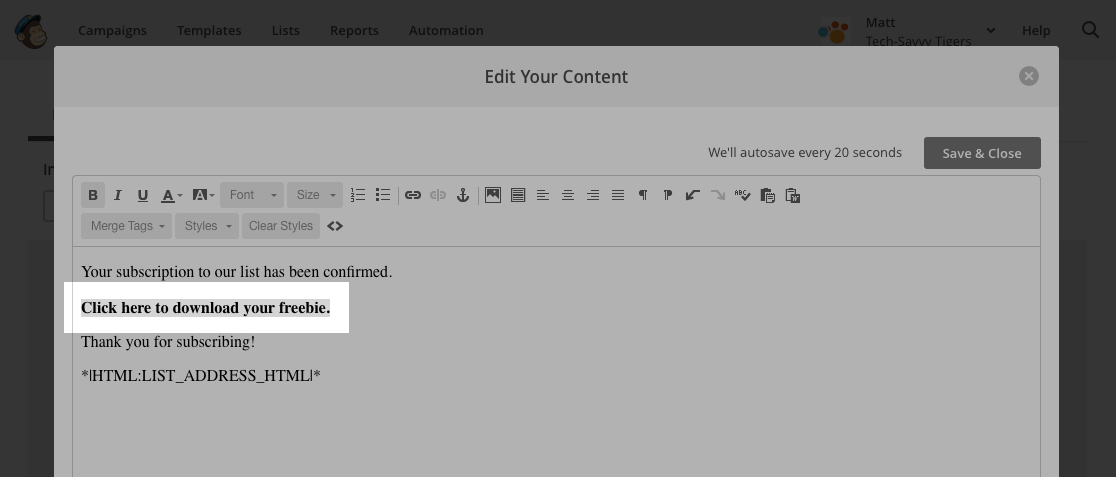

Enter the text you’d like to use for your freebie link, then click and drag the text to select it. - Link the text to your freebie.
Click the Link button in the edit window toolbar (it looks like a chain link). Copy the URL for your freebie that you saved earlier, then paste it into the Web Address (URL) box and click Insert: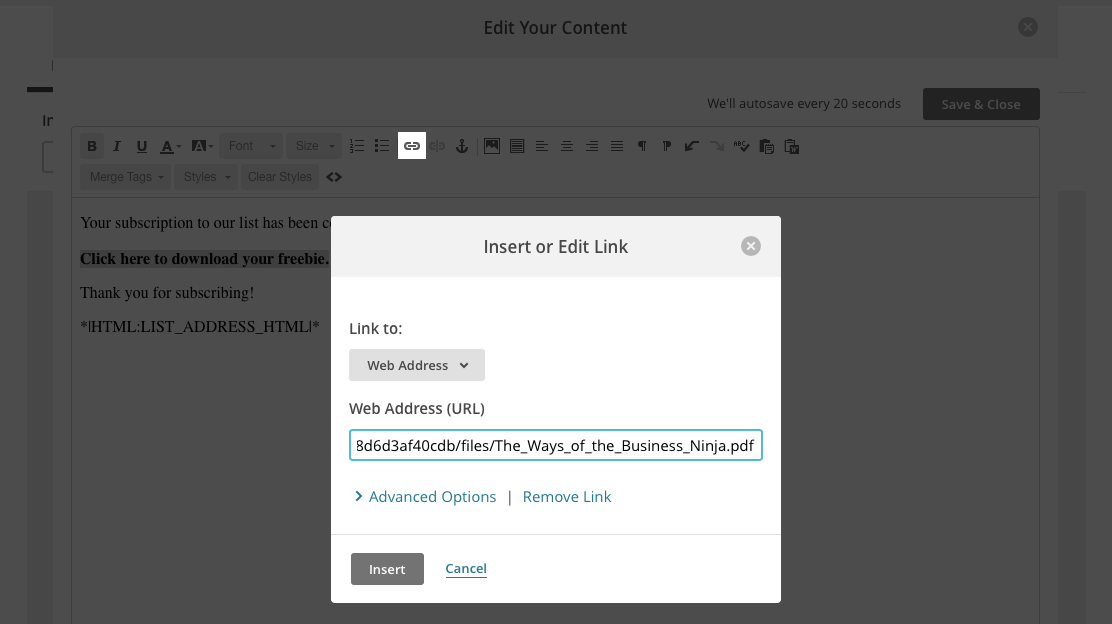

Once you’ve selected your text, click the Link button then paste in the freebie URL you saved earlier.
You’ve now linked up your freebie to your thank-you page. Now, when subscribers sign up, they’ll be able to click the link to download the freebie. Great work!
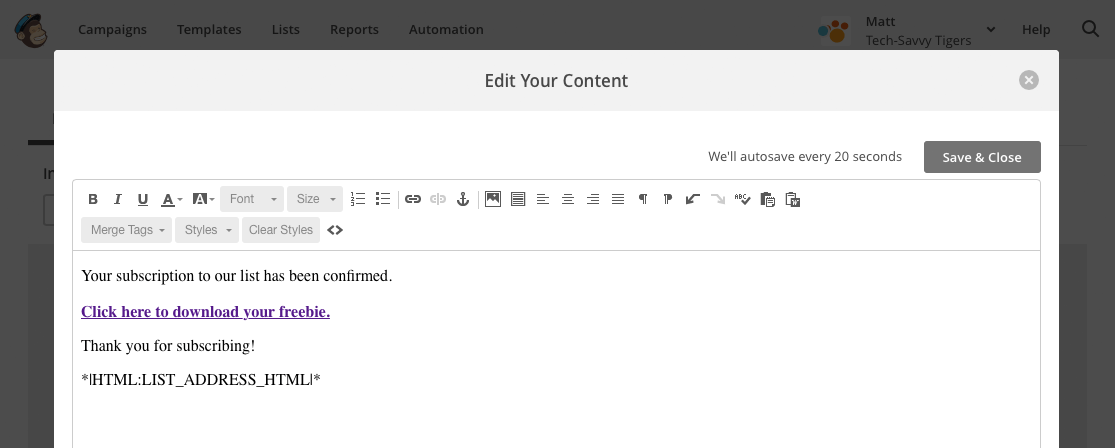
Finally, click the Save & Close button in the Edit Your Content window to close the window.
Step 3: Link to the freebie in a welcome email
Another nice touch is to send a final “welcome” email to a subscriber — containing your freebie link — once they’ve signed up. This makes sure that new subscribers don’t miss your freebie!
Here’s how to do it:
- Edit the welcome email.
On the “Create forms” page that you used in the last step, click that big grey button below Forms and response emails again. This time, choose Final “welcome” email in the menu that appears: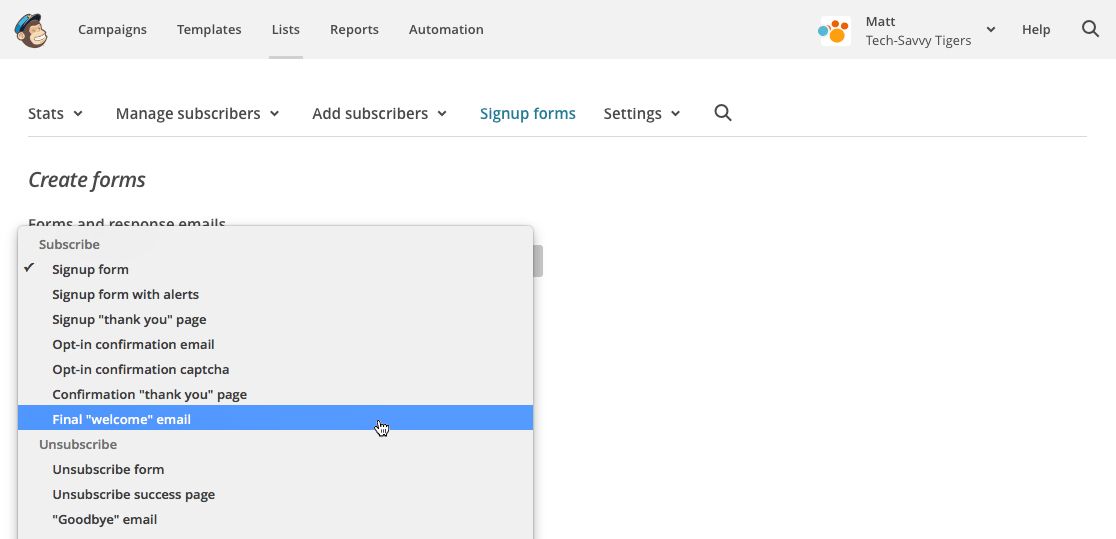

To edit your welcome email, select the Final “welcome” email option. - Edit the welcome email content.
First, make sure the Send a final welcome email checkbox is selected. Now click the dotted box at the top of the email template that contains the text Your subscription to our list has been confirmed. This opens the same Edit Your Content window that you used when adding the link to the thank-you page: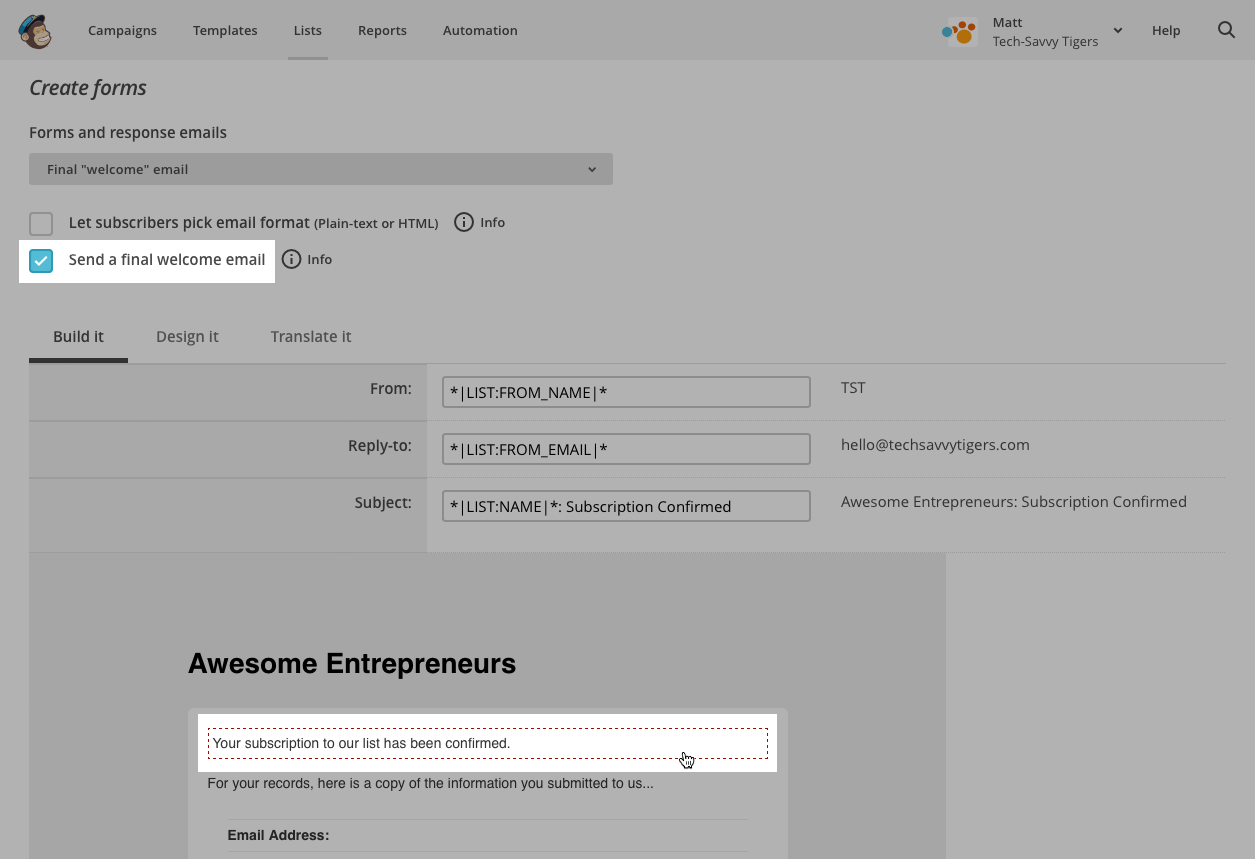

Make sure Send a final welcome email is selected, then click the dotted box to edit the email content. - Add the text for your link to the welcome email.
As before, type the text that you’d like to use for your download link (for example, “Click here to download your freebie.”). Click and drag over the text you just typed to select it. - Link the text to your freebie.
Click the Link button in the edit window toolbar. Copy the URL for your freebie that you saved earlier, then paste it into the Web Address (URL) box and click Insert. Click the Save & Close button to close the Edit Your Content window: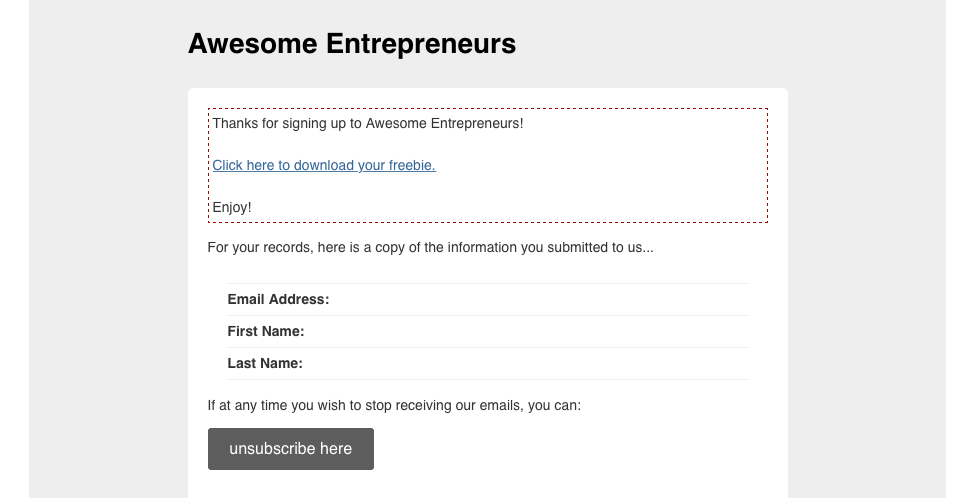

Your welcome email now contains a download link so that subscribers can easily download your freebie. Nice!
Your subscribers can now click the download link in their welcome email to download your freebie at any time. Great stuff!
Step 4: Test it out
Now that you’ve set up your opt-in freebie with MailChimp, it’s a good idea to test it out by signing up to your list and making sure the download links work correctly.
Here’s how to test your freebie download:
- Access the signup forms for your list.
On the “Create forms” page that you used in the last step, click the big grey button below Forms and response emails once more. Choose Signup form in the menu that appears. - Copy the signup form URL.
Click inside the Signup form URL box in the page to select the URL, then choose Edit > Copy in your browser’s menu to copy the URL: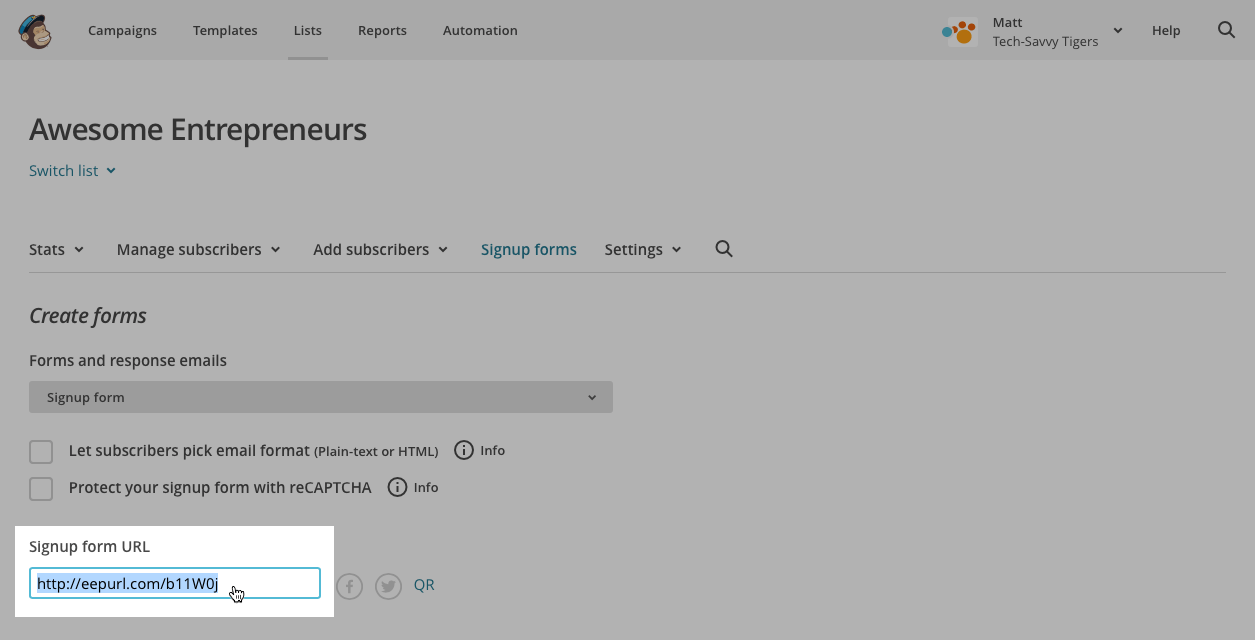

Select the URL for your list’s signup form, then choose Edit > Copy. - Paste the signup form URL into a new window.
Open a new browser window, then choose Edit > Paste to paste the copied signup form URL into the browser’s address bar. Press Return to display the form. - Sign yourself up!
Enter your email address in the Email Address box and click Subscribe to list: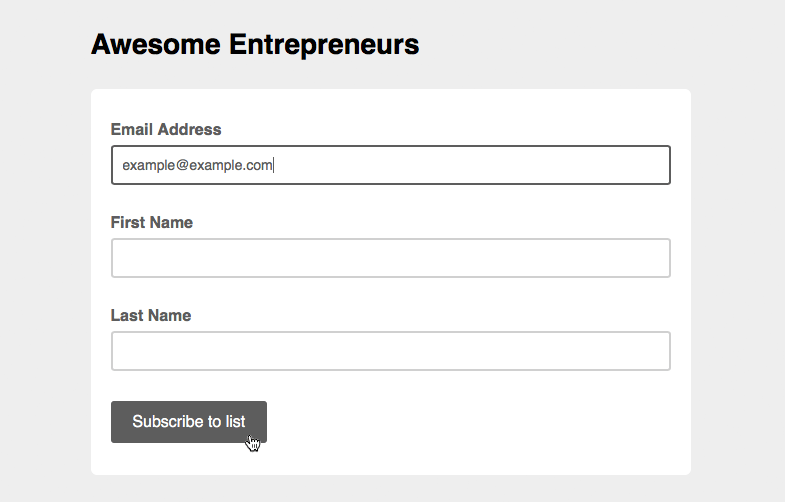

Sign yourself up using your list’s signup form. - Confirm your subscription.
You’ll receive an email from MailChimp asking you to confirm your subscription. Click the Yes, subscribe me to this list button in the email to finish the subscription process: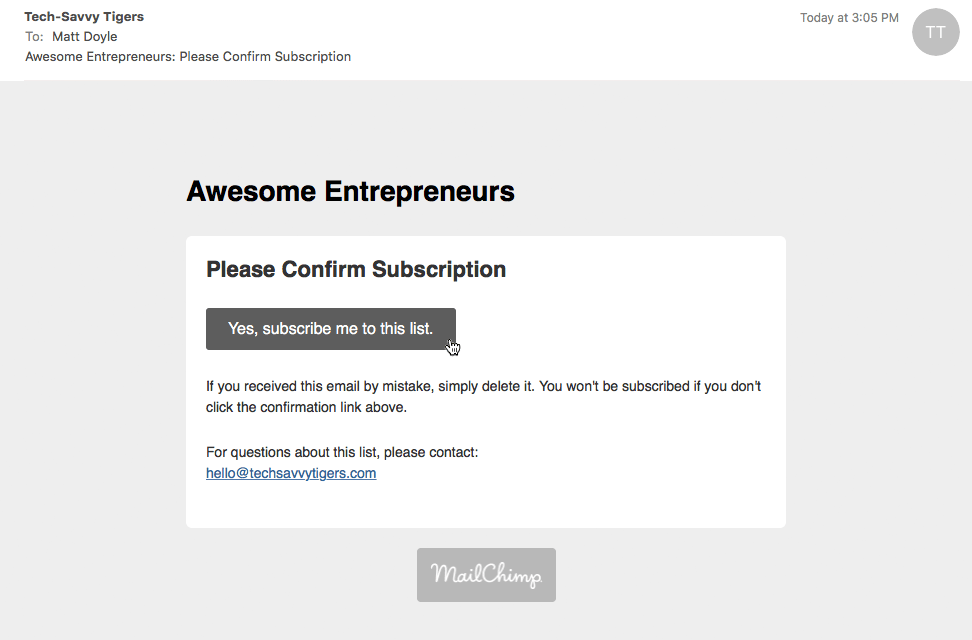

When you receive the confirmation email, click the button to confirm your subscription. - Test the download link in the thank-you page.
Once you click the email link, the thank you-page appears in your browser. Click the link you created in “Step 2: Link to the freebie from the thank-you page” and make sure your freebie opens or downloads: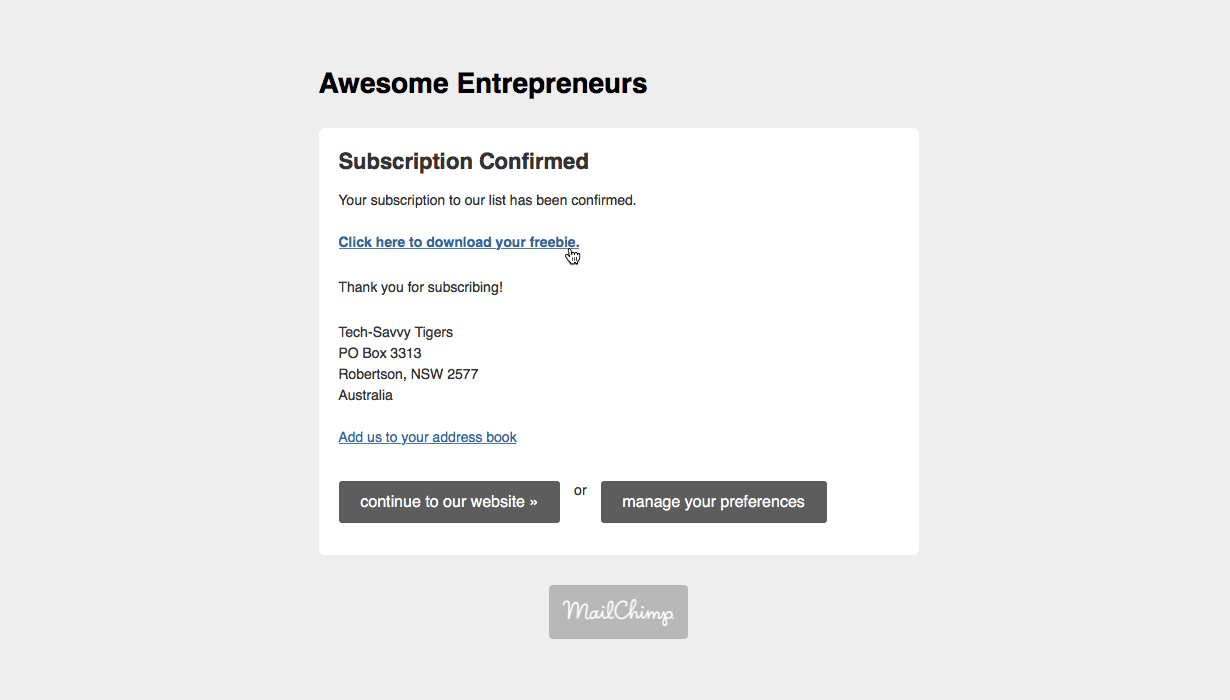

Click the download link in the thank-you page to make sure your freebie downloads OK. - Test the download link in the welcome email.
Shortly after you confirm your subscription, MailChimp sends you the welcome email. Click the link in the email you created in “Step 3: Link to the freebie in a welcome email” and make sure your freebie opens or downloads: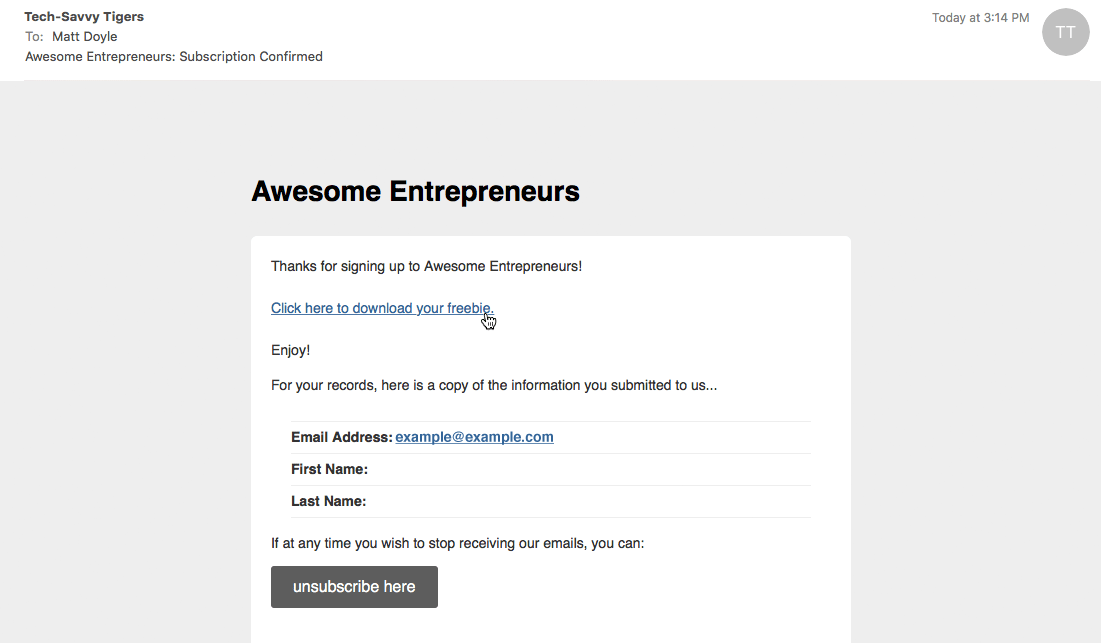

To test the welcome email, click the link in the email. Your freebie should appear in your browser or download to your computer.
If all works well, then congratulations! You’ve set up your opt-in freebie in MailChimp. Give yourself a pat on the back!
Set up your freebie in MailChimp today!
Getting your opt-in freebie up and running can seem daunting. You have to work out where and how to upload it, as well as how to make it available for your new subscribers to download.
Luckily, as you’ve seen in this guide, you can do the whole thing in MailChimp. And it’s really quite straightforward.
So grab a coffee. Dust off that eBook, worksheet or video that you’ve been wanting to use for your opt-in freebie. Upload it to MailChimp. Link it up. Tell everyone about your shiny new freebie on your website and social media.
And watch your signup rate soar!
[Image credits: Audience by William White (CC0), cropped, edited]
Great article Matt! Loved the screen shots and simple instructions, well done.
Thank you Samantha! Glad you liked it. 🙂
Does this work for the free version mail chimp?
Yes it does Erin 🙂 Feel free to ask if you need any help setting it up.
Hi Mat – thank you for your easy to follow instructions here – unfortunately I didn’t get the expected outcome. Two things I noticed – each time I changed the text on a form (eg. thank you form / welcome form) the same text appears on all the other forms (i.e. not customised for each form stage). Secondly, when I tested the process, the whole sequence emails/pages did not appear. I didn’t receive the thank you page with the download link. I even revised the process by adding the pdf (freebie) to a different form stage but I didnt get it either. It has taken me over two hours already to get this far. Is there a simple solution?
Hi Carloline,
It’s tricky for me to give an answer without seeing the problem myself. It sounds like you might have changed the text in the wrong place, but I can’t be sure. I’d need more information.
If you’d like me to take a look at your MailChimp setup, please contact me directly at https://www.elated.com/contact/.
Best wishes,
Matt
That was fabulous! So clear, easy, helpful and straight to the point! Thank you 🙂
Question: what if I use the Mail Chimp Subscriber pop up form? Do I have to upload the freebie again or will it work automatically once they confirm their address and receive the final welcome email? It seems that I just have to add the code from ‘Generate code’ to my website. Is that correct? What else should I do?
Thank you for your help!
You’re welcome Nanou 🙂 The technique should still work, whether you’re using a regular in-page form or the Subscriber Pop-up form. MailChimp should still give subscribers the thank-you page and welcome email containing the download links. I would test it first of course, just to make sure.
And yes, you should just have to click the View Code button in the “Subscriber Pop-up form” designer page, copy that code, and paste it into your page (make sure you use the Text editor if you’re using a CMS like WordPress, not the Visual editor). Also don’t forget to click the Save and Exit link in the form designer to save changes to your pop-up form.
Hope that helps! Please feel free to ask if you have any more questions. 🙂
Hey Matt,
Thanks so much for the quick reply. I saved and exited, I have the code but where exactly do I paste it in? Which page do you mean (with WordPress)? I tried the header and footer file, I tried the CSS section but it didn’t work…It slowed down the website and only a blank little square came up with a cross on it.
It’s good to know though that Mailchimp should automatically link it and send the thank you email with the link.
Thank you so much for your help, I appreciate it as technology can drive me nuts 🙂
Ah that particular pop-up form code is JavaScript, which WordPress won’t let you insert into a page’s content (not by default anyway).
Do you want it on every page of your site (in the footer or sidebar)? If so then you can paste it into a Text widget in your footer/sidebar. Choose Appearance > Widgets in your WordPress admin, and there should be a box called something like Footer or Sidebar on the right (it depends on your theme). Drag in a Text widget from the left-hand Available Widgets column into that box. Then paste your MailChimp code into the widget’s Content field and click Save. 🙂
PS: I just noticed that the MailChimp “Subscriber Pop-up” form doesn’t show anything in the page (such as a button) – it actually appears automatically when a visitor first views a page. Google is starting to penalise such “intrusive” popups (on mobile at least):
https://webmasters.googleblog.com/2016/08/helping-users-easily-access-content-on.html
So I’d recommend avoiding this type of form on your site. Go with an embedded form, or a pop-up form that only opens when you click a button (such as we use on this site).
I’m not tech savvy and this can seem like rocket science to me. This article was the best I’ve read on the subject – simple straightforward advice that’s easy to understand and implement. Thank you so much!
Thank you for your lovely feedback Deb! I’m really pleased that my article helped you to set up your freebie. 🙂
Thank you SOOOO MUCH! This is EXACTLY what I was looking for. Thank you!
You’re welcome, Cassie! I’m glad it helped 🙂
Thank you so much! SUCCESS!!! I’ve learned so much from this blog and have everything in working order. This guide is MUCH easier to understand than the MailChimp Blog. My website is ALMOST FINISHED!
Thanks for your comment Emily – that’s great to hear! Good luck with launching your site. 🙂
I got invited to participate in a summit and had never set-up a freebie specific to an event. Your article helped a lot. Thank you!
Thanks Nanette. I’m glad you found the tutorial helpful! 🙂
Hi Matt, amazing article. Thank You.
I already have a subscribers box on my site for my blog.
So I’ve chosen to create a separate freebie opt in box using the final email option
This is solely for those who want the freebie, but not to become a die hard subscriber.
I’ve found if you offer a freebie with your main subscribe box, people often unsubscribe as soon as they get what they want
Is this option ok too?
Thanks for your comment Jaiden. Sure, you can have a separate list for the freebie. In fact this is one of the ways you can offer multiple freebies to your readers — you create a separate list for each freebie, then you can merge subscribers into your main list if you like!
Thank you thank you! I’m clueless on Mail Chimp. I redesigned my website and wanted to update my freebie, but I had no idea where to start. This post was exactly what I needed.
Thanks for your comment Megan. That’s great to hear! 🙂
This is great content, thanks Matt. I was wondering how to add this form as a pop up instead of in every page. I’ve been researching for a while now so your help is much appreciated.
Thanks Kunal! 🙂
To add a pop-up you could use the MailChimp Subscriber Pop-Up form:
https://kb.mailchimp.com/lists/signup-forms/add-a-pop-up-signup-form-to-your-website
Or if you’re using WordPress then you could use a plugin like Bloom:
https://www.elegantthemes.com/plugins/bloom/
THANK YOU! You really saved me from a big mess! 🙂
You’re welcome, Ashley. Glad I could help! 🙂
thank you mat ! you are such a life saver. am gonna implement this , what is the optin form you are using 🙂 It would better if you could tip over that too 🙂
Glad it helped Joby ?
I think our optin form originally used Bloom ( https://www.elegantthemes.com/plugins/bloom/ ), but I ended up rewriting it so we could do multiple optin freebies with MailChimp. Maybe I’ll write an article on that one day!
Thank you Matt! Your post was a real life-saver for me. I read several posts on this topic but kept getting stuck at some point or the other. I went through your step-by-step guide and FINALLY managed to get from A to Z. My opt-in is up and I couldn’t be happier.
Thank you so much for taking the trouble to put this guide together.
That’s great Diana! I’m glad my article helped you to get your optin working 🙂
Thank you so much. This was simple and straightforward. It was useful.
You’re welcome, Ijeoma! Thanks for the feedback. 🙂
Thank you for this article. It’s an easy read and hoping it will be easy to follow when I go to add an ebook or PDF as a freebie opt-in on my website. Which, brings me to my question, will these same steps work on my free Wix website? I’m just starting out with my online health coaching business.
Sure – you don’t even need a website, since it’s all done in MailChimp. 🙂 But you can also add your MailChimp signup form to your Wix site by using an HTML Code widget. Tutorial here: https://www.youtube.com/watch?v=zvjia1ShEQk
Wow! Thank you so much for your quick response and for your help. I’ll try the tutorial tomorrow and will definitely let you know! Thanks again!
Oh wow! I feel totally accomplished right now! Thank you so much for the clear, easy steps to setting up MailChimp with my wix website! It all worked superbly! Thank you again!
Am I to assume that as people begin to subscribe, there’s away for me to see and track?
When it comes time to remove my opt in on my wix website, is there a way to do that? Thank you so much in advance for your help!
What a brilliant article. Thanks for making it so straight-forward. It all worked beautifully for me, except that I haven’t received the final confirmation email from Mailchimp. I don’t know why.
Can I add my opt-in to my facebook page somehow? Also, how do I now put this onto my wordpress site as an opt-in? Thanks again.
Thanks for your comment Julie. 🙂
Did you select the “Send a final welcome email” checkbox in MailChimp? It might also be worth checking your junk/spam folder to see if the welcome email turned up there.
You can add a MailChimp signup form to your WordPress site using a plugin such as this one.
And here’s how to add the signup form to your Facebook page.
Thanks Matt
Unfortunately, by using the embedded sign up form on my website it won’t take me to the thank you page. Is there any way to embed a general form or link the embedded form to the thank you page? Thanks!
Hey Natalie,
Thanks for your question. Is the embedded form using Ajax? If so then try turning off the Ajax option (if possible). This should allow MailChimp to redirect you to the thank-you page on signup.
This was so easy to follow and now I feel like I know what I’m doing! Thank you!
Thanks for your comment Mandy! I’m glad my tutorial helped you out. 🙂
This was very helpful! Just wanted to say Thank you for sharing it! 🙂
Thanks Nicole, glad it helped! 🙂
Brilliant article, thank you! I don’t know why this isn’t as clear in mail chimp. Am going to try it now 🙂
Do you have any advice for setting up specific landing pages linked to specific thank you pages? I have a few different freebie’s I’d like to put out there…
Thanks Jacinta! 🙂 The only way I’ve found to do this in MailChimp is to have multiple lists (1 list per freebie), with a separate landing/thank you page for each list. Then, whenever you want to send a mailout to your main list, you first move all the new subscribers from your various freebie lists into the main list. It’s a bit of a pain but it works!
Thank you so much for this great article! This finally helped me get a freebie set up on my website. I can’t tell you how confusing other articles I read were. This just set out the steps plain and simple!
Thanks for your comment Jae! I’m really happy to hear that my article helped you get your freebie working. 🙂
Hi! So I have a blog related to travel and Instagram help/growth guides. I want to create 2 freebie opt in’s – one related to travel and one related to Instagram and then segment my list based off of which freebie they choose. How do i do this?! Thanks!
Hey Laura, in MailChimp you need to create 2 lists to do this (1 freebie per list).
You can get MailChimp to send subscribers to a custom thank-you page URL instead of the MailChimp thank-you page as follows:
https://mailchimp.com/help/design-and-host-your-own-thank-you-pages/
And then another question, instead of using the “thank you page” could I send them to a landing page that I designed on lead pages by putting in my lead pages address in the part where it says “instead of showing users this thank you page, send subscribers to this link instead.”
Hi Matt,
Thank you so much for this information! Quick Question which you’ve probably already answered but I still need more clarification on offering my opt-in freebie.
I would like to have subscribers give me their information first (name & email) for them to download the opt-in freebie. The link is going on my Instagram as I am not embedding it onto a website or blog. Since it’s not a “Welcome or “Thank You” What type of opt-in would I used to attach the freebie ~ a landing page, lead or subscriber opt-in?
Then would I still have a Thank You after they download the opt-in?
Looking forward to hearing from you soon!
Thanks,
Jaime
Hi Jaime,
Thanks for your question. Yes, you can host your freebie on Instagram (although subscribers will be taken straight to the freebie rather than a thank-you page).
To do this, click Lists in the top MailChimp menu, then click the down arrow to the right of your list and choose Signup Forms. Click Form Builder then, in the drop-down menu below “Forms and response emails”, choose “Confirmation thank you page”. Copy the URL of your Instagram freebie, then paste it into the “Instead of showing this thank you page, send subscribers to another URL” box, then click Save.
Subscribers will then be taken straight to your freebie, instead of seeing a thank-you page!
You are an awesome human being, thank you so much for this article. Easy to follow and everything has worked perfectly. I very much appreciate you spreading your knowledge to help others.
Thanks for your kind words Anisa – I’m glad you found my article helpful. 🙂
Hi Matt,
How to give each new subscriber a special link (to file), but after they click and download the file, the link will expired. So new subscribes cant share the link to others, after he/she download the file.
You would need some custom coding on your website to do this. You’d generate a random ID in the MailChimp signup form and pass this through as a merge tag to the MailChimp thank-you page so you can include it in the download link. Then keep a list of IDs and expiry dates in your website’s database.
Excellent post.
Did you ever get around creating a post on how to do multiple optin freebies for the same subscriber with MailChimp?
I want to offer many different freebies, however, once someone optins for one, they get a message saying they are already subscribed and cannot get the new freebie. I know I can stop the “already subscribed” message in settings, however, it only updates; it does not send them a link to the new freebie. Is there a way to offer multiple freebies even to those who are already on my list? Or, is the only answer to create a separate list for every freebie optin? Thank you,
This was great! Quick question, I’d like to offer monthly freebies. How will they be able to subscribe for it, if they’ve already subscribed or should I automatically email everyone already on my list?
Also, do I just follow this same process with each offer?
Hi Matt
I’ve been trying for quite some time to organise an opt-in thruogh Mailchimp. I have the document ready to send and I created a landing page but I can’t marry them up!
Your article seems so simple but when I go into Mailchimp I don’t see the same things as you show in your article. I am currently on the free package, is this why?
Do I need to be a paying client of mailchimp to create this kind of automation?
Thank you so much! While the screenshots and instructions are a little dated since it seems like MailChimp has changed their site, this post helped me more than any other I’ve found so far. I’ve been struggling with how to do this for weeks and finally have successfully set up the automated emails with my opt in. Thanks very much again!!!
Hi,
Thanks for the great article!
However, I am confused that how to embed this freebie sign up form in my blog?
Thanks,
Hi thanks for this! Wondering if you can use this function if you only have the free Mailchimp account? Or do you need the standard or premium plan?
Thanks
Hey Matt,
I’m interested in the answer to B’s question above.
Does this article’s How-To’s still match MailChimp’s process for the Free plan?
Thanks
Hi,
Thanks! This post was very helpful! I want to create an opt-in for a freebie, but how I only get new subscribers? For example, let’s say I already have people who are subscribed to my blog and they want the freebie, do they have to ‘subscribe’ again to get the freebie? Or is there a way to get first time subscribers without having older subscribers mixed in? I hope that was clear.
Hi! This was really helpful, but it was difficult to follow because Mailchimp has gone through a redesign. Is there any way you could update it so it actually follows what Mailchimp looks like now?
Thanks!
This was so easy!! I had been looking for this specifically for days now! I’m wondering how do you embed this on a Shopify site?
Sorry. This post is totally outdated and the procedure doesn’t work anymore as you described her.e . Please update.
I’m trying to figure out the best way to require an email to download a freebie. But my extra need is this – I have about 10 pdfs that I’m giving away, but people may only want to get 1 or maybe all of them. Is there a way in MailChimp to offer downloads to ALL the pdfs with just one sign-up or do I have to make a separate sign-up for each download. Thanks!
This was super helpful!!! Thank you.
Thanks for this crystal clear guide, Matt!
OMG this is EXACTLY what I was looking for. Some feature locations have changed over time but I was able to figure it out. Thank you!