
Does the idea of selling eBooks online freak you out at all?
You know that eBooks can be a great source of passive income for your business. Perhaps you already have some awesome ideas for an eBook, or even have a finished eBook ready to sell.
But getting that eBook out there can seem daunting. How do you take online payments for the book? Do you need to set up a PayPal account? An internet merchant account? How do you keep people’s card details safe? How do you deal with accounting, tax, and credit card fraud issues? And once shoppers have paid for your book, how do you deliver it to them automatically?
So many headaches. And a few years ago, you would have had to deal with them all yourself. But not any more!
Thanks to amazing internet tools like Gumroad, you no longer have to worry about any of these issues. In fact, with Gumroad, you can make your eBook available for purchasing and downloading in just 30 minutes!
Want to know how it’s done? You’ve come to the right place. By the time you’ve read this tutorial, you’ll have your eBook up for sale on Gumroad and linked from your own website. In half an hour’s time, you’ll be ready to take orders for your book.
Ready to make some money? Let’s go!
Why Gumroad is a great choice for selling eBooks
Gumroad makes it ridiculously easy for anyone to sell eBooks and other digital products. It handles the entire sales process for your eBook, from secure payment through to digital delivery of your PDF file and depositing the proceeds into your bank account. So all you have to worry about is what to spend your earnings on!
Another major headache for anyone selling digital products to consumers in Europe is how to handle VAT (European sales tax). If you sell a digital product directly to European Union consumers — even if you’re not in the EU yourself — then you’re supposed to:
- Register for VAT in an EU country (such as the UK)
- Collect details on each consumer’s location
- Charge VAT on your sales, where appropriate (and at different rates for different EU countries!), and
- Pay the VAT to the tax authority in the country you registered with.
Needless to say, this can be a major pain in the backside, especially for the solopreneur or small business.
Fortunately, with Gumroad, this isn’t a problem at all. From a tax point of view, Gumroad supplies your eBook to your customers, not you. This means that Gumroad handles all the VAT stuff for you. Nice!
What else can you sell with Gumroad?
While this tutorial shows you how to sell an eBook, there are tons of different product types that you can sell on Gumroad, including:
- Music and videos (you can even upload several MP3 files per product to create albums).
- Subscription content, where people pay regularly for content that you email to them.
- Membership content, where people pay regularly for access to a content archive.
- Physical products, such as CDs and T-shirts.
Gumroad fees
About the only downside of using Gumroad is that they take a fairly hefty percentage of the sale compared to, say, PayPal or an internet merchant account. However, if you want an easy, hassle-free way to sell your digital products then I’d say it’s worth paying the higher fees for the Gumroad experience.
You have two main options when it comes to fees (at the time of writing):
- Pay no monthly fee, and pay 8.5% + 30 cents per sale.
- Pay a $10 monthly fee, then pay 3.5% + 30 cents per sale. You also get some other perks, such as removing the Gumroad branding from your sales emails, custom product delivery options (so you can handle fulfilment yourself), and more.
Obviously, once you start selling more than a handful of eBooks per month, the $10/month option is a good way to go! For example, if you sell 50 eBooks a month at $20 each, you’ll be paying $100 per month with the first option, and $60 per month with the second.
It’s worth pointing out that the $10/month option is for up to 1,000 unique customers per year. If you have more customers then the monthly price goes up accordingly.
Now that you know the pros and cons of Gumroad, you’re ready to start selling your first eBook! The following steps show you how it’s done.
Let’s start selling!
Step 1: Sign up for Gumroad
Signing up is free and easy.
Visit https://gumroad.com/ and click the Start selling button. Then enter your email address and a password, and click Create account. You can also use Facebook or Twitter to sign up if you prefer:

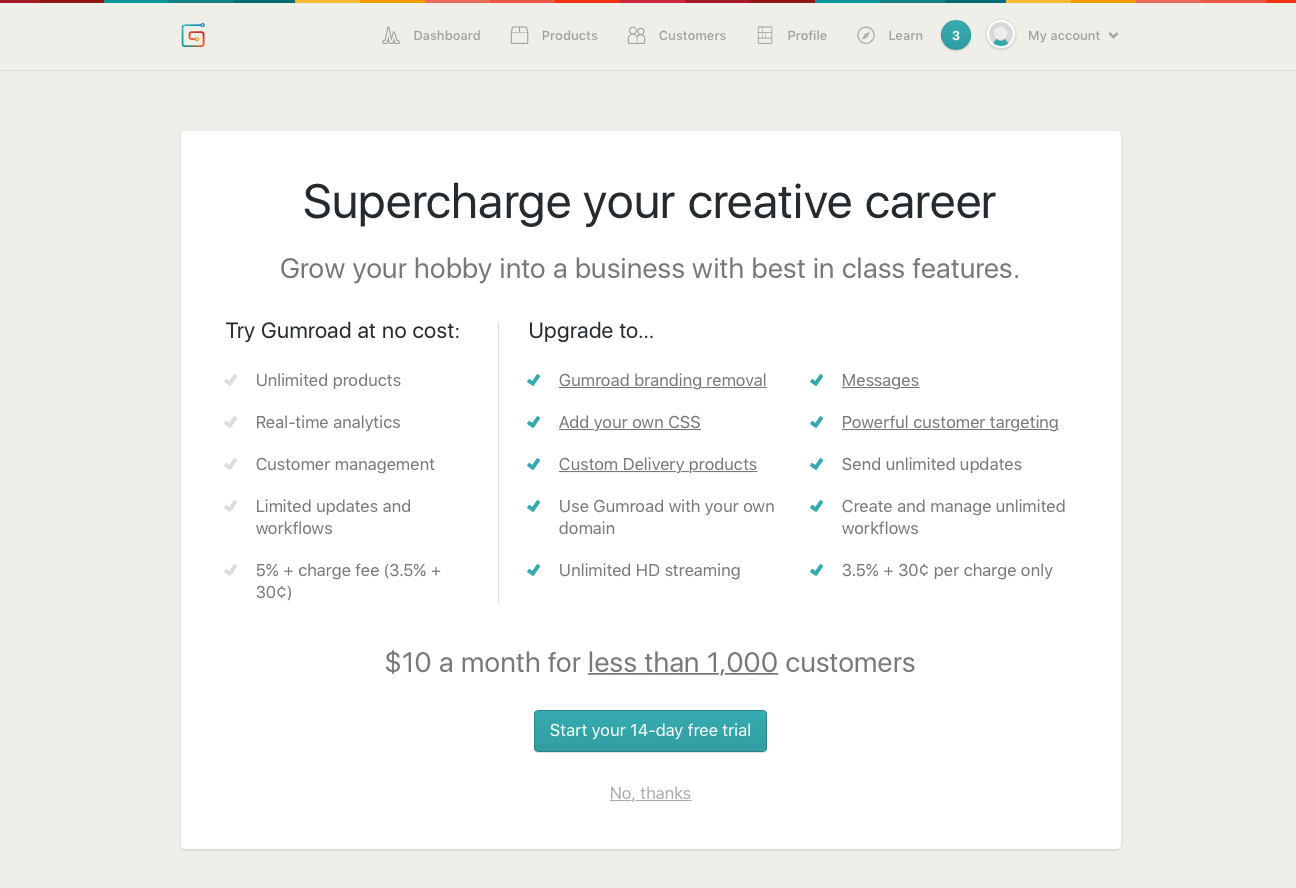
Once you’ve signed up, you’re given the option to upgrade to the $10/month plan with the lower transaction costs (see “Gumroad fees” earlier in this article). For now, click No, thanks. You can always upgrade later at the click of a button:
Next, Gumroad asks you to enter some basic information about yourself and the product you want to sell. Choose your options from the drop-down menus. In the “What are you working on?” section, click Book or Comic. Click the Continue button when you’re done:

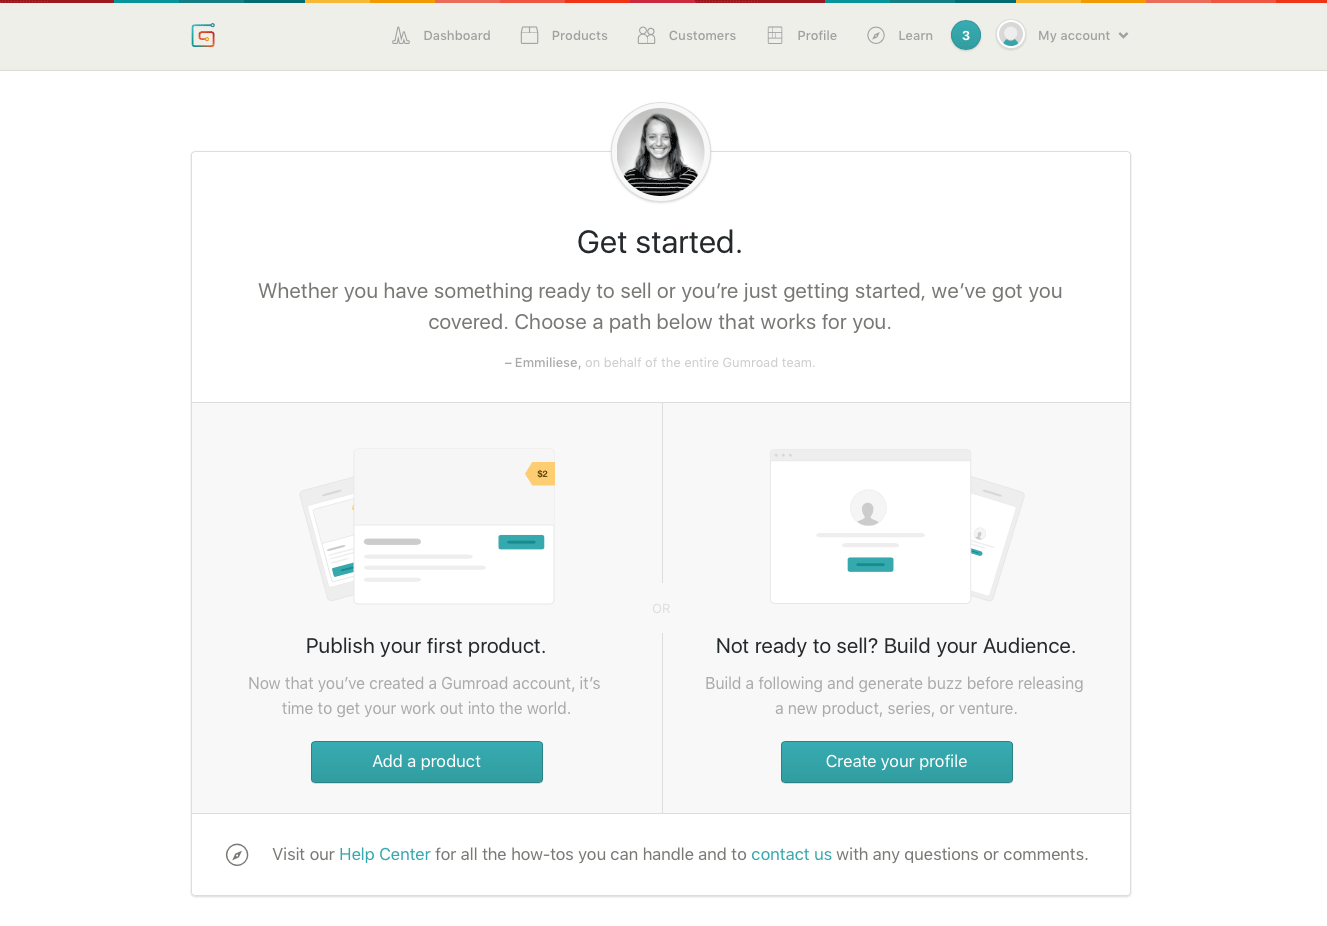
You’ll now see a “Get started” page. Since you’re ready to publish your eBook, click the Add a product button to continue:
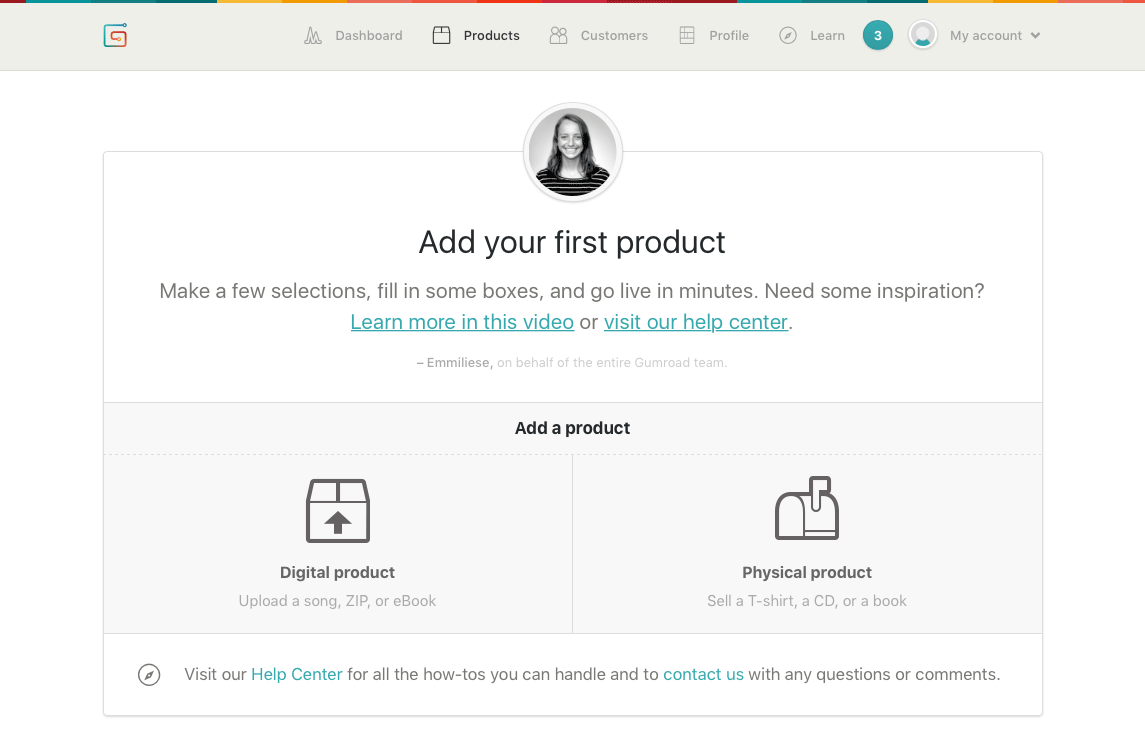
Step 2: Add your product
Gumroad now walks you through the steps for adding your first product. Click the Digital product button, since you’ll be selling an eBook:
Now you can choose how you want to sell your eBook by clicking one of three buttons:
- Product lets you start selling your eBook immediately.
- Subscription lets you set up recurring payments for your product. This is great if you’re selling access to a membership area, for example.
- Pre-order lets you start taking orders before your product goes on sale.
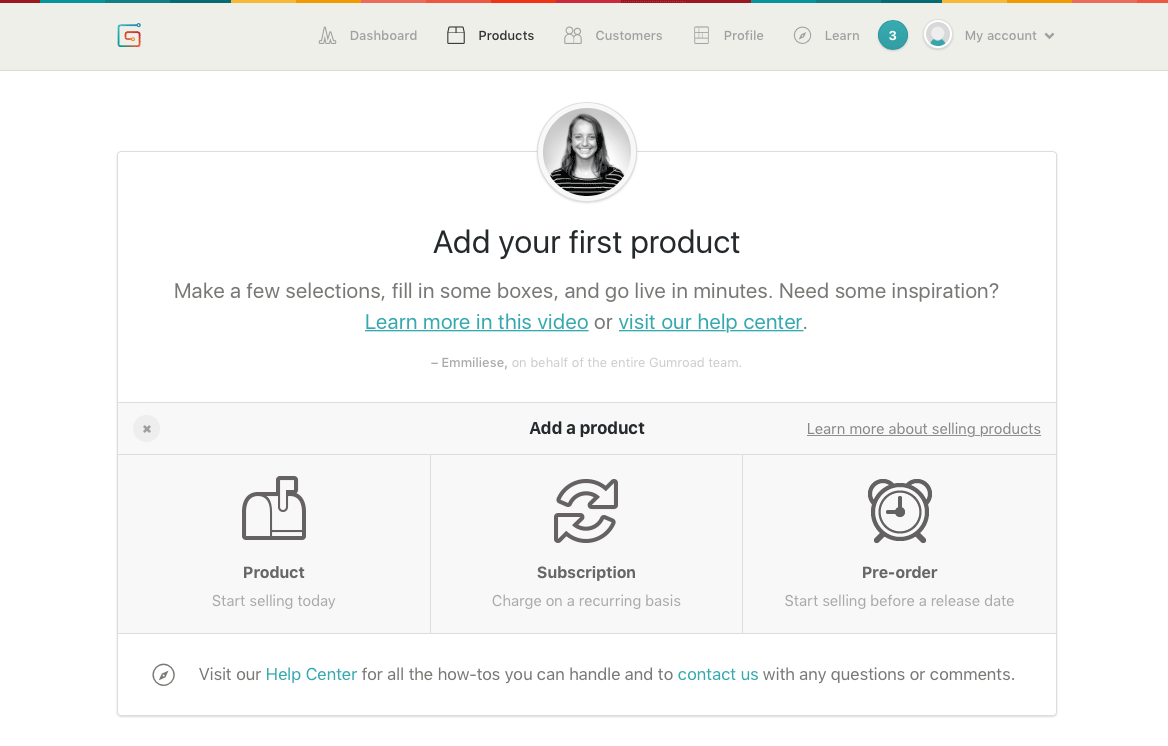
Since you already have an eBook to sell, click the Product button to continue.
Now comes the fun bit: adding your product! Follow these steps:
- Enter the product name.
Enter the title of your product in the Name of product box. This name will appear wherever your product is offered for sale on Gumroad or your own site. - Set the price.
Enter the price in the box next to the Name of product box. You can enter any price from $0.99 up to $5,000. You can also click the currency symbol to select a different currency. - Upload your PDF.
Click the Choose your files button, and choose how you’d like to upload your PDF file. For example, to upload your file from your computer, click From computer, then select your file to upload. Wait a few seconds while your file is uploaded.
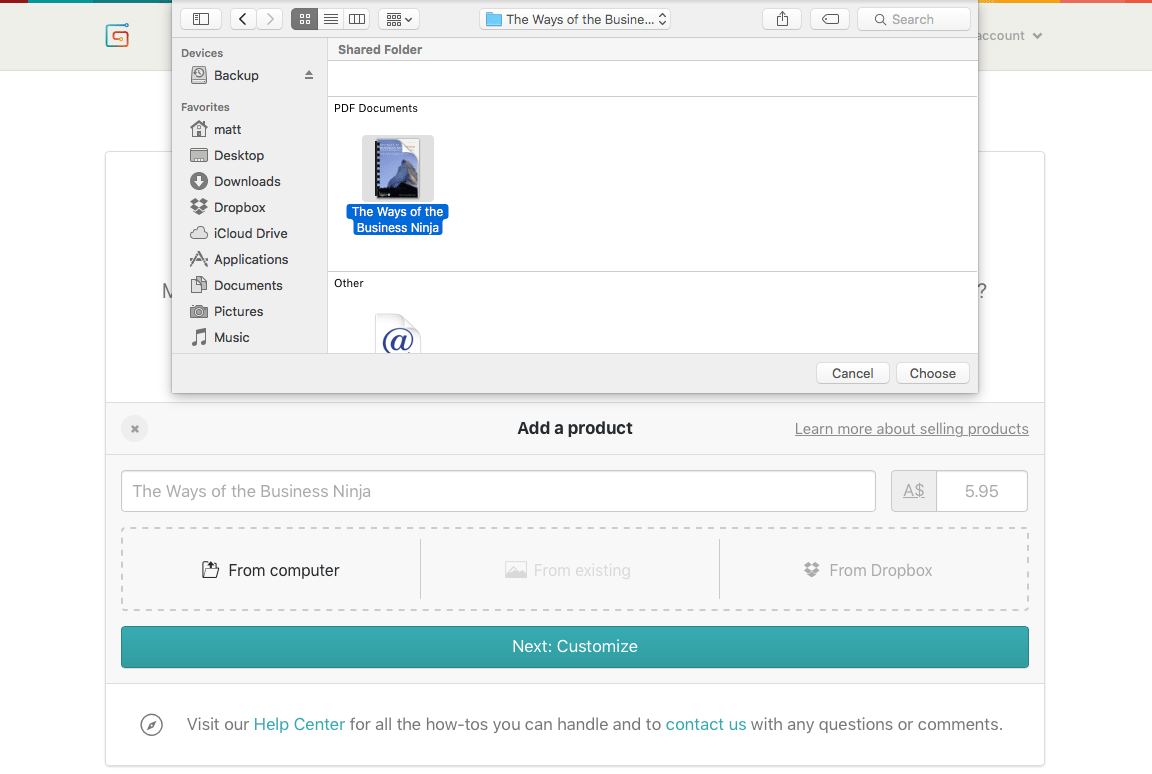
You can change the product name, price, and file later if you wish. Watch out, though: Once you’ve set the currency for this product, you can’t change it later!
When you’re done, click the Next: Customize button to continue to the next page.
Step 3: Add a cover image and description
On this page, you get to upload a cover image for your product, as well as enter a description.
Start by clicking the Upload a cover button, then choose a suitable image file on your computer. For an eBook, you’d usually use the same cover image that you put on the first page of your PDF file.
Next, enter a description for your product in the Describe your product… box. This description appears below your product name whenever someone buys your eBook.
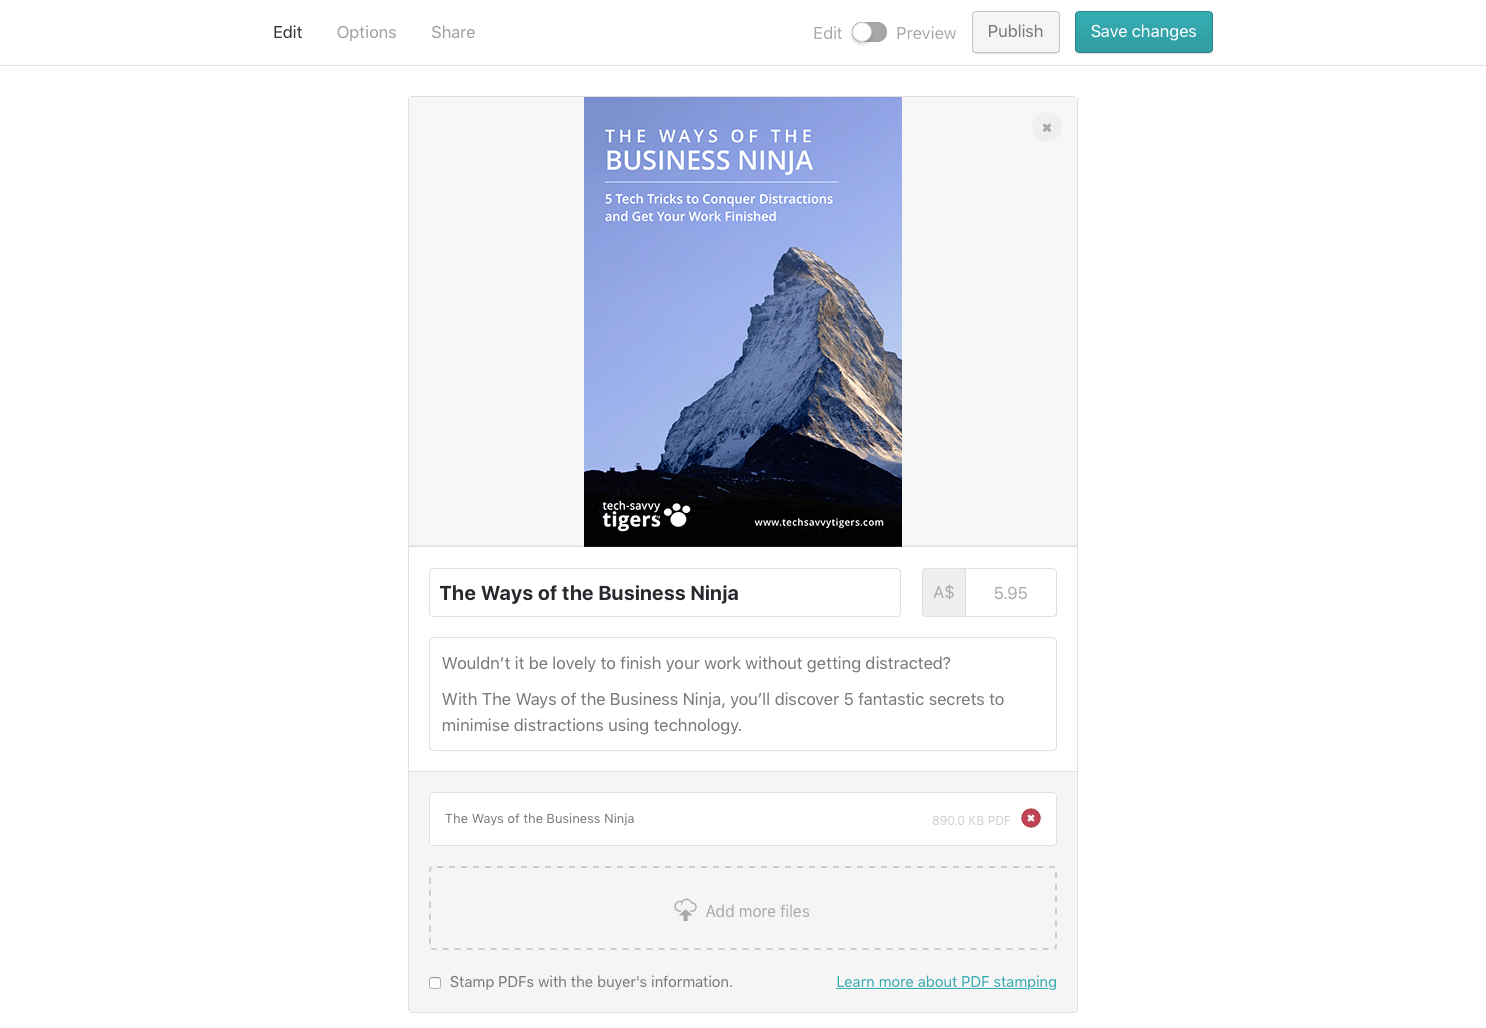
At the bottom of the page, there’s a Stamp PDFs with the buyer’s information checkbox. If you select this option, Gumroad stamps a small message onto the first page of the buyer’s PDF that says “Sold to (buyer’s email address)”. The idea is to discourage piracy. However, if you find the message intrusive and you’d rather just trust people’s honesty, then feel free to leave this option unchecked!

When you’re happy with your cover image and description, click the Save changes button to add your product!
Step 4: Preview and publish your product
Your product is saved, but it’s still in draft form. Before you publish it, you can preview it to see how it will look to your buyers.
To do this, just click the Edit/Preview switch at the top of the page to change the switch from Edit mode to Preview mode:
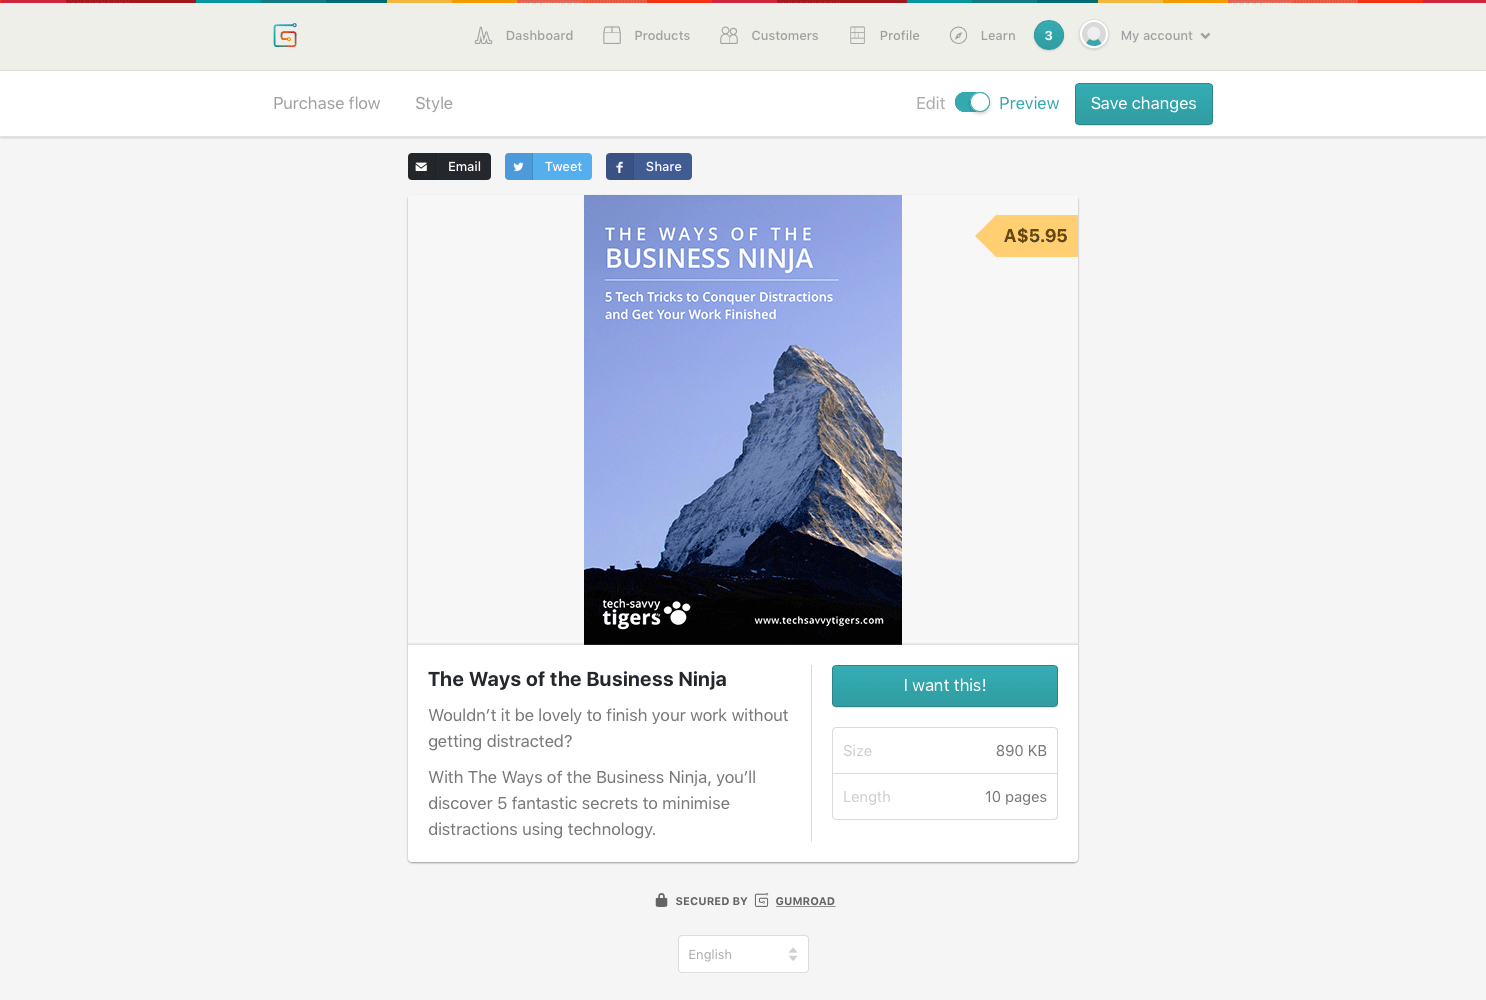
This shows you how your product appears when someone clicks the “buy” button on your site.
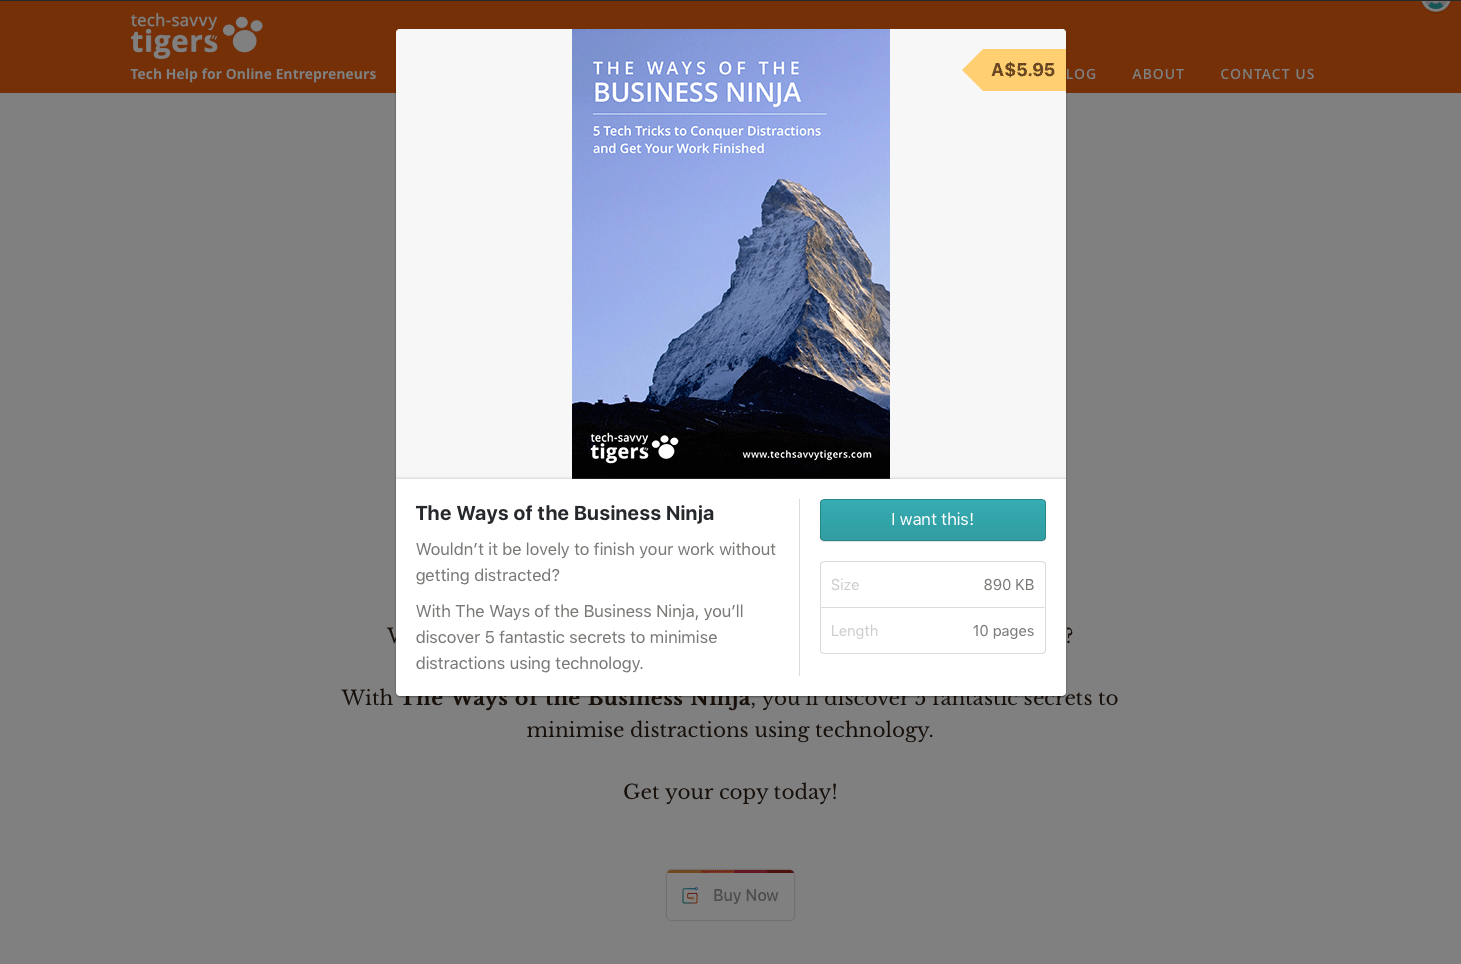
You can even preview the whole payment process from here. Click the I want this! button to reveal the payment form (using a test credit card), then click the Pay button:
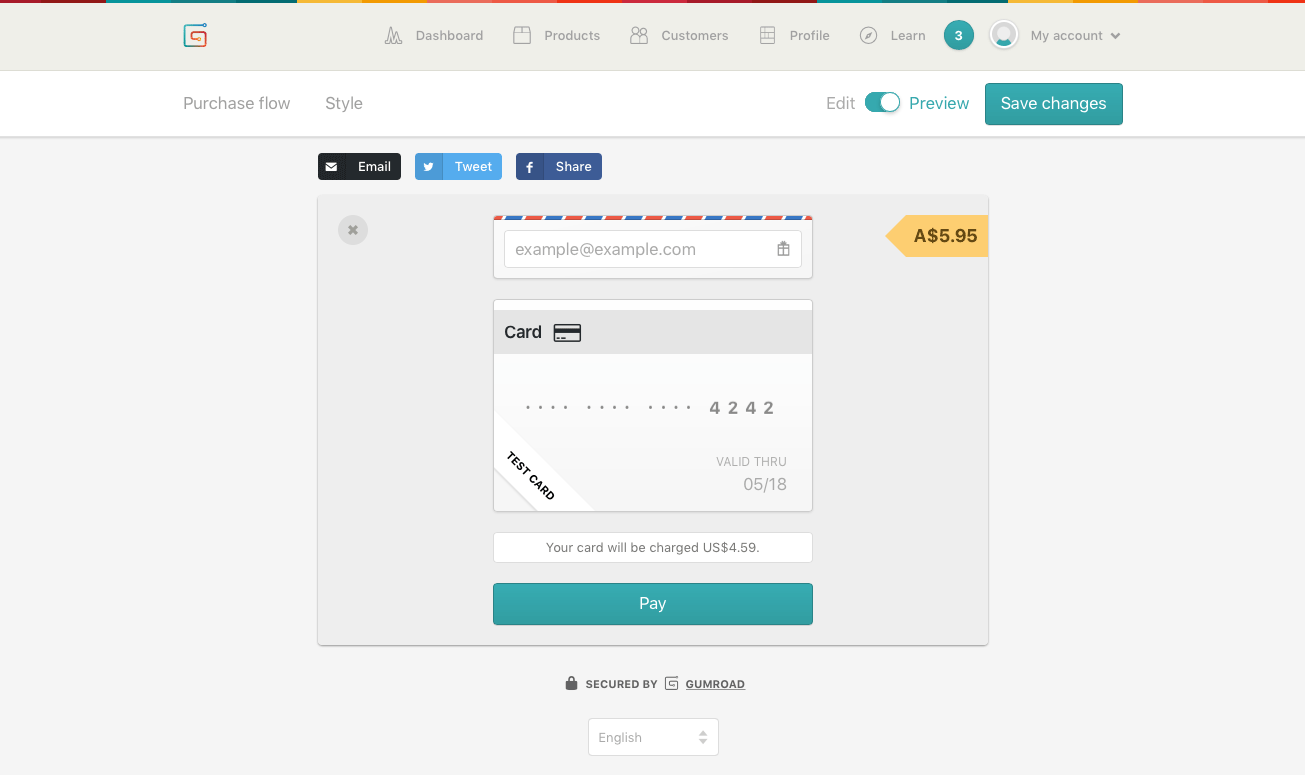
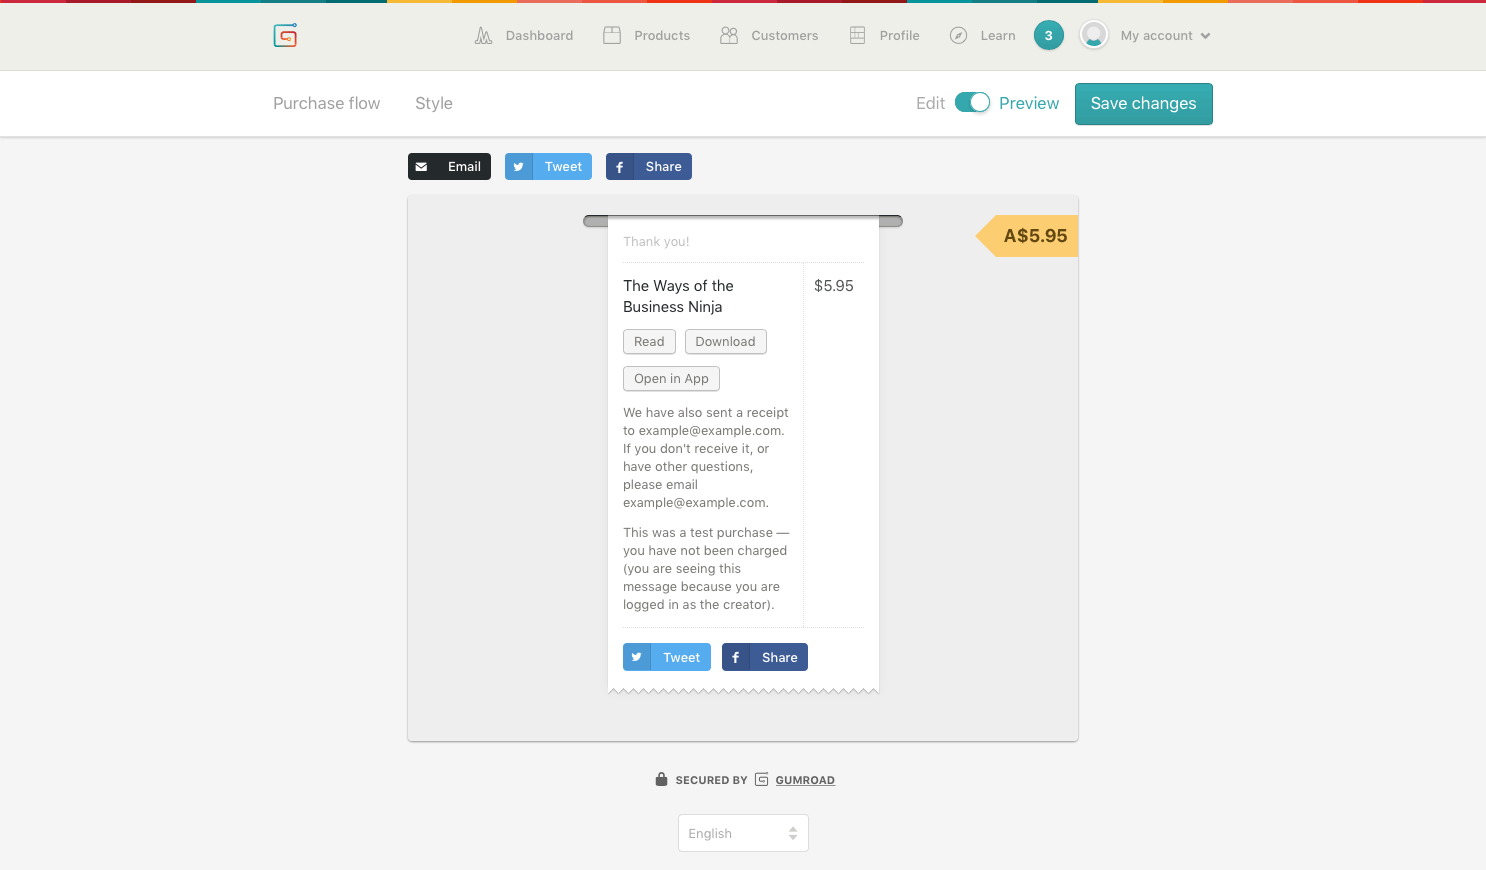
You’ll then “buy” your eBook (don’t worry, you won’t be charged). A receipt appears, from which you can choose to read the book online, download the book, or open the book in the Gumroad app:
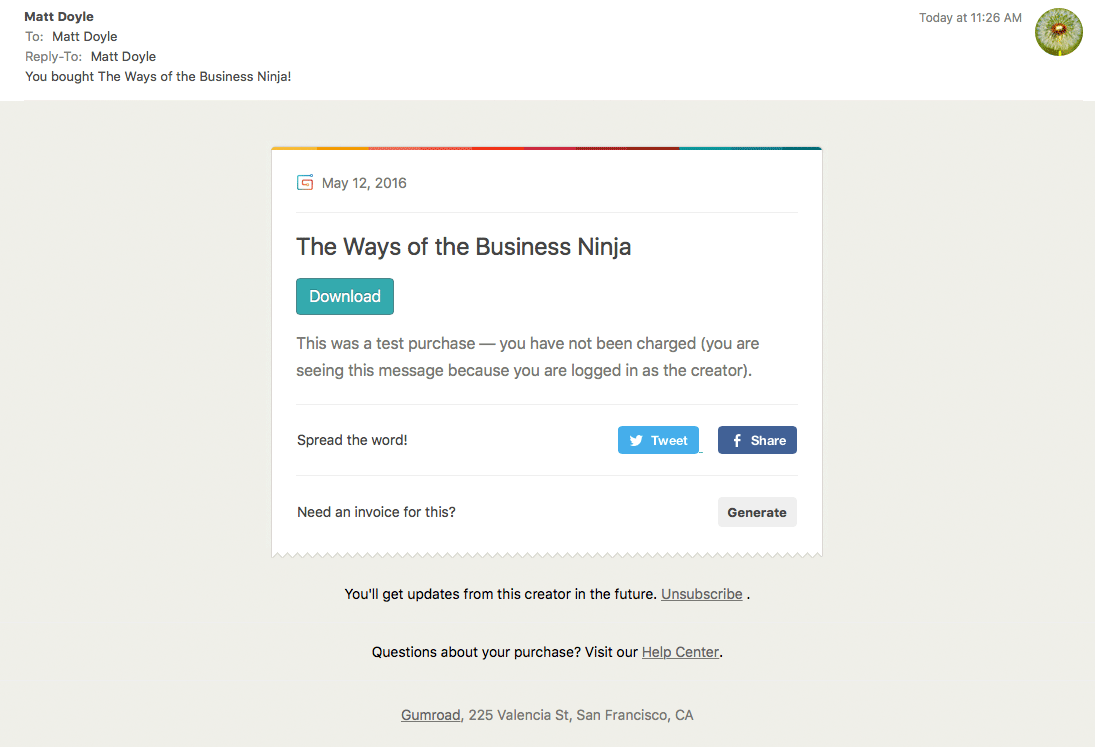
Gumroad also sends you a purchase email, so you can see what the emails will look like to your customers:
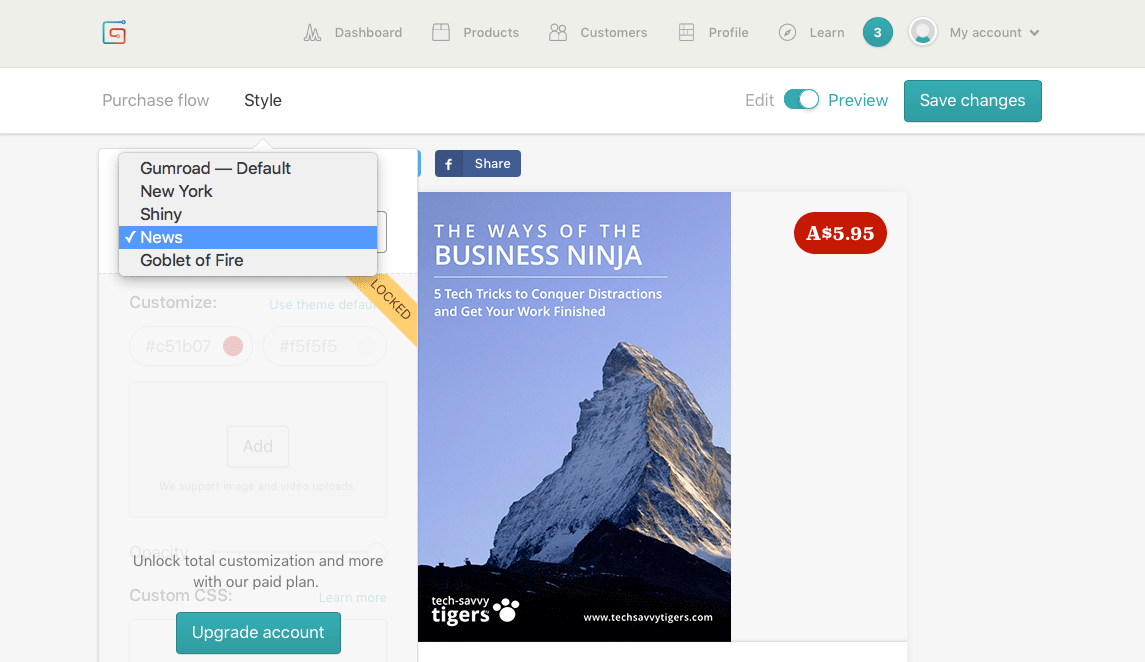
By the way, if you’d prefer a different look for your purchase page, click the Style link at the top of the Preview page. You can then choose from five different themes to suit your brand:
Once you’re happy with the way your product looks, click the Edit/Preview switch at the top of the page to change back to Edit mode.
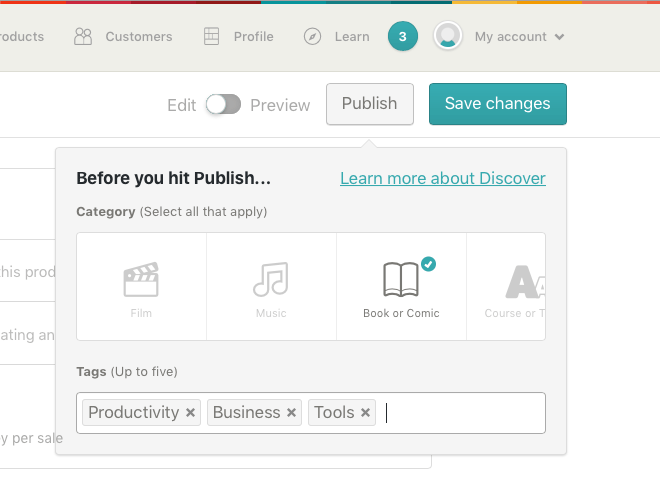
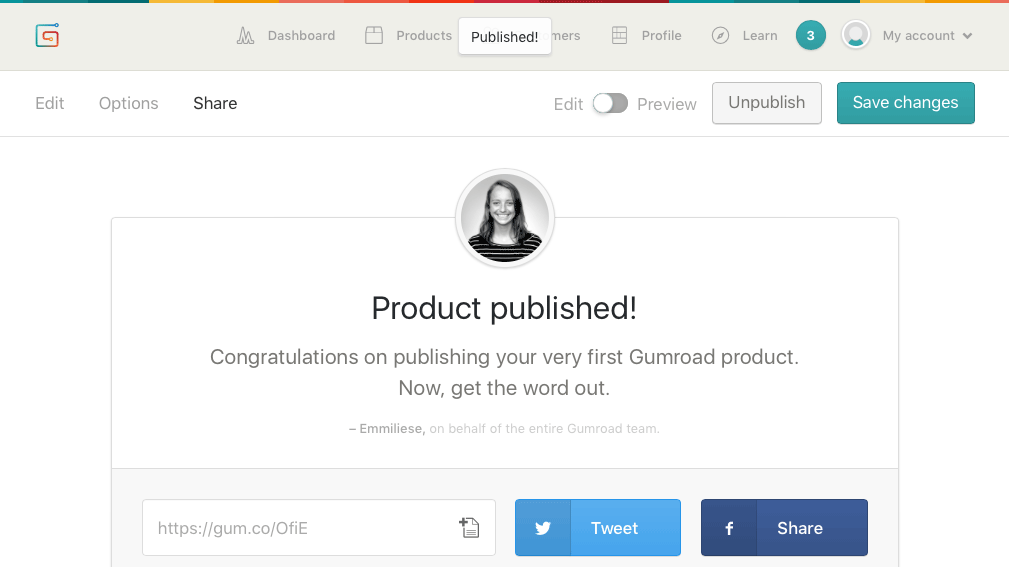
Now it’s time to publish your book! Click the Publish button, and in the “Before you hit Publish” popup that appears, make sure Book or Comic is selected. You can also enter tags to classify your book (such as Business or Productivity). These feed into Gumroad Discover — Gumroad’s recommendation engine — which can then recommend your book to relevant buyers, so it’s well worth doing:
Once you’ve entered your tags, all you need to do is click the Publish button again to publish your eBook. Your book is now available for purchase. High-fives all around!
Step 5: Add your product to your website
Now that your eBook is published, you’ll probably want to offer it for sale on your own website. As with everything else, Gumroad makes this process easy!
There are three main ways that you can put a Gumroad product up for sale on your site:
- Linking to the Gumroad product page for your eBook. Gumroad automatically creates a product page on its website where people can buy your eBook. You can simply link to this page from your website.
- The Overlay widget adds a “Buy Now” button to a page on your site. When a shopper clicks the button, a pop-up overlay appears in your page. This window looks much like the preview you saw in Step 4. It shows your product cover image, the product details, and an “I want this!” button. The shopper clicks the button, enters their card details, and purchases your eBook — all from within the overlay in your page:
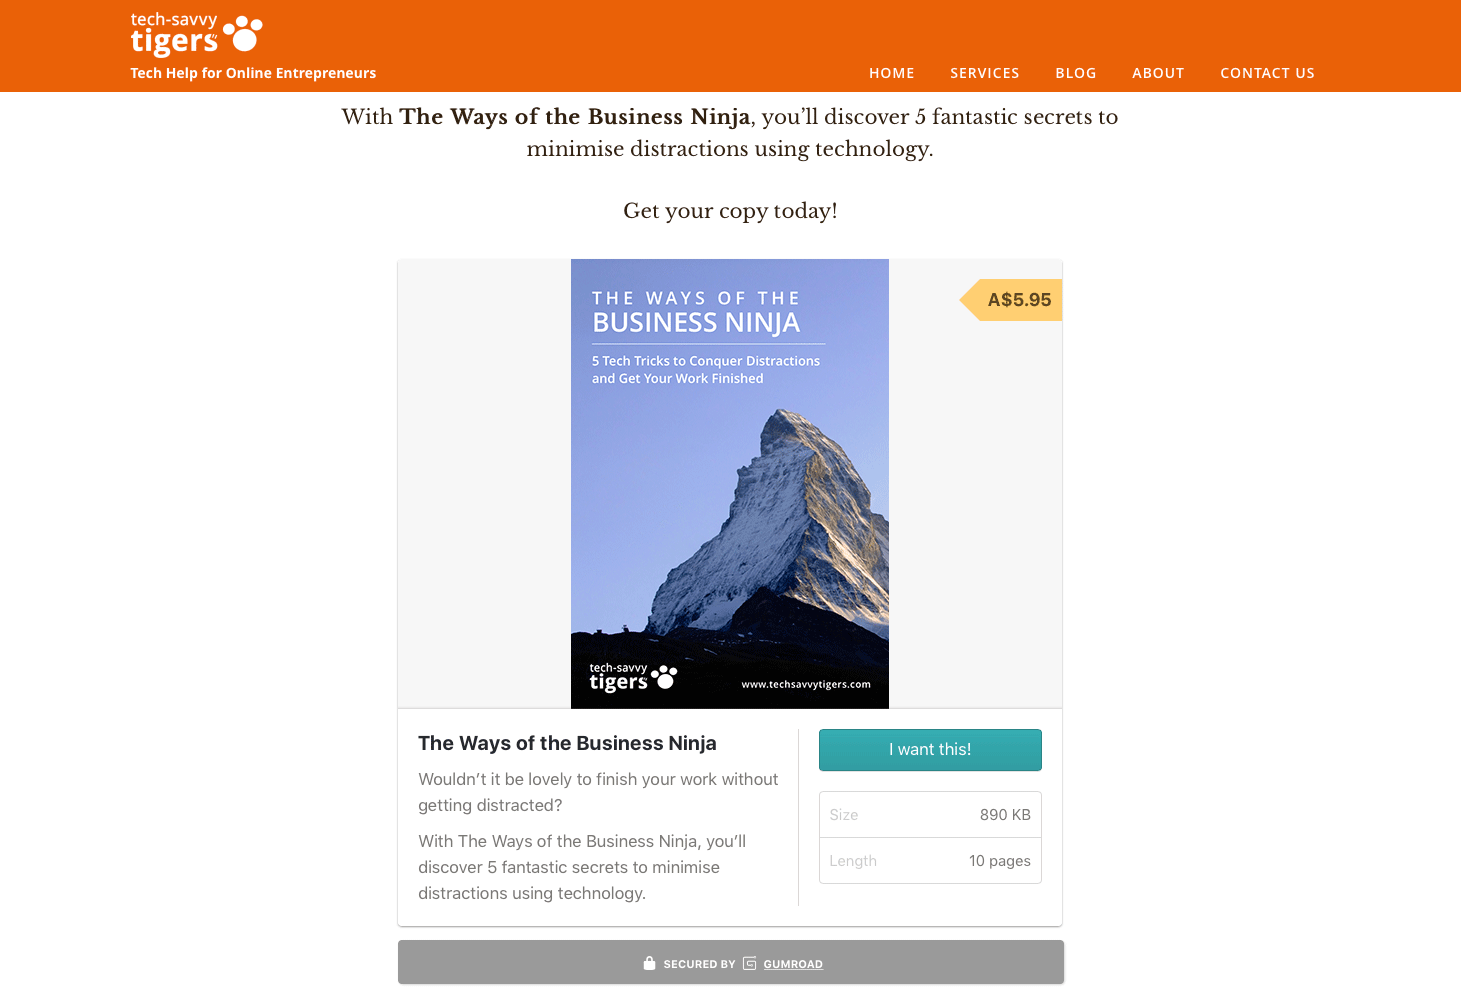
- The Embed widget is similar to Overlay, except that it embeds the contents of the overlay — the cover image, product details, and “I want this!” button — directly in your page:
Which option should you choose?
All three methods have their pros and cons:
- Linking is the easiest to set up, since it doesn’t involve adding code or plugins to your site. However, it takes the shopper away from your site and onto Gumroad’s site. This can be tricky if you’d like shoppers to take other actions on your site after purchasing, such as signing up for your list. You can minimise this issue by opening the Gumroad page in a new tab (you’ll see how to do this in a moment).
- The Overlay widget looks nice; it’s just an unobtrusive button in your page. At the time of writing, it’s also the only way to allow shoppers to buy more than one product at once. However, overlays don’t work on mobile phones; if you’re on a phone then the button simply opens your product on the Gumroad site in a new browser tab.
- The Embed widget is slightly quicker to use than the Overlay widget, because shoppers don’t have to click the first “buy” button to view and buy your product. It also works on mobiles. However it can also be hard to make it blend in nicely with the rest of your page design, and if you have more than one product in your page then all those embeds can start to look rather unwieldy.
Furthermore, if you’re selling products using the Gumroad Overlay or Embed widgets, you really should purchase and install a TLS (also known as SSL) certificate for your site, so that your pages can be accessed using https:// instead of http://. It can be fiddly to set up, but it provides extra protection against hackers and also reassures your customers. The Gumroad site has a good page that explains how to set up a TLS certificate. (If you get stuck, ask your web hosting provider — they’re usually pretty helpful with this sort of thing!)
Linking to your product from your site
For this tutorial, you’ll use the linking method. It’s easy to set up, and you don’t have to worry about getting a TLS certificate on your site.
Follow these steps to link to your Gumroad product page from your site:
- Find the URL of your Gumroad product page.
Click the Products menu option in Gumroad to view your products, then click your product to edit it. Click the Share tab. Your product page’s URL is right at the top: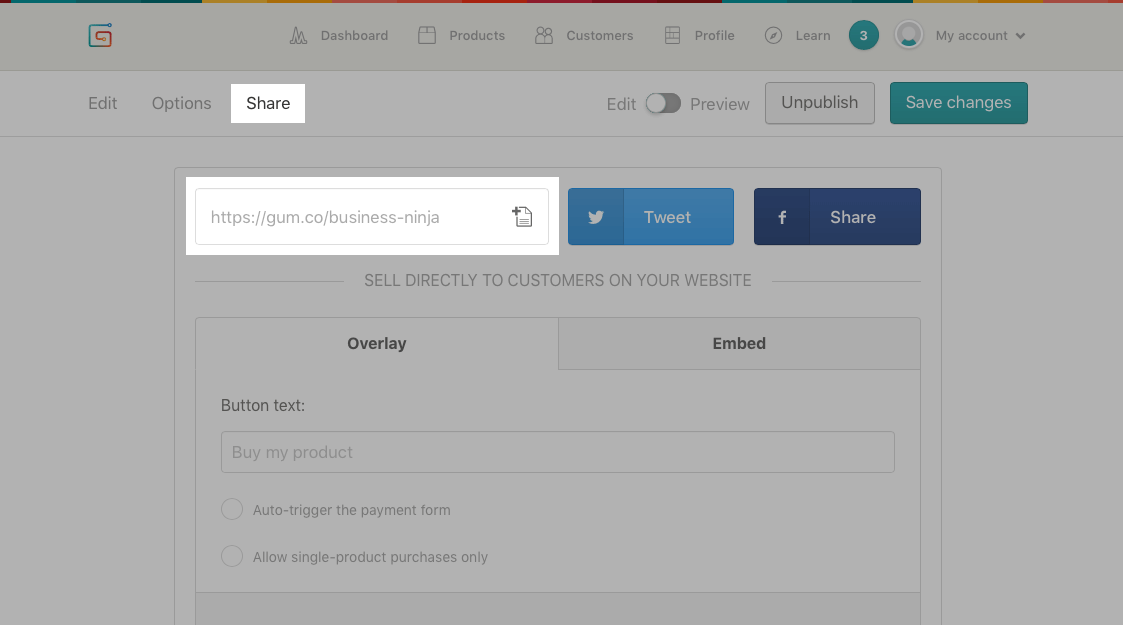

To link to your eBook’s Gumroad product page, first find the URL to link to in the Share tab. - Copy the product page URL.
Select the URL that you found in Step 1. In most browsers you can do this by triple-clicking the URL (clicking it three times in a row). Now choose Edit > Copy in your browser’s menu to copy the URL to the clipboard. - Insert the link in your webpage.
Edit your page in WordPress. Type the text or insert the image that you’d like to use for the link, then select it. Click the Insert/edit link button in the editor’s toolbar, then choose Edit > Paste in your browser’s menu to paste the URL into the link box: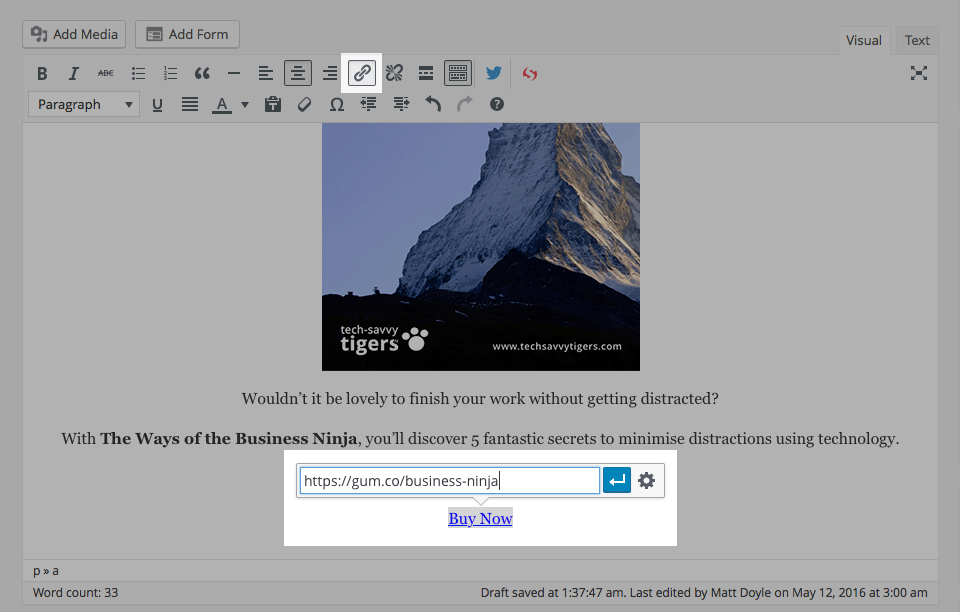

To add the link in WordPress, select the text you want to use for the link, then click the Insert/edit link toolbar button and paste in the URL. - Make the link open in a new browser tab (optional).
As mentioned earlier, one issue with the linking method is that it takes shoppers away from your site and onto Gumroad. You can get round this to some extent by opening the Gumroad page in a new browser tab, which keeps your page open in the original tab. To do this, click the little “gear” icon in the WordPress link box (see the screenshot above) and, in the popup that appears, select the Open link in a new tab checkbox. Click the Update button to close the popup: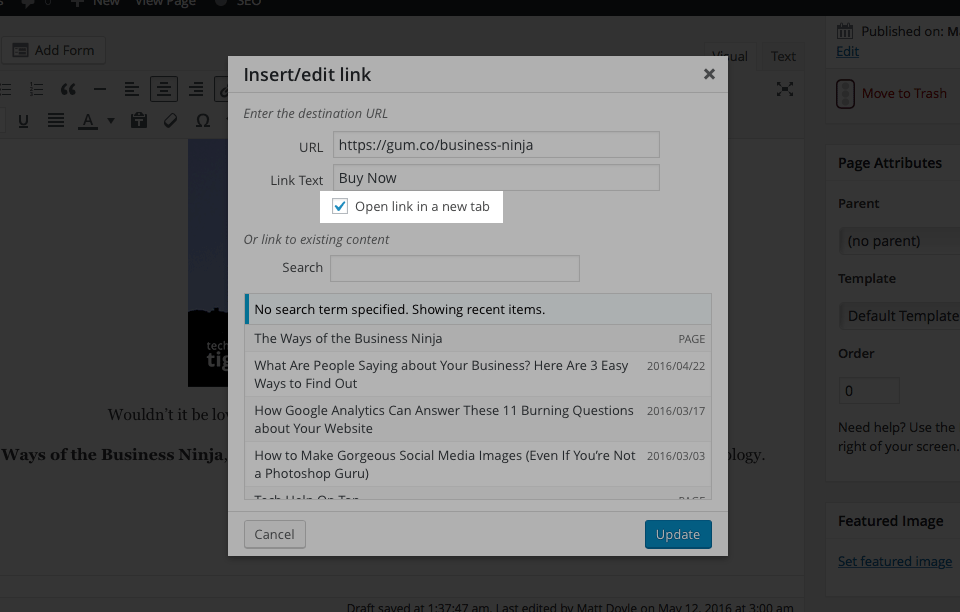
To make your Gumroad product page open in a new browser tab, select the Open link in a new tab checkbox in WordPress.
Now press Return to save your link (if necessary). Save your page and view it in your browser. You should see the Buy Now link in the page; click it to open your product page on Gumroad.
Linking with a button
Often you’ll want to link to your Gumroad product with a Buy Now button instead of a text link. There are several ways to do this, but here are a couple of methods you can use:
- Add a
buttonclass to the link. Many WordPress themes include abuttonCSS class that styles a link as a button. To use this class, first create a text link as described above. Then click the Text tab in the WordPress editor to switch to the text editor. Find the markup for your link, which will look something like this:<a href="https://gum.co/business-ninja">Buy Now</a>Now add the text
class="button"just after the start of the<a>tag, like this:<a class="button" href="https://gum.co/business-ninja">Buy Now</a>Then save your page in WordPress and view it in your browser to see the effect. Here’s how this button looks on our site:
- Add your own CSS to style the link as a button. If adding the
buttonclass as shown above doesn’t have any effect then your theme doesn’t include the class. You could add it yourself by creating a child theme and adding abuttonclass to the stylesheet, but if that all sounds a bit scary, here’s a “quick and dirty” solution! Find the markup for your link as described above, and add the textstyle="padding: 15px; border-radius: 5px; background: #448844; color: #ffffff;"just after the start of the<a>tag, like this:<a style="padding: 15px; border-radius: 5px; background: #448844; color: #ffffff;" href="https://gum.co/business-ninja">Buy Now</a>Feel free to tweak the
backgroundandcolorvalues to match your site’s design. Then save your page in WordPress and open it in your browser to see the result. Here’s how this button looks:
Step 6: Get paid!
Congratulations – your eBook is now for sale on your site. Make sure you tell everyone. 🙂
The final step is to tell Gumroad how to send you your money! Here’s what you need to do:
- View the Payout page.
Click My account in the top-right corner of your Gumroad dashboard. In the drop-down menu that appears, click Settings. When the Settings page appears, click the Payout link near the top of the page: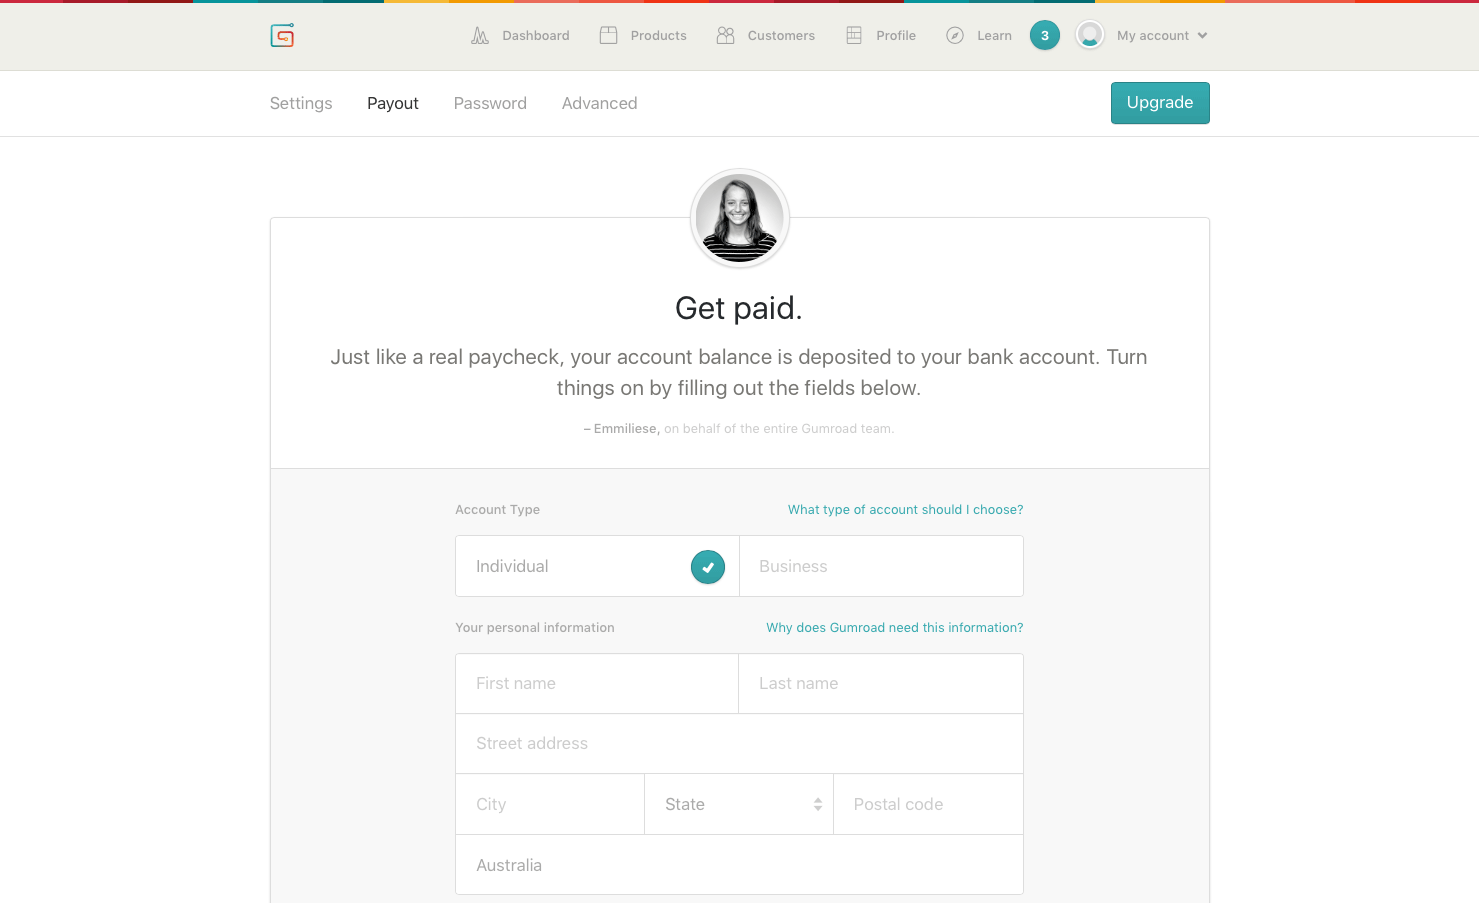

The Gumroad Payout page is where you enter your payment details. - Choose your account type.
The Account Type option at the top of the form gives you two options: Individual and Business. If you’re registered as a business, even as a sole trader — for example, you have a US EIN (Employer ID Number) or an Australian ABN (Australian Business Number) — then you should select the Business option. If you’re just selling your eBook as a private individual, select the Individual option. - Fill in your personal info.
This will vary depending on your country of residence, as well as whether you selected Individual or Business in Step 2. Generally you need to fill in your name, address and date of birth, as well as your business number (if applicable). - Enter your bank account details.
Finally, enter the details of the bank account where you want Gumroad to send your money. (In some countries you’ll need to use a PayPal account instead of a bank account.)
When you’ve filled in the form, click the Finish button. You’ll receive an email confirming that you added your bank account.
All done! Gumroad pays you every Friday. 🙂
Start making money now!
Selling eBooks can seem scary. Not only do you have to find a way to take payments safely online, but you also have to figure out how to do digital delivery, and potentially deal with VAT issues too!
With Gumroad, though, you don’t have to worry about any of that stuff. Gumroad handles it all for you. You just upload your eBook, set a few options, add the product to your site, and tell Gumroad how to pay you. It couldn’t be simpler.
So what are you waiting for? Start selling your eBook today!
[Image credits: Reading an eBook by James Tarbotton (CC0), cropped, enhanced, blur]
This is great! Thank you! I’m also interested in publishing on Amazon and how that differs from Gumroad. I also wonder about selling my book on my website *and* on Amazon, whether that is possible or advisable. Maybe a topic for a new blog post? 🙂
Great question Heather! Definitely a blog post in there. 🙂
Yes, you can publish your book both on Amazon Kindle (KDP) and Gumroad/your website at the same time. However, if you opt to enrol your book in the KDP Select program (for higher royalties etc), then your book must be exclusive to Amazon for a 90-day period.
It can definitely be worth trying many different ways to sell your books. All those sales add up!
Thanks for your comment!
Can I sell ebook from Canada?
Hi Paul, thanks for your comment! Yes you certainly can use Gumroad to sell eBooks if you’re based in Canada. In fact Canada is one of the countries where Gumroad uses direct deposits:
https://help.gumroad.com/11164-payments/getting-paid
Many thanks for your very good tutorial. Be blessed!
This tutorial has been so helpful to me and my blog, making no comment would mean being unfair. Tech-Savvy, stay blessed TIGERS!
Thanks Julius – glad it helped!
Hi Matt,
your Gumroad tutorial is great and it was easy to follow all steps. I uploaded my products with description and cover, I added tags and I activated the “discover function”. My ebooks are published since 3 days and I verified that they can be seen and found by visitors on the gumroad site. I had 4 clicks so far (coming from my fb site because I published one link there) and no sales yet. My question is, how long does it approximately take until I will get visitors and hopefully some sales? I also don´t want to place links all over the Internet as this could be seen as spamming. Can you give me some advice, please? I don´t have a website, but as I read on the gumroad site itself this is not necessary, what do you think?
I wouldn’t rely on the Discover function alone to get enough sales for your products. You’ll need to promote and link to your products on your website and social media.
Fantastic guide!
Just a clarification…
Does Gumroad pay the authors for their copyright?
Authors must send invoices to Gumroad or not?
This might help clarify things Mirko.
Can I sell ebooks on gumroad from Nigeria?
Hello,
It seems very easy and convenient. I would like to ask if customers can download PDF to their computer etc. or they can just read it online? How do you secure ebook from downloading and Copying?
Hi Nahit, yes your customers can download your digital item (PDF etc) –OR– they can read it online only.
It’s up to you to decide which one will work best for you 🙂
Hey Joe, Gumroad has an article which might be helpful – search online for:
Can I Use Gumroad in My Country?
Best of luck
Hey Matt, great article and tutorial!
I’ve been selling products and courses on Gumroad for some years now, and have recently been thinking about selling some of my books as digital downloads.
I found this article and now I’m inspired again – thanks Matt!
Cheers
Teena
Thanks Teena!
Hello sir,pls just want to know if I can link Gumroad and Amazon to my facebook for my ebook sales and also if both Gumroad and Amazon do direct bank payment to Nigeria instead of paypal.
CAN I LINK MY FACEBOOK TO GUMROAD TO SELL MY EBOOK SINCE NO BLOG FOR NOW? PLUS DOES GUMROAD HAVE BOOK COVERS OR I HAVE TO UPLOAD? WHAT ABOUT PAPERBACK WITH GUMROAD,IS THAT POSSIBLE TOO?