In this tutorial, I’m going to look at the GIF and JPEG Optimizer commands, and show how you can use them to make good-looking, fast-loading Web graphics. (Paint Shop Pro 7 also features the PNG Optimizer, which I may cover in a later tutorial.)
If you’re not that familiar with GIFs, JPEGs and PNGs, take a look at my Understanding image formats tutorial, which describes these formats in detail, and offers hints on when to use each image format.
The GIF Optimizer
The GIF Optimizer is probably the tool you’ll be using most often to make Web graphics. GIFs are great for nearly all types of Web image except photos and other images with lots of different colours.
To turn your Paint Shop Pro image into a GIF, make sure you have the image open in Paint Shop Pro, then select File > Export > GIF Optimizer…. The following dialog appears:
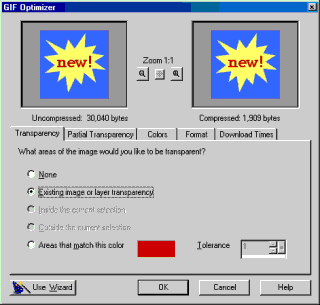
The two windows at the top show your original image (on the left) and what your compressed image (GIF) will look like (on the right). As you make changes to the settings in the dialog box, the right-hand window will change to reflect your new settings.
Let’s look at each of the tabs in this dialog box.
Transparency
A GIF has the ability to include transparent areas in the image. This is good if your web page has a fancy background, as it lets an irregular-shaped image “float” over the background, without an ugly box around it!
In the Transparency tab, you can choose which part of your image will be transparent (in other words, which part will allow your Web page background to show through):
None – Don’t use transparency; make the whole image opaque.
Existing image or layer transparency – This will turn any transparent areas in your Paint Shop Pro image into transparent areas on the GIF. Make sure you hide your Background layer to allow the transparent areas to show through!
Inside/Outside the current selection – You can use a selection to determine the transparent areas of the GIF image. (Make sure you select something first!) Inside will make all the areas inside your selection transparent, and Outside will of course do the opposite.
Areas that match this color – This allows you to choose a particular colour in your image to be transparent – great for quickly selecting the background area of the image and making it transparent. Click on your image in the main Paint Shop Pro window to select the colour you want. You can increase the Tolerance slider to make sure you’re capturing all the shades of your chosen colour and making them transparent.
Partial transparency
In Paint Shop Pro and other graphics packages, you can have varying degrees of transparency. For example, with a drop shadow around an image, the more solid area of the shadow is fairly opaque (low transparency), and the blurry area towards the outside of the shadow is more transparent. This is called having partial transparency.
However, GIFs are more limited in their transparency options – each pixel can only be 100% transparent, or 100% opaque (effectively ‘on’ or ‘off). The Partial Transparency tab allows you to choose how to convert partially transparent areas in your Paint Shop Pro image to the more limited transparency available in the GIF.

We’ll explain this tab with the help of an example. Let’s say we have a letter “P” with a drop shadow (a good example of partial transparency) that we want to place on our lovely pink (!) page background (see the image on the right).
The Partial Transparency tab will look like this:
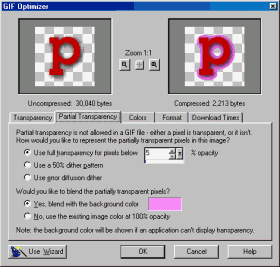
The first three options allow you to choose how to convert the partially transparent pixels in the original image to either fully transparent or fully opaque (as required by the GIF format).
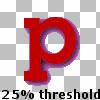
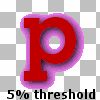
Use full transparency for pixels below 5% opacity. This allows you to set a threshold according to how transparent each pixel is. If it’s less than 5% opaque (i.e. nearly completely transparent), then make the pixel transparent in the GIF, otherwise make the pixel opaque in the GIF. You can set the threshold using the slider. The higher the threshold, the more of the semi-transparent pixels in your original image will be made completely transparent.
This option is good if your image doesn’t have too much blurriness (variation in transparency), as it cuts down on the “graininess” you get with the other two options. It also preserves the detail in the original image. It’s usually the best option if your page background is a uniform colour, rather than a complicated pattern, as it can have quite a noticeable “halo” around the image.
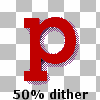
Use a 50% dither pattern. This option produces a nice neat transition, using an even 50% dither pattern to blend the image with the background. Unlike the first option, it is pretty good for patterned page backgrounds. However, it does result in a lot of detail being lost in the semi-transparent area (in this case the drop shadow).
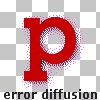
Use error diffusion dither. This dithering method produces a more random, dotty appearance for the semi-transparent areas than the 50% dither method. Error diffusion is useful when you want accurate reproduction of your semi-transparent areas, but don’t want the “halo” effect you get with the first option. You can see that it more closely matches the original drop-shadow than the 50% dither pattern method. However, it can look messy, especially on plain (non-patterned) page backgrounds.
The last two options let you choose to create the GIF to match a specific background, or to make it suitable for any background. Generally speaking, if you know the background colour of the page you’re going to use the GIF on (even if it’s only an approximate colour), choose Yes and choose your background colour by clicking on the colour box next to it.
If you want your GIF to work on any background colour, then choose No, which will make PSP use the original colour of your semi-transparent areas instead of blending with a specified background colour. This will make your image work better with all backgrounds, but at the expense of reducing the quality of the semi-transparent areas.
Colors
In the Colors tab, you can choose how many colours will be in your GIF image’s colour palette. You can also select which method Paint Shop Pro uses to reduce the colours in your image to fit into the GIF’s colour palette.
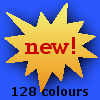

Generally speaking, the more colours you use, the better the image quality, but lots of colours mean a big file size, which will make your website very slow to download. Reduce the number of colours as much as you can, without letting your image lose too much quality.
You can change the amount of dithering in the GIF with the How much dithering do you want? box. Dithering is a technique for compensating for the limited colour palette used in the GIF. By using different coloured pixels next to each other in a dither pattern, you can give the impression of more colours in the GIF than are actually there. The disadvantages are that it tends to make the file size a bit bigger, and it can look messy. Experiment with different levels of dithering to find the level that looks good for your image, while still keeping the file size small.
You can specify how Paint Shop Pro picks the colours that will appear in your GIF in the “What method of color selection do you want to use?” section. Existing Palette uses your original image’s palette (assuming the image is not true-colour). Standard/Web-safe uses the Web-safe colour palette to avoid browser dithering on computers with only 256 colours (not many of those these days!). Optimized Median Cut is recommended if you want to use a very small number of colours in your GIF (less than 16), while Optimized Octree faithfully reproduces your original image colours (provided you don’t have too many colours in your image!).
Generally speaking, the two Optimized options tend to give the best results.
Format
The Format tab lets you choose the format of GIF to create. Non-interlaced is the standard GIF format that loads the GIF image from the top to the bottom. Interlaced loads a low-resolution version of the GIF first, followed by higher and higher resolution versions, until the whole image is loaded. Interlaced GIFs are good for showing a basic image to people while it’s downloading, but they also result in slightly bigger file sizes.
You can also choose to create the GIF in either Version 87a format or Version 89a format. You will nearly always want to choose Version 89a.
Download Times
The last tab, Download Times, shows you approximately how long it will take to download your optimised GIF at different connection speeds.
Saving the GIF
When you’re happy with the way your GIF looks, and you’ve reduced its file size as much as possible, click OK to save the GIF. Note that this saves a copy of your image; it does not overwrite the original image.
The JPEG Optimizer
The JPEG Optimizer is, thankfully, a lot simpler than the GIF Optimizer! Use JPEGs when you’re saving a photo for the web, or an image with lots of colours in.
To turn your Paint Shop Pro image into a JPEG, make sure you have the image open in Paint Shop Pro, then select File > Export > JPEG Optimizer…. The following dialog appears:
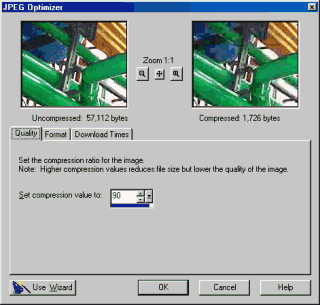
As with the GIF Optimizer, the two windows at the top show your original image (on the left) and what your JPEG will look like (on the right).
In the Quality tab, you choose how much compression to apply to the image. The higher the value, the smaller the file size, but the worse the image looks. Try to choose a value that looks good, without making a large file size. Values between 40 and 70 usually work well for most photographs.
In the Format tab, you can select from Standard or Progressive. The Standard format loads the image from top to bottom – this is the normal method. The Progressive format loads a low-resolution version of the image first, followed by successively higher resolutions, until the entire image is loaded. This is good for people with slow connections because it can give them an idea of what the finished image will look like without waiting for the whole image to load in. The disadvantages of the Progressive file format are that it results in a slightly larger file size, and that really old browsers can’t display them.
As with the GIF Optimizer, the Download Times tab shows approximate download times of your JPEG for different connection speeds. Try to keep that file size as small as possible!
Saving the JPEG
When you’re ready to save your JPEG, click OK. As with the GIF Optimizer, this saves a copy of your image; it does not overwrite the original image.
Leave a Reply