
JavaScript is a great language, but building complex user interfaces for websites and web apps using JavaScript alone can get tedious and fiddly. You have to deal with cross-browser issues, as well as write long-winded functions to manipulate the DOM (document object model), handle events, and more.
For this reason, a large number of useful JavaScript libraries have emerged in recent years to make your job as a JavaScript coder easier and more fun.
One recent library that’s growing in popularity is Knockout. It’s small, easy to use, and plays nicely with other JavaScript libraries such as jQuery. Using Knockout, you can build complex user interfaces in a fraction of the time that it would take you to code everything by hand.
In this tutorial, you learn Knockout from the ground up. You explore the key concepts behind Knockout, and learn how to create interactive web pages quickly and easily. At the end of the tutorial, you work through a complete “product selection” example that shows how to use Knockout in practice.
By the time you’ve finished reading, you’ll be able to build rich, interactive web pages using Knockout, and you’ll be well on the way to becoming a Knockout expert!
Let’s kick things off with a brief look at Knockout’s philosophy, features, and benefits.
What is Knockout?
Knockout is a small JavaScript library that makes it really easy to create interactive user interfaces for your websites and web apps. It’s based on a coding pattern called Model-View-Viewmodel (or MVVM for short).
Essentially, Knockout works like this:
- You create your HTML view; that is, your user interface, or web page, containing text messages, text fields, checkboxes,
selectmenus, and so on. - You create a JavaScript view model object that holds all the data that appears in your view, and link the view model with the view using bindings.
- Then, any changes you make to the data in the view model object automatically update the widgets in the view.
- Conversely, if the user changes something in the view — such as selecting a checkbox — then the data in the view model updates automatically. (This, in turn, can cause other widgets in the page to update automatically.)
The great thing is that, once you’ve created your view and view model, Knockout updates them automatically, without you having to write any tedious JavaScript code to access and manipulate the DOM yourself. This saves you a lot of time, and gives you a nice clean separation between your web app’s logic and its user interface.
Knockout’s main features
Knockout revolves around the following main features:
- The view: The HTML document that displays the user interface.
- The view model: A JavaScript object that represents all the data and operations in the view.
- Bindings:
data-bindattributes that you add to various HTML elements in the view. The bindings link those elements to the data in the view model. - Observables: Values you add to the view model that have a two-way binding to an element, or elements, in the view. When an observable value in the view model changes, so does the view, and vice-versa.
- Computed observables: Observables that compute their values based on the values of other observables. Knockout cleverly tracks dependencies, so that whenever an observable’s value changes, any computed observables that use that observable are run automatically to compute their new values.
- Templates: Snippets of HTML markup that Knockout inserts into the view as required. For example, a template might only be inserted if a certain condition is true, or you can create a loop to repeatedly insert a template containing an
lielement into a list.
Let’s take a look at some of these key features, starting with views, view models, and bindings.
Creating views, view models and bindings
Here’s a very simple example Knockout page that creates a view, a view model, and a binding between the two:
<!doctype html>
<html>
  <head>
  <title>A Basic Knockout View, View Model, and Binding</title>
  <script type="text/javascript" src="http://ajax.googleapis.com/ajax/libs/jquery/1.7.2/jquery.min.js"></script>
  <script type="text/javascript" src="knockout-2.1.0.js"></script>
  <script type="text/javascript">

function ViewModel() {

  /* Store 'this' in 'self' so we can use it throughout the object */
  var self = this;

  /* Create a variable that the view can bind to */
  self.productName = "WonderWidget";
}

/* When the DOM is ready, activate Knockout */

$( function() {
  ko.applyBindings( new ViewModel() );
} );

  </script>
</head>
<body>
  <h1>A Basic Knockout View, View Model, and Binding<br></h1>
  <p>Your selected product is: <span data-bind="text: productName"></span>.</p>
</body>
</html>
Press the button below to see this page in action:
As you can see, the page displays the following:
Your selected product is: WonderWidget.
Let’s take a look at the various elements in the page:
- The JavaScript includes
Inside the page’sheadelement, we’ve added a couple of JavaScript includes: jQuery on Google’s CDN, which we’ll use in the examples in this tutorial, and the Knockout library itself, which is stored in a single JavaScript file,knockout-2.1.0.js.Download the Knockout library via the Knockout installation page.
- The view
The view is the user interface. In this case, it’s simply anh1element with the page title, and apelement containing the message “Your selected product is: “, along with aspanelement to hold the product name. - The view model
The JavaScript code at the top of the document creates a view model class,ViewModel. The class contains a single property,productName, holding the value"WonderWidget". After creating theViewModelclass, the code uses the jQuery$()method to wait until the DOM is ready before calling the Knockout methodko.applyBindings(), passing in a newViewModelobject. This activates Knockout and associates the view model with the current view — that is, the web page. - The binding
On line 28, our view’sspanelement has the attributedata-bind="text: productName". This tells Knockout to link the text inside thespanwith the value of theproductNameproperty in the view model object. When our code callsko.applyBindings(), Knockout goes through the markup, finds thedata-bindattribute, and insertsproductName‘s value inside thespan.
Adding observables
We’ve now created a basic Knockout example, with a view, a view model, and a binding to link the two together. However, this page isn’t interactive at all — it doesn’t do anything after it’s displayed.
To take our example to the next level, it would be great if we could let the user interact with the page after it’s loaded. For example, the user could click a button to change the value of the productName property. Then the span‘s text in the view should update itself accordingly. Let’s try it:
<!doctype html>
<html>
  <head>
  <title>Changing a Property in the View Model - First Attempt</title>
  <script type="text/javascript" src="http://ajax.googleapis.com/ajax/libs/jquery/1.7.2/jquery.min.js"></script>
  <script type="text/javascript" src="knockout-2.1.0.js"></script>
  <script type="text/javascript">

function ViewModel() {

  /* Store 'this' in 'self' so we can use it throughout the object */
  var self = this;

  /* Create a variable that the view can bind to */
  self.productName = "WonderWidget";

  /* Change the product when the user clicks the button */
  $('#changeProduct').click( function() {
    self.productName = "SuperWidget";
  } );
}

/* When the DOM is ready, activate Knockout */

$( function() {
  ko.applyBindings( new ViewModel() );
} );

  </script>
</head>
<body>
  <h1>Changing a Property in the View Model - First Attempt<br></h1>
  <p>Your selected product is: <span data-bind="text: productName"></span>.</p>
  <button id="changeProduct">Change Product</button>
</body>
</html>
As you can see, we’ve added a Change Product button to the page, then created a click handler using jQuery that changes the value of the view model’s productName property to "SuperWidget".
Try out the example by pressing the button below:
Press the Change Product button in the page. Did anything happen? No!
Although the productName property does change to "SuperWidget" when the button is clicked, the span‘s text doesn’t update automatically to reflect the new value. This is because Knockout has no way of knowing that the property’s value has changed.
Doing it right
To fix this problem, we need to replace our productName property with — you guessed it — an observable. An observable is a value that Knockout can track, so that whenever the value changes in the view model — even after the page has loaded — Knockout automatically updates any bound HTML elements in the view.
You create an observable in your view model like this:
observableName = ko.observable( initialValue );
This creates a new observable, observableName, with an optional starting value, initialValue. (If you miss out initialValue then the observable’s value is undefined.)
You then read an observable’s value like this:
currentValue = observableName();
…and change the observable’s value like this:
observableName( newValue );
Within your view, you access an observable through a data-bind attribute, just like you reference a regular property:
data-bind="text: observableName"
OK, now we can rewrite our simple example above, replacing the productName property with a productName observable:
<!doctype html>
<html>
  <head>
  <title>Creating an Observable</title>
  <script type="text/javascript" src="http://ajax.googleapis.com/ajax/libs/jquery/1.7.2/jquery.min.js"></script>
  <script type="text/javascript" src="knockout-2.1.0.js"></script>
  <script type="text/javascript">

function ViewModel() {

  /* Store 'this' in 'self' so we can use it throughout the object */
  var self = this;

  /* Create an observable that the view can bind to */
  self.productName = ko.observable( "WonderWidget" );

  /* Change the product when the user clicks the button */
  $('#changeProduct').click( function() {
    self.productName( "SuperWidget" );
  } );
}

/* When the DOM is ready, activate Knockout */

$( function() {
  ko.applyBindings( new ViewModel() );
} );

  </script>
</head>
<body>

  <h1>Creating an Observable<br></h1>
  <p>Your selected product is: <span data-bind="text: productName"></span>.</p>
  <button id="changeProduct">Change Product</button>
</body>
</html>
I’ve highlighted the important changes in the code above. As you can see, we create a new observable called self.productName inside the view model, and give it the initial value "WonderWidget". Then, in the click handler, we change the observable’s value to "SuperWidget".
Try it out by pressing the button below:
Notice that, when you click the Change Product button, the text in the page changes to:
Your selected product is: SuperWidget.
As you can see, this change happens automatically. We don’t need to explicitly write any code to update the DOM. This is one of Knockout’s main strengths.
Two-way observables
Observables get even better. If you create a binding between an observable and an HTML element that the user can update — for example, a text field — then whenever the user changes the value in the element, Knockout updates the observable value in the view model automatically. This means you can easily create a two-way link between the data in your view model and the widgets in the view, all without having to write tedious JavaScript code to access the DOM. Nice!
Let’s try this out. We’ll remove the Change Product button from our example, and replace it with a text field bound directly to the productName observable:
<!doctype html>
<html>
  <head>
  <title>Creating a Two-Way Observable</title>
  <script type="text/javascript" src="http://ajax.googleapis.com/ajax/libs/jquery/1.7.2/jquery.min.js"></script>
  <script type="text/javascript" src="knockout-2.1.0.js"></script>
  <script type="text/javascript">

function ViewModel() {

  /* Store 'this' in 'self' so we can use it throughout the object */
  var self = this;

  /* Create an observable that the view can bind to */
  self.productName = ko.observable( "WonderWidget" );
}

/* When the DOM is ready, activate Knockout */

$( function() {
  ko.applyBindings( new ViewModel() );
} );

  </script>
</head>
<body>

  <h1>Creating a Two-Way Observable<br></h1>

  <p>Your selected product is: <span data-bind="text: productName"></span>.</p>

  <label for="newProductName">New Product Name: </label>
  <input type="text" name="newProductName" data-bind="value: productName" />

</body>
</html>
As you can see on line 33, we’ve added an <input type="text"> field to the page. The field includes the attribute data-bind="value: productName". This binds the text field’s value to the productName observable.
Go ahead and try it out:
Try typing a new value, such as “My Great Widget”, into the text field and pressing Return. Notice that the text in the page automatically updates to:
Your selected product is: My Great Widget.
When you change the value in the text field, this automatically updates the productName observable. This, in turn, automatically updates the paragraph of text in the page.
More on bindings
In addition to the text and value bindings, there are a range of other useful bindings that you can use to link HTML elements in the view with observables in the view model. We’ll look at some of these throughout the tutorial. Here’s a quick summary of the built-in Knockout bindings:
visible
- Hides the element if the observable’s value is
false.
text
- Makes the element display the observable’s text value.
html
- Makes the element render the HTML string stored in the observable.
css
- Adds or removes a CSS class on the element, based on the result of an expression.
style
- Adds or removes an inline CSS style on the element, based on the result of an expression.
attr
- Sets any attribute of the element to the observable’s value.
foreach
- Loops through an array, duplicating a chunk of markup for each array item. Handy for lists and tables.
if
- Displays a chunk of markup only if an expression is
true.
ifnot
- Displays a chunk of markup only if an expression is
false.
with
- Lets you explicitly set a binding context for a chunk of markup.
click
- Assigns a specified JavaScript function to be the
clickevent handler for the element.
event
- Assigns a specified JavaScript function to be a specified event handler for the element.
submit
- Assigns a specified JavaScript function to be the
submitevent handler for aformelement.
enable
- Enables a form field if the observable’s value is
true, and disables it if the value isfalse.
disable
- Disables a form field if the observable’s value is
true, and enables it if the value isfalse.
value
- Creates a two-way binding between an observable and a form field’s value. This includes text fields, textareas, and
selectmenus.
hasfocus
- If the observable is set to
true, this binding focuses the element. If it’s set tofalse, the binding unfocuses the element. Similarly, if the user focuses or unfocuses the element, the observable becomestrueorfalse.
checked
- Links a checkbox or radio button’s
checkedstatus with an observable. If the observable is set totrueorfalsethen the element is checked or unchecked automatically. Similarly, if the user checks or unchecks the element then the observable is set totrueorfalserespectively.
options
- Populates a
selectmenu’s options with the values in an array (or an observable array).
selectedOptions
- Creates a two-way binding between an observable array and the selected options in a multiple
selectmenu.
uniqueName
- Adds a unique
nameattribute to the element, if it doesn’t already have one. Handy for plugins and browsers that require an element to have anameattribute.
template
- Lets you explicitly set an element’s content to the results of rendering a named template (that is, a chunk of markup, usually containing
data-bindattributes).
You can even write your own custom bindings.
Creating observable arrays
An observable array allows your view model to keep track of a whole group of items at once. This is handy if your user interface contains user-editable lists of items, such as select menus, tables, or groups of checkboxes. You can easily bind an observable array to such elements, and let Knockout take care of updating the contents of the array as the user adds and removes items in the list.
You create an observable array like this:
observableArrayName = ko.observableArray( initialValue );
You can pass an optional initial array in order to pre-populate the observable array. For example:
selectedItems = ko.observableArray( [1,2,3] );
If you don’t supply an initial array then the observable array starts out empty.
Once you’ve created your observable array, you can access the underlying JavaScript array by calling the observable array as a function, like this:
observableArrayName()
For example, you can display the first element inside a selectedItems observable array like this:
alert( 'The first selected item is ' + selectedItems()[0] );
Although you can manipulate the underlying array using JavaScript’s array functions, such as push(), splice() and indexOf(), Knockout provides its own equivalent functions that you can use directly on the observable array. Not only are these functions more convenient, but they also work across all browsers and link up with Knockout’s dependency tracking, so that when you modify an array the corresponding elements in the view get updated automatically.
For example, you can use push() add a new item to the end of an observable array, like this:
observableArrayName.push( newItem );
Let’s try an example that shows observable arrays in practice:
<!doctype html>
<html>
  <head>
  <title>Using Observable Arrays</title>
  <script type="text/javascript" src="http://ajax.googleapis.com/ajax/libs/jquery/1.7.2/jquery.min.js"></script>
  <script type="text/javascript" src="knockout-2.1.0.js"></script>
  <script type="text/javascript">

function ViewModel() {

  /* Store 'this' in 'self' so we can use it throughout the object */
  var self = this;

  /* Create an array to store the available products */
  self.availableProducts = ko.observableArray( [ "SuperWidget", "MegaWidget", "WonderWidget" ] );

  /* Create an observable array to store the selected products */
  self.selectedProducts = ko.observableArray();

  /* Track the available product that the user wants to add */
  self.productToAdd = ko.observable();

  /* Track the available product that the user wants to remove */
  self.productToRemove = ko.observable();

  /* Add a product to the "selected products" list */
  self.addProduct = function() {
    self.selectedProducts.push( self.productToAdd() );
    self.productToRemove( self.productToAdd() );
    self.availableProducts.remove( self.productToAdd() );
    self.productToAdd( self.availableProducts()[0] );
  }

  /* Remove a product from the "selected products" list */
  self.removeProduct = function() {
    self.availableProducts.push( self.productToRemove() );
    self.productToAdd( self.productToRemove() );
    self.selectedProducts.remove( self.productToRemove() );
    self.productToRemove( self.selectedProducts()[0] );
  }
}

/* When the DOM is ready, activate Knockout */
$( function() {
  ko.applyBindings( new ViewModel() );
} );

  </script>
</head>
<body>

  <h1>Using Observable Arrays<br></h1>

  <label for="availableProducts">Available Products:</label>
  <select name="availableProducts" id="availableProducts" data-bind="options: availableProducts, value: productToAdd" size="3" style="width: 120px"></select>
  <button data-bind="click: addProduct, enable: productToAdd">Add Product</button>

  <br/><br/>

  <label for="selectedProducts">Selected Products:</label>
  <select name="selectedProducts" id="selectedProducts" data-bind="options: selectedProducts, value: productToRemove" size="3" style="width: 120px"></select>
  <button data-bind="click: removeProduct, enable: productToRemove">Remove Product</button>

</body>
</html>
This example contains two select menus: a list of available products, and a list of selected products. You can select a product in the first list and press the Add Product button to move the product to the second list. Similarly, you can select a product in the second list and press Remove Product to move it back to the first list.
Try it out by pressing the following button:
The page contains the following parts:
- The
availableProductsselectmenu
This holds the list of products that the user can select from. It has anoptionsbinding that binds the options in the menu to theavailableProductsobservable array (which we’ll look at in a moment). This means that whenever an item is added to or removed from the observable array, the options in theselectmenu update automatically.The menu also has a
valuebinding that links the selected item with theproductToAddobservable. So whenever the user selects an item,productToAddautomatically updates to contain the selected product name. Conversely, if theproductToAddobservable is changed in the view model, the selected item in theselectmenu changes automatically to match. - The Add Product button
After the Available Products menu is an Add Product button that adds the selected product to the Selected Products menu. This button has two bindings:click, which calls anaddProduct()method when the button is pressed, andenable, which enables the button when theproductToAddobservable contains a non-empty value (and disables it ifproductToAddis empty). - The
selectedProductsselectmenu and Remove Product button
These two widgets are the counterparts of theavailableProductsselectmenu and Add Product button.selectedProductsholds the list of products that the user has added, and contains bindings to theselectedProductsobservable array and theproductToRemoveobservable. The Remove Product button contains aclickbinding to theremoveProduct()method to remove a product from the list, and anenablebinding that enables the button only if theproductToRemoveobservable is non-empty. - The
availableProductsandselectedProductsobservable arrays
In the JavaScript at the top of the page, we create the two observable arrays:availableProductsto hold the list of products to select (initially populated with the values"SuperWidget","MegaWidget"and"WonderWidget"), andselectedProductsto hold the list of products that the user has selected (initially empty). Since these are bound to theselectmenus in the view, theselectmenus will update automatically whenever items are added to or removed from these arrays. - The
productToAddandproductToRemoveobservables
Next we create two observables,productToAddandproductToRemove. These are bound to theavailableProductsandselectedProductsselectmenus respectively, using theirvaluebindings. This means that, when the user selects an item in one of the menus, the corresponding observable value is automatically updated. Similarly, if we update the observable, the corresponding value in the menu is automatically selected. - The
addProduct()method
Our view model contains anaddProduct()method that runs when the user presses the Add Product button. The method’s job is to move the selected product from theavailableProductsmenu to theselectedProductsmenu. The method does this in four steps:- It adds the selected product — stored in the
productToAddobservable — to theselectedProductsobservable array. (Theselectmenu updates automatically.) - It selects the newly-added item in the
selectedProductsmenu by setting theproductToRemoveobservable’s value to the name of the added product. - It removes the added product from the
availableProductsobservable (and therefore theselectmenu). - It selects the first item in the
availableProductsmenu by setting theproductToAddobservable to the first product in theavailableProductsobservable array.
- It adds the selected product — stored in the
- The
removeProduct()method
This method runs when the user presses the Remove Product button. It is the exact opposite of theaddProduct()method: it moves the selected product in theselectedProductsmenu back to theavailableProductsmenu.
With this example, you can see how powerful observable arrays can be. By linking observable arrays to select menus in the view, you can let Knockout take care of the tedious work of updating the menus when the view model changes, and vice-versa.
Creating computed observables

As well as holding simple values and arrays of values, observables can also be functions that calculate and return a value. These are called computed observables. You create a computed observable like this:
observableName = ko.computed( function() {

  // Do stuff here to compute the value
  return ( value );

} );
Computed observables have a very important feature. Say a computed observable uses the values of some other observables to carry out its calculation. If any of these observables’ values change, Knockout automatically re-runs your computed observable so that its value is updated too.
For example:
- You create a computed observable, A, that uses the value of another observable, B, and another computed observable, C, to compute its value.
- The computed observable C uses two other observables, D and E, to compute its value.
- If B‘s value changes, Knockout automatically re-runs A to compute its new value.
- If either D‘s or E‘s value changes (or both values change), Knockout automatically re-runs C to compute its new value. Since C‘s value has now also changed, Knockout also re-runs A to compute its new value.
In this way, you can chain as many observables and computed observables together as you like, and Knockout handles all the dependencies automatically.
Let’s try an example that uses computed observables:
<!doctype html>
<html>
  <head>
  <title>Creating Computed Observables</title>
  <script type="text/javascript" src="http://ajax.googleapis.com/ajax/libs/jquery/1.7.2/jquery.min.js"></script>
  <script type="text/javascript" src="knockout-2.1.0.js"></script>
  <script type="text/javascript">

function ViewModel() {

  /* Store 'this' in 'self' so we can use it throughout the object */
  var self = this;

  /* Create some regular observables to bind to the view */
  self.firstName = ko.observable( "" );
  self.lastName = ko.observable( "" );
  self.location = ko.observable( "" );

  /* Create a computed observable to construct the full name */
  self.fullName = ko.computed( function() {
    return ( self.firstName() + " " + self.lastName() );
  } );

  /* Create another computed observable to construct the greeting */
  self.greeting = ko.computed( function() {
    if ( self.fullName().length > 1 && self.location().length > 0 ) {
      return ( "Hello, " + self.fullName() + " in " + self.location() + "!" );
    } else {
      return ( "Please enter your first and last name, and your location." );
    }
  } );

}

/* When the DOM is ready, activate Knockout */

$( function() {
  ko.applyBindings( new ViewModel() );
} );

  </script>
</head>
<body>

  <h1>Creating Computed Observables<br></h1>

  <p data-bind="text: greeting"></p>

  <label for="firstName">Your First Name: </label>
  <input type="text" name="firstName" data-bind="value: firstName" />
  <br/>

  <label for="lastName">Your Last Name: </label>
  <input type="text" name="lastName" data-bind="value: lastName" />
  <br/>

  <label for="location">Your Location: </label>
  <input type="text" name="location" data-bind="value: location" />
  <br/>

</body>
</html>
Try it out by pressing the button below:
To start with, you’ll see a prompt telling you to enter your first and last name, and your location. Fill in the three text fields in the page, and press Return. Notice that the prompt changes to a greeting that includes the data you entered into the fields.
Let’s take a look at our code and see how it works:
- The view
The view contains a paragraph element whose text value is bound to an observable calledgreeting. It also contains the three text fields —firstName,lastNameandlocation— whose values are bound to thefirstName,lastNameandlocationobservables respectively. - The standard observables
On lines 15-17, our view model defines three regular Knockout observables,firstName,lastNameandlocation, and gives them each an initial value of""(an empty string). - The
fullNamecomputed observable
On lines 20-22, we’ve added a computed observable calledfullNameto our view model. This function simply concatenates the values of thefirstNameandlastNameobservables (with a space in between), and returns the resulting string. Whenever the value of eitherfirstNameorlastNamechanges,fullNameis automatically run to compute the new value. - The
greetingcomputed observable
On lines 25-31, we’ve added a second computed observable,greeting. This function constructs the greeting message to display to the user, based on the value of thefullNamecomputed observable, as well as the value of thelocationobservable.Again, if the value of either
fullNameorlocationchanges, Knockout recognizes the dependency and automatically re-runsgreeting‘s function to compute the new value. What’s more, since the paragraph in the view is bound to thegreetingcomputed observable, the momentgreeting‘s value changes, the text in the paragraph automatically updates to the new value.
As you can see, computed observables make it really easy to create complex user interfaces. When the user changes one widget in the page, a bunch of other widgets in the page can update automatically, without you having to write the code to explicitly manage the dependencies. This is powerful stuff!
A complete example: Widget Shop
Let’s bring together many of the concepts you’ve learned in this tutorial and build “Widget Shop”, a complete product selection page using Knockout. Our page will have the following features:
- The page pulls some JSON product data from the server via Ajax, and displays four product thumbnails, along with the product names.
- When the user clicks a thumbnail, a “product info” box appears, containing the product name, price, full-size product image, description, options, a Quantity field, and a Buy Now button.
- The user can select different product options and change the quantity. The price inside the Buy Now button updates automatically.
- When the user presses the Buy Now button, the selected product data is sent to the server via Ajax. (In our example, we’ll simulate this by simply displaying the JSON data in an alert box.)
You can try out the example now by pressing the following button:
Try clicking a product to select it, then adjusting the options and quantity. When you’re done, press the Buy Now button to see the JSON data that the app would send to the server.
The product data file
Let’s start with the JSON product data. Normally this would be pulled dynamically from a database using a server-side script (such as PHP), but to keep things simple we’ll create a static text file instead. Create a widget-shop folder somewhere in your website, and save this file as products.txt inside the widget-shop folder:
{
"products": [
{
"id": 1,
"name": "SuperWidget",
"price": 19.99,
"description": "The SuperWidget is a great all-rounder. Simple, fast, and it gets the job done.",
"thumbImage": "SuperWidget-small.jpg",
"mainImage": "SuperWidget.jpg",
"options": [
{ "optionId": 1, "name": "Large Screen", "price": 7 },
{ "optionId": 2, "name": "64GB Memory", "price": 9 },
{ "optionId": 3, "name": "Fast Charger", "price": 3 }
]
},
{
"id": 2,
"name": "WonderWidget",
"price": 24.99,
"description": "If you want a string of admirers following you around, go for the WonderWidget. Its eye-catching bright orange colour and striking lines will catch anybody's attention!",
"thumbImage": "WonderWidget-small.jpg",
"mainImage": "WonderWidget.jpg",
"options": [
{ "optionId": 4, "name": "Day-Glow Paintwork", "price": 3 },
{ "optionId": 5, "name": "Turbo Booster", "price": 11 },
{ "optionId": 6, "name": "WonderWidget Baseball Cap", "price": 2 }
]
},
{
"id": 3,
"name": "MegaWidget",
"price": 29.99,
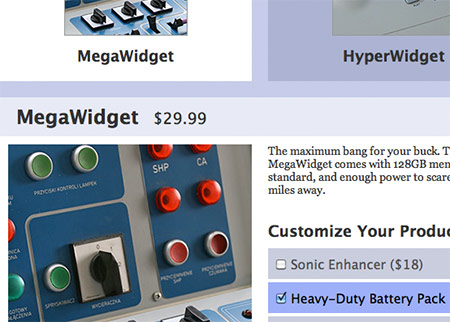
"description": "The maximum bang for your buck. The MegaWidget comes with 128GB memory as standard, and enough power to scare a yak 18 miles away.",
"thumbImage": "MegaWidget-small.jpg",
"mainImage": "MegaWidget.jpg",
"options": [
{ "optionId": 7, "name": "Sonic Enhancer", "price": 18 },
{ "optionId": 8, "name": "Heavy-Duty Battery Pack", "price": 13 },
{ "optionId": 9, "name": "MegaWidget Bumper Sticker", "price": 1 }
]
},
{
"id": 4,
"name": "HyperWidget",
"price": 49.99,
"description": "The most luxurious widget money can buy. Carved from a single block of amazium, you can drop this widget off a cliff and still use it the next day. It has 72 USB ports and a 30-day battery life, and comes with a 5-year warranty.",
"thumbImage": "HyperWidget-small.jpg",
"mainImage": "HyperWidget.jpg",
"options": [
{ "optionId": 10, "name": "Leather Case", "price": 5 },
{ "optionId": 11, "name": "Table Stand", "price": 3 },
{ "optionId": 12, "name": "Solar Charger", "price": 14 }
]
}
]
}
If you’re familiar with JSON then this file should be pretty straightforward. It represents four products: SuperWidget, WonderWidget, MegaWidget and HyperWidget. Each product has various attributes, including a unique ID, a name, a price, a description, thumbnail and full-size image filenames, and an options array containing a list of product options, each with a unique ID, a name, and a price.
The view
Now let’s create our view — that is, the page that the user interacts with. Save the following file as choose-product.html inside your widget-shop folder:
<!doctype html>
<html>
  <head>
  <title>Complete Knockout Demo: Product Selection</title>
  <meta charset="utf-8">
  <meta name="viewport" content="initial-scale=1, maximum-scale=1" />
  <link rel="stylesheet" href="style.css" />
  <script type="text/javascript" src="http://code.jquery.com/jquery-1.7.1.min.js"></script>
  <script type="text/javascript" src="knockout-2.1.0.js"></script>
  <script type="text/javascript" src="choose-product.js"></script>

  <script type="text/javascript">
    $( getProducts );
  </script>

</head>
<body>

  <h1>Complete Knockout Demo: Product Selection<br></h1>

  <div id="content">

    <h2>Choose a Product:</h2>

    <ul id="products" data-bind="foreach: products">
      <li data-bind="click: $parent.chooseProduct, css: { selected: $parent.productSelected(id) }">
        <img data-bind="attr: { src: 'images/' + thumbImage, alt: name }"/><br/>
        <span data-bind="text: name"></span>
      </li>
    </ul>

    <div id="chosenProduct" data-bind="visible: chosenProduct">

      <h2><span data-bind="text: chosenProduct().name"></span> <span id="productPrice" data-bind="text: '$'+chosenProduct().price"></span></h2>
      <img data-bind="attr: { src: 'images/' + chosenProduct().mainImage, alt: chosenProduct().name }"/>

      <div id="productInfo">

        <p data-bind="text: chosenProduct().description"></p>

        <h3>Customize Your Product:</h3>

        <ul data-bind="foreach: chosenProduct().options">
          <li data-bind="css: { selected: $parent.optionSelected(optionId) }">
            <label onclick="function() {}"><input type="checkbox" data-bind="value: optionId, checked: $parent.chosenOptions"/><span data-bind="text: name"></span> <span>($lt;/span><span data-bind="text: price"></span><span>)</span></label>
          </li>
        </ul>

        Quantity: <input type="number" name="qty" id="qty" data-bind="value: qty" min="1" max="9"/>
        <button id="buy" data-bind="click: buyProduct">Buy Now ($lt;span data-bind="text: totalPrice"></span>)</button>

      </div>

    </div>

  </div>

</body>
</html>
Let’s look at the important parts of this page:
- The includes
As well as our usual jQuery and Knockout includes, we also include a style sheet,style.css, and achoose-product.jsJavaScript file that will contain our view model and other functions. (We’ll create these files in a moment.) - The call to
getProducts()
When the page DOM is ready, we use jQuery’s$()method on line 13 to callgetProducts(), a function withinchoose-product.jsthat grabs the product data and starts Knockout running. - The product thumbnails
On lines 25-30, we create aulelement to hold the list of products. We add aforeachbinding to the element that links aproductsarray in the view model with the list. This makes Knockout loop over the products in the array, rendering the suppliedlielement template for each product object in the array.We add two bindings to the
lielement itself: aclickbinding that runs the view model’schooseProduct()method when the user clicks the product, and acssbinding that calls the view model’sproductSelected()method, passing in the current product object’sidproperty. If this method returnstrue, the binding adds theselectedCSS class to thelito highlight the selected product.Within the
li, we add animgelement with anattrbinding. The binding adds two attributes to the element:src, to link the element to the product’s thumbnail image file (stored inside animagesfolder), andalt, to set the image’s alternate text to the product name. It gets these two pieces of data from the current product object’sthumbImageandnameproperties. We also add aspanelement that displays the product’s name, again pulled from the object’snameproperty. - The
chosenProductdiv
Thedivwith theidofchosenProduct, on lines 32-54, displays the selected product details. We add avisiblebinding to it so that it’s only shown when thechosenProductobservable is not empty — that is, the user has chosen a product. - The product name and base price
Within thechosenProductdiv, we first add anh2element on line 34 containing twospans. The firstspandisplays the selected product’s name by retrieving thenameproperty of the product object stored in thechosenProductobservable in the view model. The secondspandisplays the product’s price by retrieving the product object’spriceproperty. - The main product image
Next, on line 35, we add animgelement to thechosenProductdivto display the main product image. As with the thumbnail, we add asrcattribute pointing to the image in theimagesfolder, and analtattribute containing the product name. We pull this data from the currently-chosen product’smainImageandnameproperties respectively. - The
productInfodiv
Thisdiv, on lines 37-52, contains the product description, options, Quantity field, and Buy Now button. - The product description
On line 39, we add the product’s long description inside theproductInfodivas apelement. The element has atextbinding to the currently-chosen product’sdescriptionproperty. - The product options
On lines 41-47, we add a “Customize Your Product” heading, along with aulelement containing the product’s options. Much like the product thumbnails above, we use aforeachbinding to the chosen product’soptionsarray to display oneliper option. We add acssbinding to eachlithat calls the view model’soptionSelected()method to determine if the current option is selected; if it is then we add aselectedCSS class to thelito highlight it.On line 45, within each
li, we add a checkbox with two bindings:-
value, which we bind to the current option object’soptionIdpropertychecked, which we bind to the view model’schosenOptionsobservable array. Knockout then associates the checkboxes with this array, so that whenever the user checks or unchecks a checkbox, the checkbox’s value is added to or removed from thechosenOptionsarray automatically. Nice!
The
lialso contains the option’s text, pulled from the current option object’snameproperty, and the option’s price, pulled from thepriceproperty. We wrap the whole lot in alabelelement so the user can click anywhere in thelito toggle the checkbox. -
- The Quantity field
On line 49, we add a Quantity field allowing the user to choose how many of the product they’d like to buy. We bind its value to aqtyobservable in the view model. - The Buy Now button
Finally, on line 50 our view includes a Buy Now button. We set the view model’sbuyProduct()method as aclickhandler for this button. We also insert the total price into the button’s text using thetotalPricecomputed observable. This observable, which you’ll create in a moment, calculates the total price on the fly based on the selected product, any chosen options, and the value of the Quantity field.
The view model and other JavaScript
The other important part of our widget shop is the JavaScript to create the view model object and fetch the product data from the server. Save the following file as choose-product.js inside your widget-shop folder:
/* Get the product data from the server, then preload the product images
 * and apply the Knockout bindings */

function getProducts() {

  var images = new Array();

  $.getJSON( "products.txt", null, function( ajaxData ) {

    for ( var i in ajaxData.products ) {
      images[i] = new Image();
      images[i].src = "images/" + ajaxData.products[i].mainImage;
    }

    ko.applyBindings( new ChooseProductViewModel( ajaxData.products ) );
  } );
}

/* The Knockout View Model object */

function ChooseProductViewModel( productData ) {

  /* Store 'this' in 'self' so we can use it throughout the object */
  var self = this;

  /* Store the retrieved list of product objects in the view model
   * so that our view can access it
   */
  self.products = productData;

  /* Create Knockout observables for various parts of our view */
  self.chosenProduct = ko.observable( false );   /* The currently-chosen product object */
  self.chosenOptions = ko.observableArray();     /* The currently-chosen options array */
  self.qty = ko.observable( 1 );                 /* The currently-entered quantity value */

  /* Compute the total order price */

  self.totalPrice = ko.computed( function() {

    /* Grab the currently-chosen product object */
    var product = self.chosenProduct();

    /* If no product has been chosen yet, do nothing */
    if ( !product ) return false;

    /* Store the base product price */
    var price = product.price;

    /* Add the price of each chosen option to the overall price */

    var chosenOptions =  self.chosenOptions();

    for ( i=0; i<product.options.length; i++ ) {
      for ( j=0; j<chosenOptions.length; j++ ) {
        if ( product.options[i].optionId == chosenOptions[j] ) {
          price += product.options[i].price;
          break;
        }
      }
    }

    /* Return the total price multiplied by the chosen quantity */
    return ( price * self.qty() ).toFixed( 2 );
  } );


  /* Change the chosen product and scroll down to the "chosen product" box */

  self.chooseProduct = function( product ) {
    self.chosenProduct( product );
    $('html,body').animate( { scrollTop: $("#chosenProduct").offset().top }, 'slow' );
  }


  /* Determine if the supplied option has been selected by the user */

  self.optionSelected = function( optionId ) {

    var chosenOptions =  self.chosenOptions();
    selected = false;

    for ( j=0; j<chosenOptions.length; j++ ) {
      if ( optionId == chosenOptions[j] ) {
        selected = true;
        break;
      }
    }

    return selected;
  }


  /* Determine if the supplied product has been selected by the user */

  self.productSelected = function( productId ) {
    return ( productId == self.chosenProduct().id );
  }


  /* Send the product data to the server */

  self.buyProduct = function() {

    /* Extract just the selected options for the chosen product */
    var product = self.chosenProduct();
    var chosenOptions = self.chosenOptions();
    var chosenOptionsForProduct = [];

    for ( i=0; i<product.options.length; i++ ) {
      for ( j=0; j<chosenOptions.length; j++ ) {
        if ( product.options[i].optionId == chosenOptions[j] ) {
          chosenOptionsForProduct.push( product.options[i].optionId );
          break;
        }
      }
    }

    /* Compose the data object */
    var data = {
      "chosenProductId": self.chosenProduct().id,
      "chosenOptions": chosenOptionsForProduct,
      "qty": self.qty()
    }

    /* Send the data to the server */
    alert( "Data to send to server:nn" + JSON.stringify( data ) );
  }

}
Let’s work through each part of this code:
- The
getProducts()function
This function is called from thechoose-product.htmlpage when the DOM is ready. First it uses jQuery’sgetJSON()method to pull the JSON product data from theproducts.txtfile on the server and turn it into a JavaScript object.Once the data is loaded and the data object has been created, the function preloads all the main product images by storing them in an array of
Imageobjects; this ensures that the user doesn’t have to wait for the main product images to load. The function then creates a newChooseProductViewModelobject and passes the data object’sproductsproperty to the constructor so that the view model object can store the product data. Then it calls Knockout’sko.applyBindings()method, passing in the new view model object, to start the ball rolling. - The view model
The rest of the JavaScript file defines theChooseProductViewModelclass that we use to create our view model object. On line 21, we start the class definition, accepting the array of product objects in aproductDataparameter. Let’s take a look at each chunk of code in our view model… - Store
'this'in'self'
As usual, on line 24, we store thethisspecial variable in theselflocal variable so we always have a reference to the current object. - Store the retrieved list of product objects in the view model
On line 29, we store the product data passed to the view model in a localself.productsproperty, so that we can easily access it from the view. - Create Knockout observables for various parts of our view
On lines 32-34, we create three observables to link to our view:-
chosenProductwill store the currently-selected product object. We set this tofalseinitially. This is used throughout the view to access information about the chosen product.chosenOptionsis an observable array holding the IDs of any product options that the user has selected. This array is linked to the option checkboxes in the view.qtymaps to the Quantity field in the view. It’s set to 1 initially.
-
- The
totalPricecomputed observable
On lines 38-64 we define a computed observable,totalPrice, that calculates the total price for the Buy Now button on the fly. This function retrieves the currently-chosen product and stores its base price in a localpricevariable. Then it loops through the available options in the currently-chosen product, as well as all the selected options in thechosenOptionsobservable array. Each time it finds a product option that has been selected, it adds its price to thepricevariable. Finally, the function multiples the total price by the value of theqtyobservable, rounds the resulting value to 2 decimal places, and returns the final price. - The
chooseProduct()method
ThechooseProduct()method, defined on lines 69-72, runs when the user clicks a product thumbnail. It accepts the chosen product object as a parameter,product, then sets thechosenProductobservable to this object. Since all the widgets inside thechosenProductdivin the view are bound to thechosenProductobservable, changing this observable’s value automatically updates all of those widgets.On line 71, we also use jQuery to slowly scroll down to the
chosenProductdivin the view. This creates a nice smooth transition, especially on mobile phones. - The
optionSelected()method
On lines 77-87, we define anoptionSelected()method, which determines if a given product option has been selected by the user. The method accepts anoptionIdargument. It then loops through all the selected options in thechosenOptionsobservable array. If it finds theoptionIdvalue in the array then it returnstrue; otherwise it returnsfalse.This method is bound to the product option
lielements using thecssbinding. If the method returnstruethen the CSS classselectedis applied to theli, highlighting it. If it returnsfalsethen the CSS class is removed. - The
productSelected()method
Lines 95-97 define aproductSelected()method. Much like theoptionSelected()method,productSelected()returnstrueif the product with the supplied ID has been selected by the user, andfalseif it hasn’t. It simply compares the supplied ID against the ID of the product object stored in thechosenProductobservable. This method is bound to the product thumbnaillielements using acssbinding, so that theselectedclass is added to theliif the product is selected, highlighting thelielement. - The
buyProduct()method
Finally, on lines 102-127 we define abuyProduct()method, which runs when the user presses the Buy Now button in the view. The method simply creates a data object containing three properties:-
chosenProductId, pulled from theidproperty of the product object stored in thechosenProductobservable.chosenOptions, which we calculate as the intersection between thechosenOptionsobservable array and the options associated with the chosen product (so that we only include selected options for the currently-selected product).qty, pulled from theqtyobservable.
Once it’s constructed the data object, the method turns it into a JSON string by calling the JavaScript
JSON.stringify()method. In a real-world app, the method would then send the JSON string to the server via Ajax. For this demo, we simply display the string in an alert box. -
The stylesheet
To make our Widget Shop page look nice — and adapt to different screen sizes, from desktop down to mobile phone — we need to add a stylesheet. Save the following file as style.css in your widget-shop folder:
/* Add some margin to the page and set a default font and colour */

body {
  margin: 30px;
  font-family: "Georgia", serif;
  color: #333;
}

/* Give headings and other elements their own font */

h1, h2, h3, h4, #products li, #productInfo li {
  font-family: "Lucida Sans Unicode", "Lucida Grande", sans-serif;
}

h1 {
  font-size: 120%;
}

/* Main content area */

#content {
  margin: 40px auto;
  -moz-user-select: none;
  -webkit-user-select: none;
  user-select: none;
  padding: 20px 0;
  background: #C7CCE8;
  overflow: hidden;
  max-width: 1340px;
}

#content h2, #content h3 {
  margin-left: 20px;
}

/* Product list */

#products {
  list-style: none;
  overflow: hidden;
  margin: 0;
  padding: 0;
}

#products li {
  display: block;
  float: left;
  width: 270px;
  margin: 0 0 20px 20px;
  text-align: center;
  background: rgba(148,155,187,.5);
  font-size: 1.2em;
  font-weight: bold;
  padding: 30px 20px 20px 20px;
  cursor: pointer;
}

#products li.selected {
  background: #fff;
}

#products li img {
  width: 150px;
  height: 150px;
  border: 1px solid #999;
  margin-bottom: 10px;
}

/* Chosen Product box */

#chosenProduct {
  margin-left: 20px;
}

#chosenProduct h2 {
  margin: 0;
  padding: 10px 0 10px 20px;
  width: 620px;
  background: rgba(255,255,255,.6);
}

#chosenProduct img {
  width: 300px;
  height: 300px;
  border: 10px solid #fff;
  float: left;
  display: block;
}

#productPrice {
  font-size: 80%;
  font-weight: normal;
  margin-left: 10px;
}

#productInfo {
  float: left;
  width: 300px;
  height: 300px;
  padding: 10px;
  background: #fff;
}

#productInfo p {
  margin-top: 0;
  font-size: 90%;
  height: 76px;
}

#productInfo h3 {
  margin: 20px 0 10px 0;
  padding: 0;
  line-height: 1.2em;
}

/* Product options */

#productInfo ul {
  list-style: none;
  margin: 0;
  padding: 0;
}

#productInfo ul li {
  background: rgba(148,155,187,.5);
  color: #555;
  margin: 4px 0;
  overflow: hidden;
  line-height: 1.3em;
}

#productInfo ul li.selected {
  background: #A0AFF6;
  color: #000;
}

#productInfo ul li input[type="checkbox"] {
  margin: 0 6px;
  vertical-align: middle;
}

#productInfo ul li label {
  display: block;
  width: 100%;
  padding: 8px 4px;
  float: left;
  cursor: pointer;
}

#productInfo ul li label span {
  vertical-align: middle;
}

/* Quantity field and Buy Now button */

#qty {
  border: 1px solid #999;
  width: 40px;
  padding: 6px;
  font-size: 15px;
  margin-top: 10px;
  line-height: 16px;
}

#buy {
  background: #fc7;
  border: 1px solid #999;
  padding: 6px;
  width: 170px;
  float: right;
  font-weight: bold;
  font-size: 15px;
  margin-top: 10px;
  line-height: 18px;
  cursor: pointer;
}

/* Media queries for responsive layout */

@media screen and (max-width: 1400px) {

  #content {
    width: 1010px;
  }

}

@media screen and (max-width: 1070px) {

  #content {
    width: 680px;
  }

}

@media screen and (max-width: 700px) {

  #content {
    max-width: 360px;
    margin-left: auto;
    margin-right: auto;
  }

  #products li {
    width: 280px;
  }

  #chosenProduct h2 {
    width: 300px;
  }

  #chosenProduct img, #productInfo {
    float: none;
  }

}

@media screen and (max-width: 320px) {

  body {
    margin: 0;
    padding: 0;
  }

  h1 {
    margin: 10px;
    text-align: center;
  }

  body p {
    text-align: center;
  }

  #content {
    max-width: 320px;
    margin: 0;
    padding: 0;
  }

  #products li {
    width: 240px;
    margin-left: 20px;
  }

  #chosenProduct {
    margin-left: 0;
  }


  #content h2, #content h3 {
    margin-left: 0;
    padding-left: 0;
    width: 320px;
    text-align: center;
  }

  #productInfo h3 {
    margin-left: -10px;
  }

}
Without going into too much detail, this stylesheet does the following main things:
- It sets up basic styles for the page, such as margins, fonts and colours.
- It styles the main
#contentdiv. - It styles the list of product thumbnails, putting each thumbnail in a box that can be highlighted with a
selectedclass. - It formats the “chosen product” box, styling the box itself, as well as the product name and price, main image, description, product options, Quantity field and Buy Now button.
- It adds media queries to adjust the page layout at various different browser sizes, from widescreen desktop displays to mobile phone displays.
Try it out!
If you haven’t already done so, try out the Widget Shop example by pressing the button below:
Click a product thumbnail, and notice how the chosen product’s details appear at the bottom of the page. Try selecting product options by clicking the checkboxes under Customize Your Product, and entering different values in the Quantity field. Try selecting different products in the list. At any time, you can click the Buy Now button to see the JSON data that would be sent to the server.
Notice how various page elements — including the highlighting on the thumbnails and product options, the chosen product’s details, and the price inside the Buy Now button — all update automatically as you interact with the widgets in the page. As you’ve seen, we’ve managed to do all this without writing any JavaScript code to update the DOM. Such is the magic of Knockout!
Summary
In this tutorial you’ve explored Knockout, a fantastic JavaScript library that lets you create rich, interactive user interfaces without needing to write tons of tedious JavaScript code. You’ve learned:
- How Knockout works, and the concept of the Model-View-Viewmodel design pattern.
- How to create a Knockout view (web page) and a view model object, and link the two together with bindings
- How to use observables to create values in the view model that automatically update in the view, and vice-versa
- How to use observable arrays to track a group of values at once
- How to create computed observables to calculate values on the fly and create chains of dependent values
At the end of the tutorial, you brought all these concepts together and built a complete product selection page using Knockout, with a nice, interactive user interface that automatically adapts as the user selects different options.
I hope you enjoyed reading this tutorial, and found it useful. Have fun with Knockout!
[Photo credits: Gramody, Minnesota Historical Society, ToadLickr, Creative Tools]
[Widget Shop photo credits: cocoate.com, Johan Larsson, wlodi, mwichary]
Thanks for such a comprehensive article on Knockout…
I’m currently checking out the various options with all these wonderful Javascript frameworks available. But one thing that has me stumped is how to integrate them with database’s (receiving the data, updating the data etc…)
Almost all of them say something like you have:
“Normally this would be pulled dynamically from a database using a server-side script (such as PHP), but to keep things simple we’ll create a static text file instead”
But it seems difficult to find a real world example which demonstrates how this is done.
Hope you can provide some feedback on this…
Best Regards, Dave
@daveporter: Thanks for your comment. That’s a good question. Essentially you’d have, for example, a MySQL database on the server, and a PHP script that runs a SELECT query on the DB to pull out the product data, then format it as a JSON string using http://php.net/manual/en/function.json-encode.php and send that back to the browser.
To go the other way, you’d use http://php.net/manual/en/function.json-decode.php to decode the JSON string that currently appears in the alert box when you press Buy Now, then do something useful with it (such as create a record in an ‘orders’ table etc).
Hard to summarise in a couple of paragraphs! Maybe I’ll write an “end-to-end” tutorial explaining the process at some point…
Cheers Matt – I’ll look forward to that…
Regards, Dave
Hello.
Great tutorial.
I am trying to add some levels the the shop json . how can i loop through sub levels. ie
"options": [{
          "optionId": 1,
            "name": "Colour",
            "colour": [{
                  "colourId": 1,
                  "name": "Black"
                }, {
                  "colourId": 2,
                  "name": "White"
            }]
          }, {
          "optionId": 2,
            "name": "Size",
            "sizes": [{
                  "sizesId": 1,
                  "name": "sml",
                  "price": 15
                }, {
                  "sizesId": 2,
                  "name": "med",
                  "price": 30
                }, {
                  "sizesId": 3,
                  "name": "lrg",
                  "price": 45
            }]
          }, {
            "optionId": 3,
            "name": "Addons",
            "addon": [{
                  "addonId": 1,
                  "name": "Draw",
                  "price": 15
                }, {
                  "addonId": 2,
                  "name": "Kitchen Printer",
                  "price": 15
                }, {
                  "addonId": 3,
                  "name": "Fast Charger",
                  "price": 15
            }]
          }]
        },
this only gets the top level
<div data-bind="foreach: chosenProduct().options">
                    <ul>
                      <li><span data-bind="text: name"></span
</li>

                    </ul>
                    </div>
thanks
all demos seems to be down, because jquery lib is referenced via http instead of https
Demo works for me: https://www.elated.com/res/File/articles/development/javascript/knockout-tutorial/widget-shop/choose-product.html