Style sheets (or to give them their full title, cascading style sheets or CSS) are becoming more and more common on the Web. They were first introduced in a limited form to Internet Explorer 3.0, and are recognised by nearly all modern browsers.
This tutorial will show you what style sheets are, when to use them, and (hopefully) how to use them!
What are style sheets?
Style sheets are a way to separate style from content in Web pages. In an ideal world, you would put all your content (e.g. text and inline graphics) in one place, and define how that content is presented (the style) in another.
Straight HTML mixes style with content. For example, each time you want a bold, centred paragraph to represent a quote, you have to use <p align="center"> and <b> tags to achieve the effect. You’re mixing what you want to say, with how you want to say it.
If you can separate your style from your content then it’s much easier and quicker to change the presentation of your content later on. You can even serve different presentations of your content to different browsers (for example, a low-graphics version for mobile phones). Style sheets provide a way for you to do these things.
Style sheets allow you to modify the default attributes of many standard HTML tags. For example, the <b> tag normally just makes text bolder, as it is doing here. However, you could use a style sheet to modify the <b> tag to make text red, all in capitals, or one font size bigger. It’s totally up to you.
Even better – if you make all documents use the same style sheet, you only have to change the properties for <b> in the single style sheet file, and all the documents in your website will display <b> in the new way! Cool, huh?
Lovely! How do I use them?
There are three main ways to apply CSS to your markup – linking to a style sheet file, embedding styles in each page’s head element within <style></style> tags, or inline, by using the style attribute within an HTML tag.
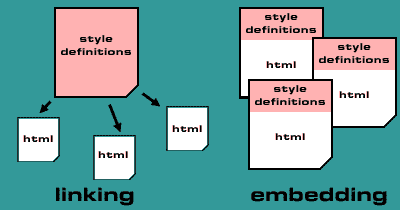
Linking vs. embedding
You can create a style sheet in a separate file and then link one or more Web pages to it. Or, you can embed style definitions directly into the <head> element of individual Web pages, using the <style> and </style> tags.
Now it doesn’t take a genius to work out that linking is more powerful than embedding. If you link many pages to one style sheet file, you only have to change a style in that one file, and all the linked pages will change their appearance. With embedding, you’d have to change the CSS between the <style></style> tags for each page:
However, embedding can be used in tandem with linking. Say you’ve done a perfect style sheet which makes everything in <b></b> tags appear blue, and 100 pages link to it. But then you realise that your 99th page would look much better if the stuff in <b></b> looked red, just for that one page! No problem – then you embed a style into just that page, using the <style></style> tags. Embedded styles override the styles defined in the linked style sheet, so for this one page the bold stuff will look red, not blue. Clever! (This is why they’re called cascading style sheets, by the way.)
So you get the general idea. Let’s get stuck in.
Inline styles
The third way to apply CSS to your pages is to add styles to individual page elements, by placing the styles in style attributes within the element tags. This is handy if you want to override a style for a specific element in the page, but generally you should link to external CSS files if possible.
The nuts and bolts of it all
Let’s examine a simple style sheet, and then see how you would link a web page to it.
p { text-align: justify;
    font-family: Verdana, Arial, sans-serif; }

h4 { color: #ff4400; margin-top: 45px; }

a:link, a:visited, a:active { text-decoration: none;
    font-weight: bold; color: #0000ff }

a:hover {color:red; text-transform:uppercase; }
This style sheet is divided into four sections, called selectors. Each of the selectors specifies a style for a selected HTML element:
The p selector affects all paragraphs (enclosed with <p> and </p>) and makes them justified with the left and right margins. It also specifies the preferred fonts. The left-most font is used if your computer has it. If not, the browser works through the list from left to right until it finds the font. It’s a good idea to put a generic font family – either serif, sans-serif, cursive, fantasy or monospace – at the end, to specify a type of font to use if none of your specified fonts are available.
The h4 selector redefines level 4 headings. Any text within an <h4></h4> tag will now be coloured orange, and there will be a 45 pixel gap between the heading and the bottom of the element above it.
The a:link, a:visited, a:active section defines the attributes for the normal, visited and active (clicked on) links in the page. text-decoration: none removes the underlines from the link text. font-weight: bold and color: #0000ff should be self-explanatory.
The last selector, a:hover, specifies a style to use when the mouse rolls over the link. In our case, rolling the mouse over a link will cause it to turn red, and all the letters will become uppercase. There’ll be no mistaking where the links are in the page! 🙂
That’s our style sheet – now how do we link our pages it to it? Simple – with one line in the <head> section:
<link rel="stylesheet" type="text/css" href="style.css">
This assumes the style sheet file is in the same directory as the Web page, and it is called style.css. If it was in the directory above, we would of course use href="../style.css", and so on.
That’s how you link to a style sheet. Suppose instead that we wanted to embed the above styles. We’d put them in the <head> element of our web page, within <style> tags:
<head>
<title>Web page with embedded styles</title>

<style type="text/css">
<!--
  p { text-align: justify;
      font-family: Verdana, Arial, sans-serif; }

  h4 { color: #ff4400; margin-top: 45px; }

  a:link, a:visited, a:active { text-decoration: none;
      font-weight: bold; color: #0000ff }

a:hover {color:red; text-transform:uppercase; }
-->
</style>

</head>

<body>
.
.
.
Note that it’s a good idea to put comment tags ( <!-- --> ) around the style definition, to hide it from browsers that don’t understand the <style> tag.
That’s how you embed a style sheet. Don’t forget that you can link to another stylesheet as well as embed one in your page, but the embedded style definitions will override the linked ones.
Adding an inline style
By specifying text-align: justify for the p selector, as we’ve done above, all paragraphs in the affected page(s) will now have their text justified.
Suppose we wanted to make the text of a particular paragraph align right rather than have it justified. We can override the style of a specific paragraph element by using an inline style on that element:
<p style="text-align: right;">This paragraph will be aligned right.</p>
Classes
For further control over the style of your web pages, it’s possible to specify element classes. For example, the <p> element could be given a class, quote, specifically for quotations. This class could indent both sides of the paragraph and make the text italicised.
The style sheet would look like this:
p.quote { margin-left: 20px; margin-right: 20px;
    text-decoration: italic; }
… and you’d reference the quote class in your HTML like this:
<p class="quote">
In the beginning God created the heavens and the earth.
Now the earth was formless and empty, darkness was over
the surface of the deep, and the Spirit of God was
hovering over the waters.
</p>
… which would make this modern translation from the Masoretic Text appear indented on both sides and italicised!
More fun with style sheets
We’ve covered the very basics of style sheets here. For a more thorough treatment of the subject, you could do worse than look at this paper from the guys who invented the thing. This is the full specification for CSS level 1, most of which is supported by nearly all modern browsers.
Leave a Reply