In this tutorial, I’ll show you how to use Paint Shop Pro’s Inner Bevel effect to create smooth 3D graphics and text.
The Inner Bevel dialog box
Let’s start by taking a look at the Inner Bevel tool itself. Create a new layer and draw something on it – for example, you could create a star using a preset shape from the Preset Shapes Tool (the blue rectangle and red oval in the Tools palette). Then activate the Inner Bevel tool with Effects > 3D Effects > Inner Bevel…. The Inner Bevel dialog box appears:
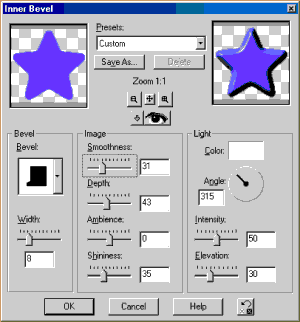
We’ll now go over the options available in the Inner Bevel dialog box and explain what they do.
Presets
To make life easier, you can choose from a range of preset bevel styles in the Presets drop-down box. You can also save your favourite bevel styles as presets using the Save As… button.
Proof
The eye button is called Proof. Click on it to update your image with the current bevel effect, so you can see what it will look like in your image.
Bevel
Here’s where you choose the shape of the bevel you want to apply. Click in the Bevel drop-down box to bring up a range of bevel shapes. Think of these shapes as cross-sections. They show how the edge of your object will be “cut out” to create the bevel effect.
Bevel Width
Below the bevel shape chooser is the Width slider. Move the slider to the right to make a thicker bevel, and to the left to make a thinner one.
Smoothness
This slider smoothes out the bevel edge, making the slope more smooth and less sharp as you drag the slider to the right.
Depth
Depth controls how deep (or high) the bevelled edge is. The more you drag the slider to the right, the sharper the edges will appear, and the “higher” the bevel will seem.
Ambience
This slider controls how much ambient light is present in the image. The higher the value, the brighter the image will appear overall.
Shininess
As you drag this slider to the right, you’ll see more bright highlights appear around the edges of the bevel, as the object becomes more “shiny”.
Color
This allows you to choose the colour of the light source that is shining on your bevelled object. This allows you to create different moods for your bevelled image.
Angle
Angle controls the position of the light source. Drag the little pointer in the circle around until you get the angle you want (the default is top-left, or 315 degrees).
Intensity
This controls how bright the light source is.
Elevation
This positions the light vertically. A value of 0 means that the light is shining at the object directly from the side. A value of 90 means the light is positioned directly overhead. You’ll usually want something between 30 and 40.
Applying the bevel
Once you’re happy with the bevel effect (click the Proof (eye) button to check it looks good in your image), click the OK button to apply the effect. Easy!
Now let’s use the Inner Bevel effect to create some cool graphics.
Heavy metal!
Let’s make some 3-D metallic text. Create a new image and click the Text tool (the letter ‘A‘ in the Tools palette). Click the Standard Text button to make sure your text doesn’t have any fancy patterns. Choose your favourite font and a large font size (e.g. 90) and type a word in the text box. Make sure Floating is selected in the “Create as” section, and click OK:
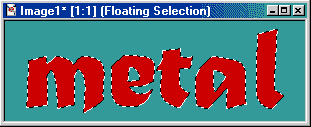
Now let’s add some texture to the text to give it a “brushed metal” appearance. Select Effects > Noise > Add… and enter a value of 100 in the Noise: box. Click OK. Now let’s turn those dots into streaks. Select Effects > Blur > Motion Blur…. Enter a value of 90 in the Direction box and a value of 8 in the Intensity box, and click OK:

Metal isn’t usually red, so let’s make it grey! Select Colors > Colorize… and make sure Hue and Saturation are both set to zero, then click OK. If you like, you can press Shift+Ctrl+M to hide the marquee:

Finally, let’s apply the bevel effect. Select Effects > 3D Effects > Inner Bevel… and select the Metallic preset. To create a “chunkier” bevel, set Width to about 3. Experiment with the other settings until you get the effect you like, then press OK:
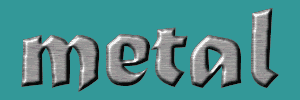
If you like, add a drop shadow to enhance the 3D effect ( Effects > 3D Effects > Drop Shadow…):

Nice! Why not experiment with the different presets and bevel shapes on some more text. You could also try bevelling buttons, shapes and even photos – if you can select it, you can bevel it! Have fun.
Leave a Reply