As of version 5 and greater, Photoshop includes a very handy “Save for Web” command. This feature allows you to produce a copy of your image that is optimised for Web use. This means that the image file will be as small as possible, and that the image will use only Web-safe colours (if desired). Save for Web can produce GIF, JPEG, or PNG format images.
Using Save for Web
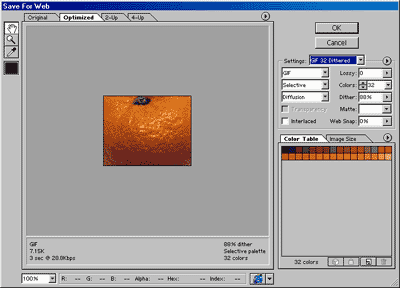
When you’re ready to put your image in your web page, select Save for Web… from the File menu. The “Save for Web” dialog appears:

This is where you tell Photoshop how you’d like to optimise your image for the Web. You can select the file format to produce (GIF, JPEG or PNG), what size palette you’d like to use, how to cut down the colours to fit the chosen palette size, how much to dither the optimised image (if at all) and how much to sacrifice image quality to produce a smaller file size.
Image views
The four tabs above the image view pane on the left allow you to view the original image, the optimised version (this is the default), the original and optimised versions side-by-side (“2-Up”) and the original, optimised and two variations on the optimisation all together (“4-Up”). You can also use the Hand tool top-left to move the view around (if the image is bigger than the view), the Zoom tool to zoom in and out of the image, and the Eyedropper tool to select a colour from the image, to be used by various colour options on the right of the dialog.
Presets
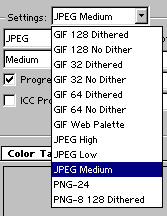
There are a lot of options in the Save for Web dialog, and the choice can be quite bewildering! Luckily, there are a list of presets you can choose from to make it easier. Click the Settings: drop-down list (just below the Cancel button) to bring up the list of presets:

There are three basic image formats in the presets – GIF, JPEG and PNG. As a basic rule, use JPEG’s for photos and GIF’s for everything else. For a full tutorial on choosing the right image format, see Understanding image formats.
Optimising GIFs
If you’re making a GIF, start off with a preset such as GIF 32 Dithered, which should work well for most GIFs. You can then fine-tune the optimisation to suit your needs. Some of the important optimisation options are discussed below.
Colour reduction method
This is the drop-down box below the Image Format box. The commonly used options here are:
- Perceptual: Creates the reduced colour palette favouring colours that the human eye is more sensitive to.
- Selective: Like Perceptual, but better for Web work. The favoured (and default) option.
- Adaptive: Creates the palette by taking an even sampling of colours from the image’s colour spectrum. Generally not quite as good as Selective.
- Web: Use if you need a complete Web-safe colour palette (Netscape 216-colour palette). These days, this usually isn’t that important as most displays support at least 16 million colours.
Dithering method
This is the drop-down box below the “colour reduction method” box. Dithering involves adding patterned or random dots to the image to make it appear to contain more colours than are actually in the palette, allowing you to use a smaller palette size. The options are:
- No Dither: No dithering is applied to the image. Good if the dithering effect looks bad, but can produce severe “banding” of colours.
- Diffusion: Uses error diffusion dithering, which looks similar to Noise dithering, producing a random-looking pattern of dots. Can produce seams when using ImageReady slices.
- Pattern: Uses a pattern for dithering, rather than random dots. Can work well for some images, but often produces a rather artificial look to the image.
- Noise: Similar to Diffusion, but does not produce seams at the edges of slices in ImageReady.
Transparency
This checkbox is only available if your image does not have its Background layer turned on. It specifies that you want parts of the saved GIF to be transparent. If you deselect this checkbox, the transparent areas will instead be filled with the Matte colour (or white if no matte is selected).
Interlaced
This checkbox controls GIF Interlacing. If enabled, the GIF will appear gradually as interlaced horizontal lines as it is loaded on the Web page, which gives viewers something to look at while the full image appears. It does increase the file size, however.
Lossy
This slider allows you to remove some detail from the image, in order to reduce the file size further. Use only if you don’t mind reducing the image quality quite severely! A value of 0 will not remove any detail; a value of 100 will remove the maximum amount of detail.
Colors
This is where you choose the size of your GIF palette. A palette of 32 colours is often sufficient for web images, but if your image has a lot of detail and looks too fuzzy/blurry/banded with 32, up it to 64, 128 or 256. If your image has very few colours in to start with, or doesn’t look too bad with fewer colours, select 16, 8, 4 or even 2! This will make the GIF file size smaller.
Dither
If you have selected a dithering method (see above), this option lets you control how much the image is dithered – 0 means no dithering, 100 means lots of dithering.
Matte
The matte is the background colour you want to use for your image. If you’ve enabled Transparency (see above), then the foreground image will be faded at the edges to blend in with the matte colour. If you choose the Matte setting of None, the GIF will have a “hard transparency” with no fading; this is great if you want to be able to use the image on any colour background.
If you’ve disabled Transparency, the transparent areas of your image will be filled in with the matte colour.
Web Snap
If you want to use web-safe colours, increase the Web Snap slider. Photoshop will bias your colour palette more and more towards web-safe colours the higher the value of Web Snap.
Optimising JPEGs
If you’re making a JPEG, start off with a preset such as JPEG Medium, which should work well for most JPEGs. You can then fine-tune the optimisation to suit your needs. Some of the important optimisation options are discussed below.
Quality
There are two ways to alter the compression quality: the Low/Medium/High/Maximum list (for quick access), and the Quality slider (for fine control). The lower the quality setting, the more blurry and bitty the JPEG will appear, but the smaller the resulting file size.
Progressive
A progressive JPEG is similar to an interlaced GIF (see above). The image will load gradually on the Web page – a low resolution image first, then eventually the full, high-resolution image. Again, great for stopping your viewers on slow modems getting bored, but it does mean a slightly larger file size, and really old browsers don’t support progressive JPEGs.
Matte
If your Photoshop image has transparent areas, you can fill them with a specified matte colour with this drop-down box.
Optimising PNGs
The options for optimising a PNG-24 is much the same as those for optimising a JPEG. Similarly, the options for optimising a PNG-8 are very similar to those for optimising a GIF. See the GIF and JPEG sections above for details.
If you really can’t be bothered…
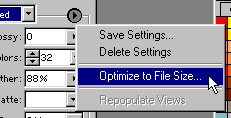
…you can always let Photoshop optimise your image for you! Select the little arrow just to the right of the Settings… box and select Optimize to File Size…:

In the dialog that pops up, select Auto Select GIF/JPEG then enter your desired file size. Click OK and Photoshop does the rest for you! If you’re not happy with the results, tweak the settings as described in the sections above, or just choose a slightly larger file size and try again.
Saving the image
Once you’re happy with your optimised image, click OK to save it to disk. The file saved will be a copy of your original image, unless you specifically overwrite the original with the optimised file.
Thanks so much for this tutorial! I created my first slideshow for my WordPress template. It looked great on Safari, but didn’t show up on any other browsers I tried, because I didn’t save my files in the correct format. I was able to resolve this problem very quickly with your help, and my slides look great on all browsers!
@CharTyler: You’re welcome – I’m glad the tutorial helped you to make a good slideshow. 🙂
Matt
That’s a very handy article. It just goes to show that there is a lot to know about optimizing images for the web.
—
http://www.moonrisedesign.com/ ~ web design company
[Edited by joeleitz on 01-Feb-11 18:26]
Hi Matt, it’s Joan Smith from Watertown, NY. I am using Photoshop CS6. I am having a problem when I use Save for Web option. I keep getting an error message that says, “Could not complete this operation, an error occurred while reading the endian type.” Is there any way to fix this? Can I use Save As? These images are being used for web products. Anything help would be appreciated.